Study Quotas
Last updated: November 6, 2026
Quotas organize participants into segments (like "Free plan", "Business plan", or "Enterprise plan") and set a recruitment limit for each one within a single study. Instead of creating multiple studies for different user types, quotas keep everything in one place. Set up quotas in the study builder, assign participants to them automatically from screener responses or manually, then track each quota's progress from the study overview. Quotas are optional.
Set up quotas
You can set up quotas before or after you publish a study. Each study has its own quotas.
Only the study owner can change a study's quotas. Quotas aren't available for studies that recruit through an external panel.
In the Plan step of the study builder, set the participation limit to A specific number of people or Unlimited.
Turn on Participant quota.
Select + Add quota. You need at least 1 quota, and you can add up to 6.
Name each quota and set its Max limit. Each quota needs a unique name and a limit of at least 1.
If the study has a specific participation limit, the quota limits can't add up to more than it. For example, two quotas of 3 won't fit a participation limit of 5.
Optional: Turn on [auto-close toggle] to stop new participants from joining a quota once it's full (see How quota limits work below).
Optional: Auto-assign participants to quotas from screener responses, and set up qualification logic to qualify or disqualify participants and choose whether they can schedule or test right after the screener.
Finish setting up your study and publish it.
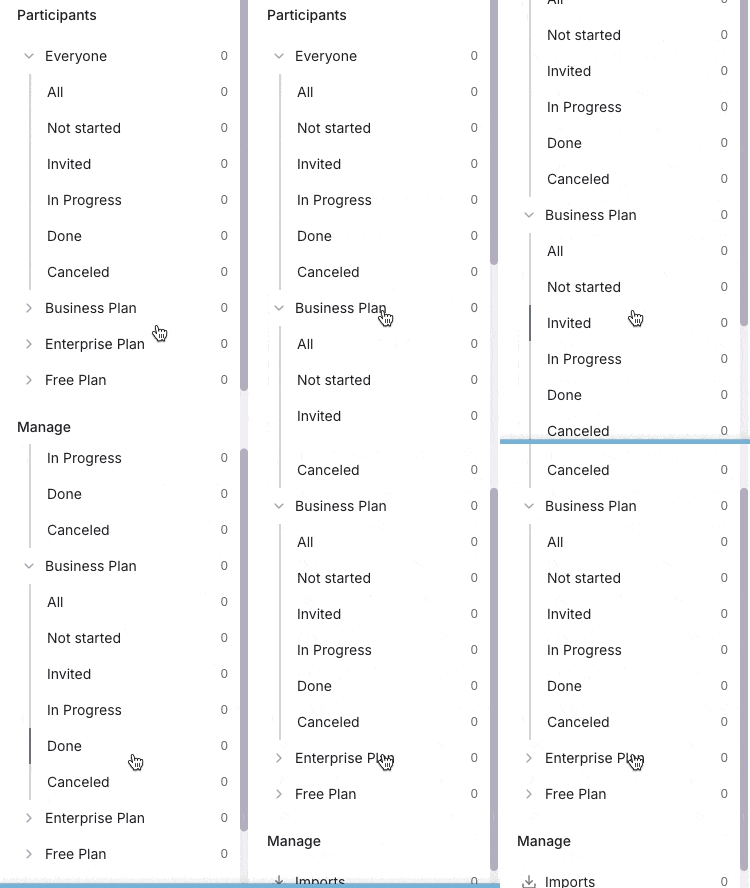
After you publish, each quota gets its own page in the study's left navigation menu. Select a quota's name to expand it and see its participants by status.
How quota limits work
A quota's Max limit is the number of spots in that quota. What fills a spot depends on the study type:
Interviews and group interviews: completed interviews plus upcoming scheduled interviews.
Unmoderated tests: completed tests plus tests in progress.
Surveys: completed responses.
When [auto-close toggle] is on and a quota is full, participants can still be assigned to it, but they can't schedule (interviews), take the test (unmoderated tests), or respond (surveys). They see a "study closed" message instead. When it's off, the quota shows as full on the study overview but doesn't block anyone.
The study's overall participation limit still applies. Once the study reaches it, no one can take part, whatever quota they're in.
Auto-assign quotas from screener responses
Set up conditional logic on screener questions to assign participants to quotas automatically.
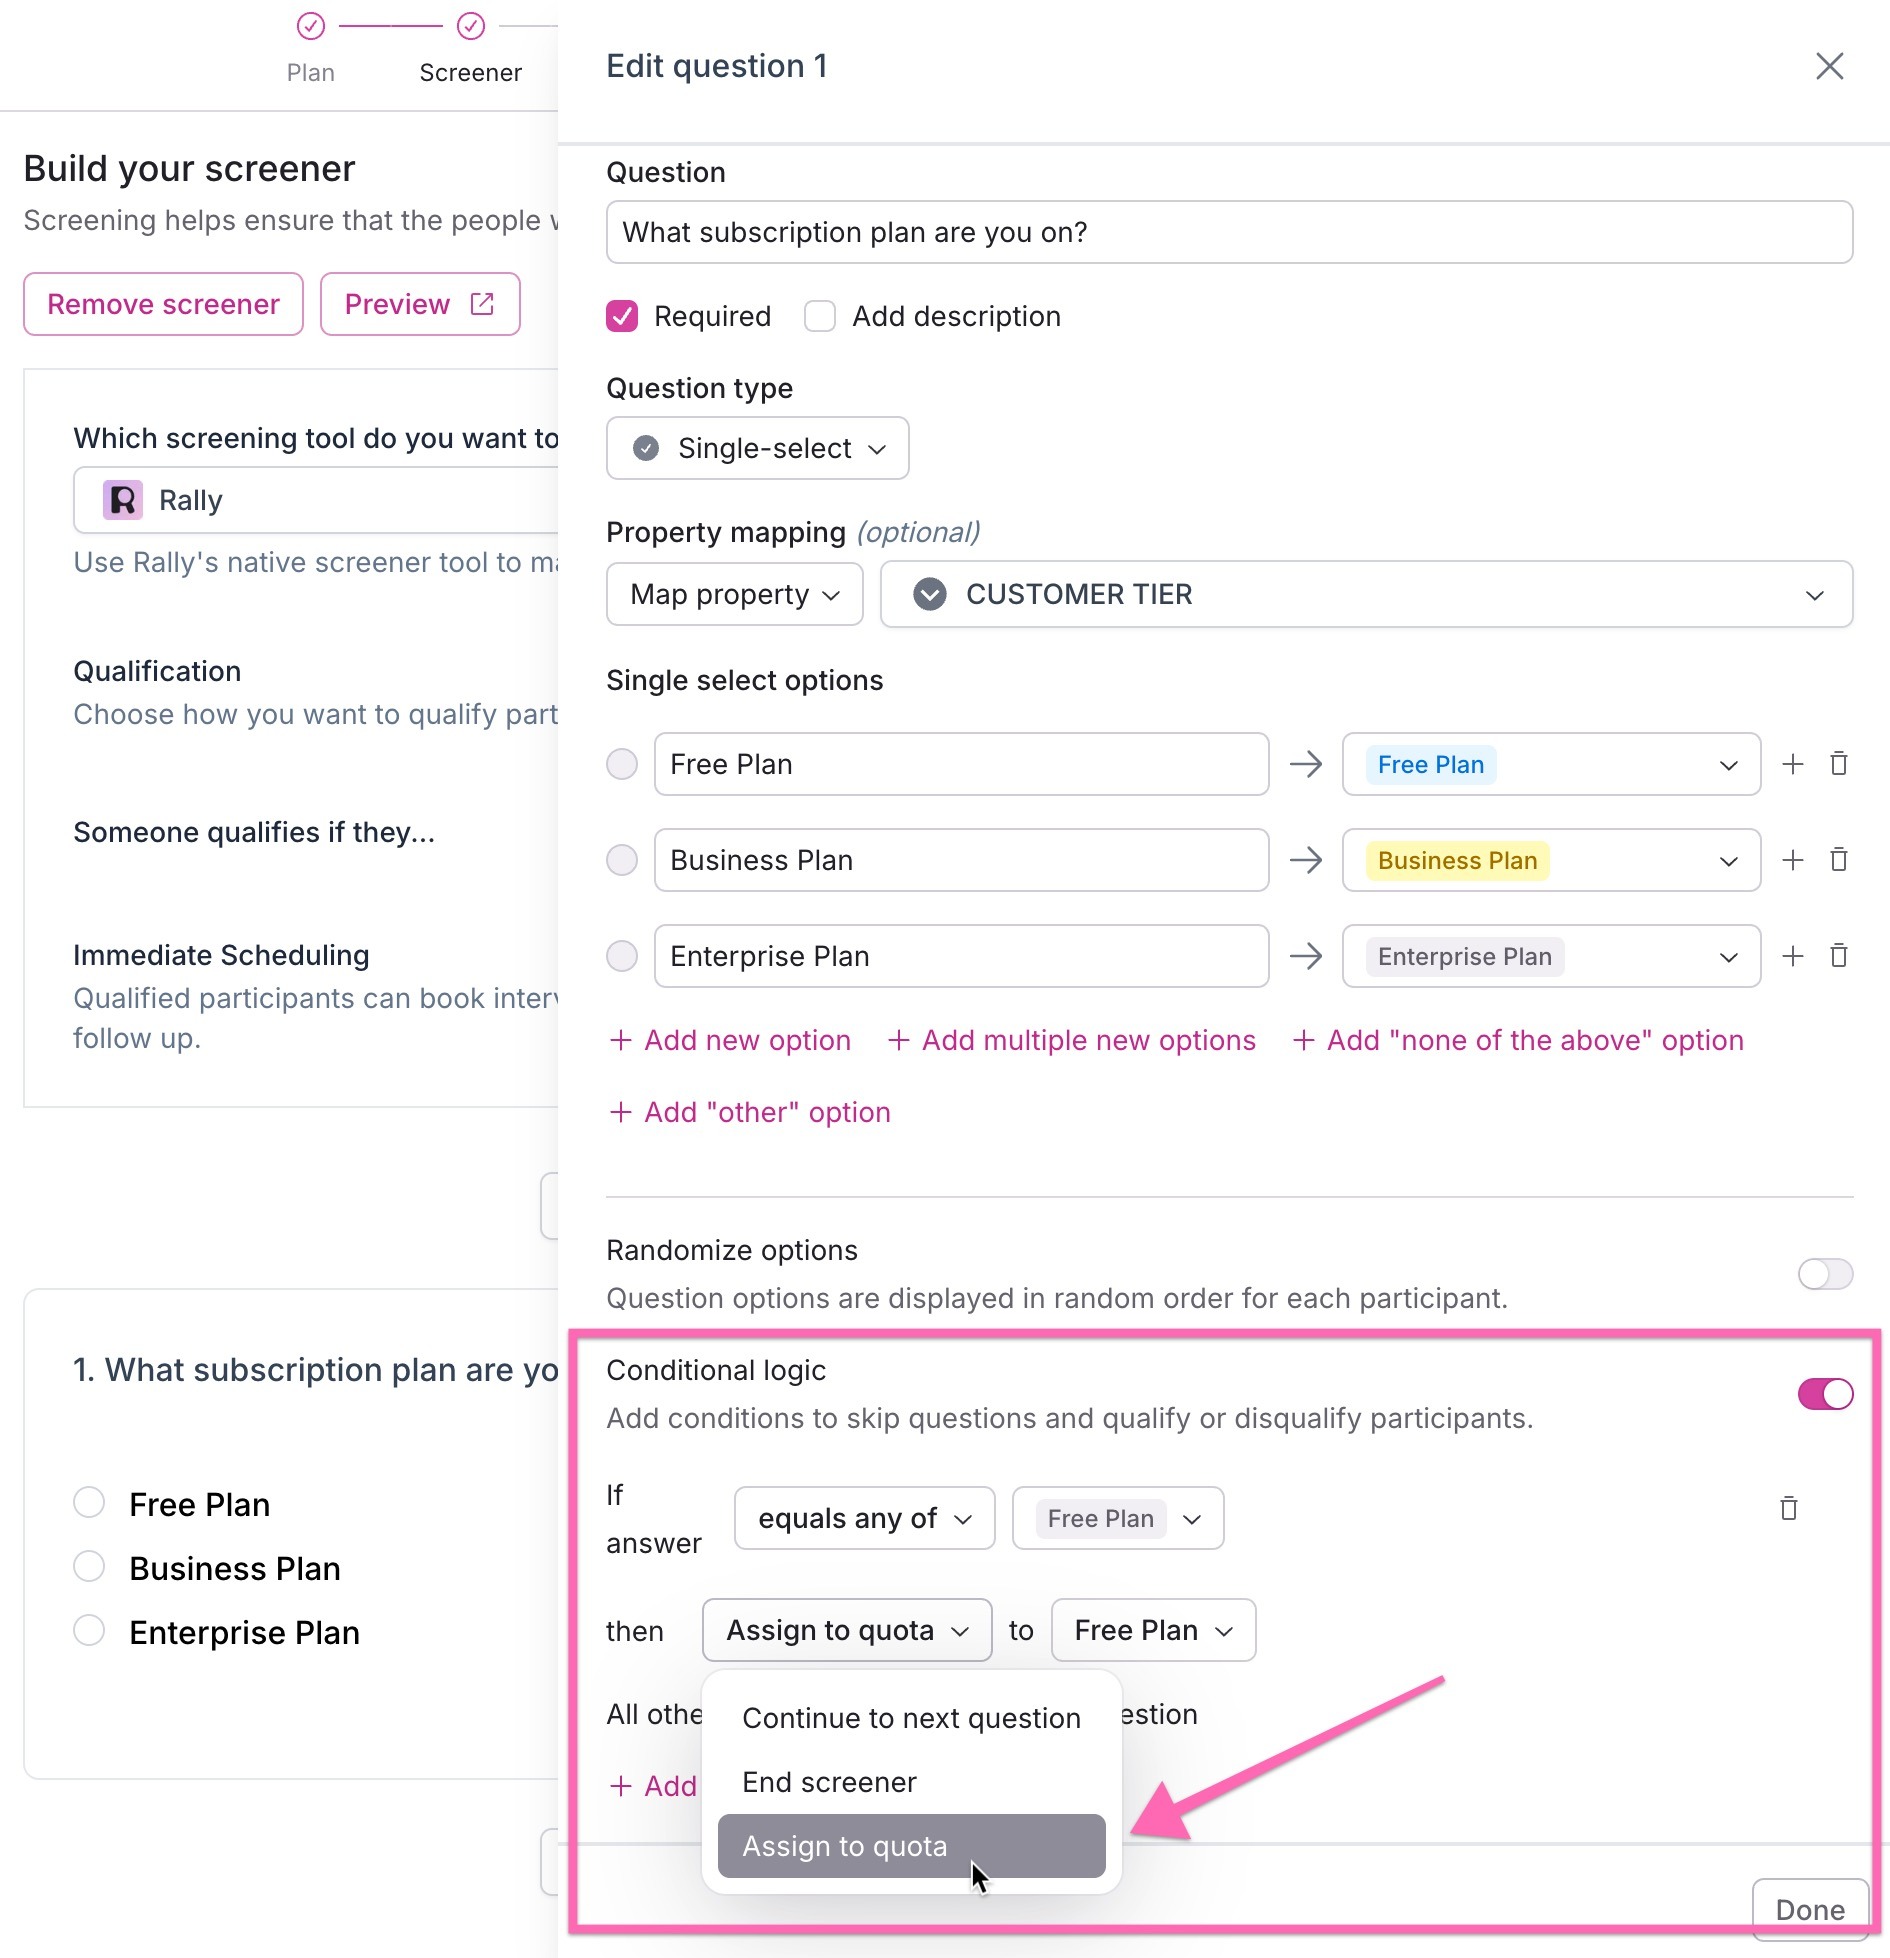
In the Screener step of the study builder, open a question that decides which quota a participant belongs in. Quota assignment works on multiple choice, dropdown, and checkbox questions.
Turn on Conditional Logic.
Select + Add condition, choose the response(s), set the action to Assign to quota, and select the quota.
Repeat for each quota and each relevant question and response.
When a participant gives a matching response, they're assigned to that quota automatically.
A participant can only be in one quota per study.
Manually assign participants to quotas
Assign participants to quotas when you add them to your study, or later from the participants table, individually or in bulk. Participants don't have to be in a quota. If you assign someone who's already in a quota, they move to the new one.
You can't assign or remove quotas on Closed studies, or if you don't have edit access to the study. If a participant is part of a standby booking pair, you'll see a warning before you confirm.
When adding participants
From the study overview, select + Add participants, then Add from existing.
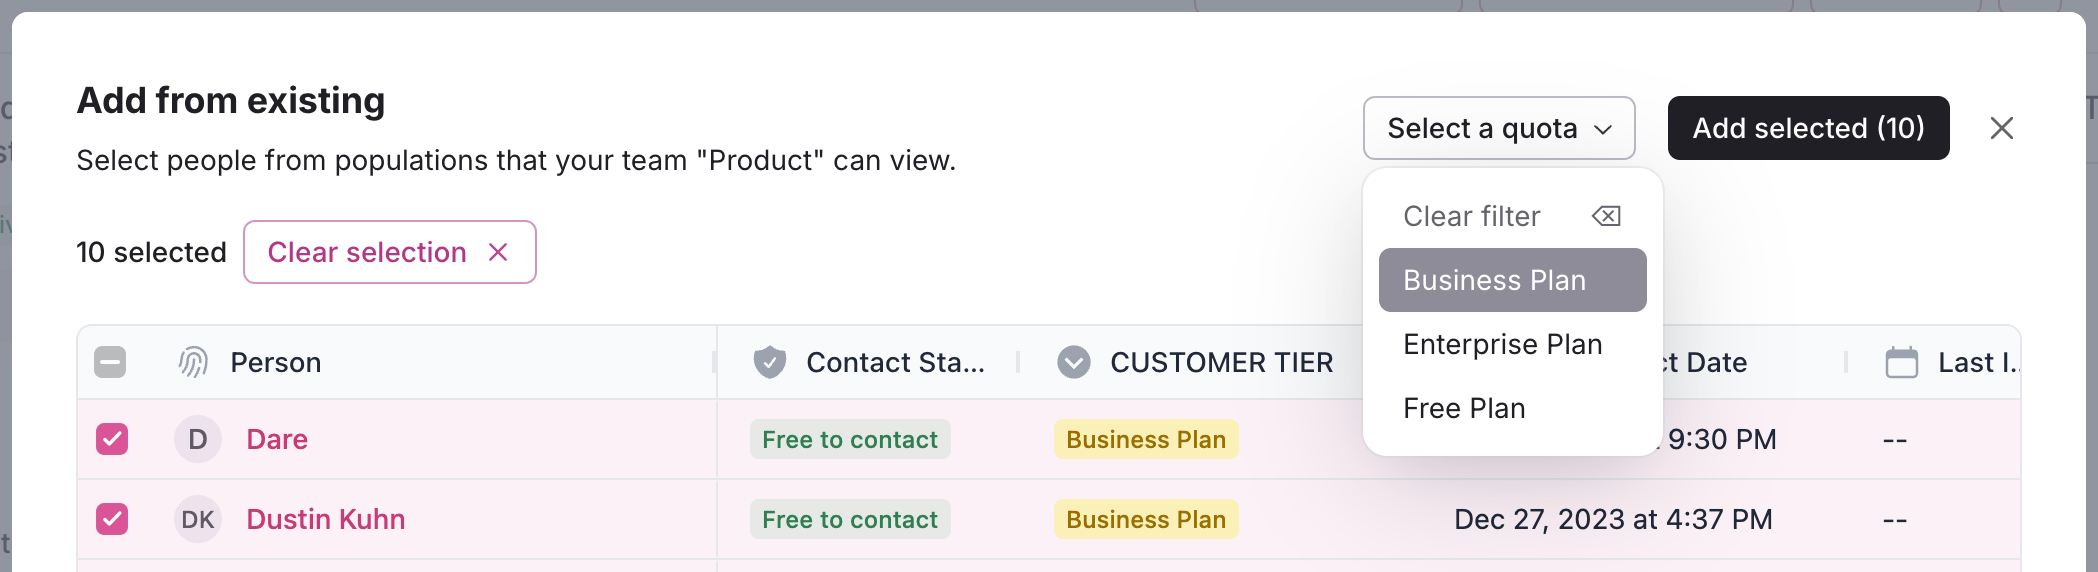
Select participants using the checkboxes. Use filters and columns to find the right people. Hold Shift to select a range of rows.
Select a quota to assign them to.
Select Add and assign to group (#) to confirm.
From the participants table
Select participants using the checkboxes.
Select More actions at the top of the table, then Assign to quota, and choose a quota.
Review the count and quota, then select Add to quota.
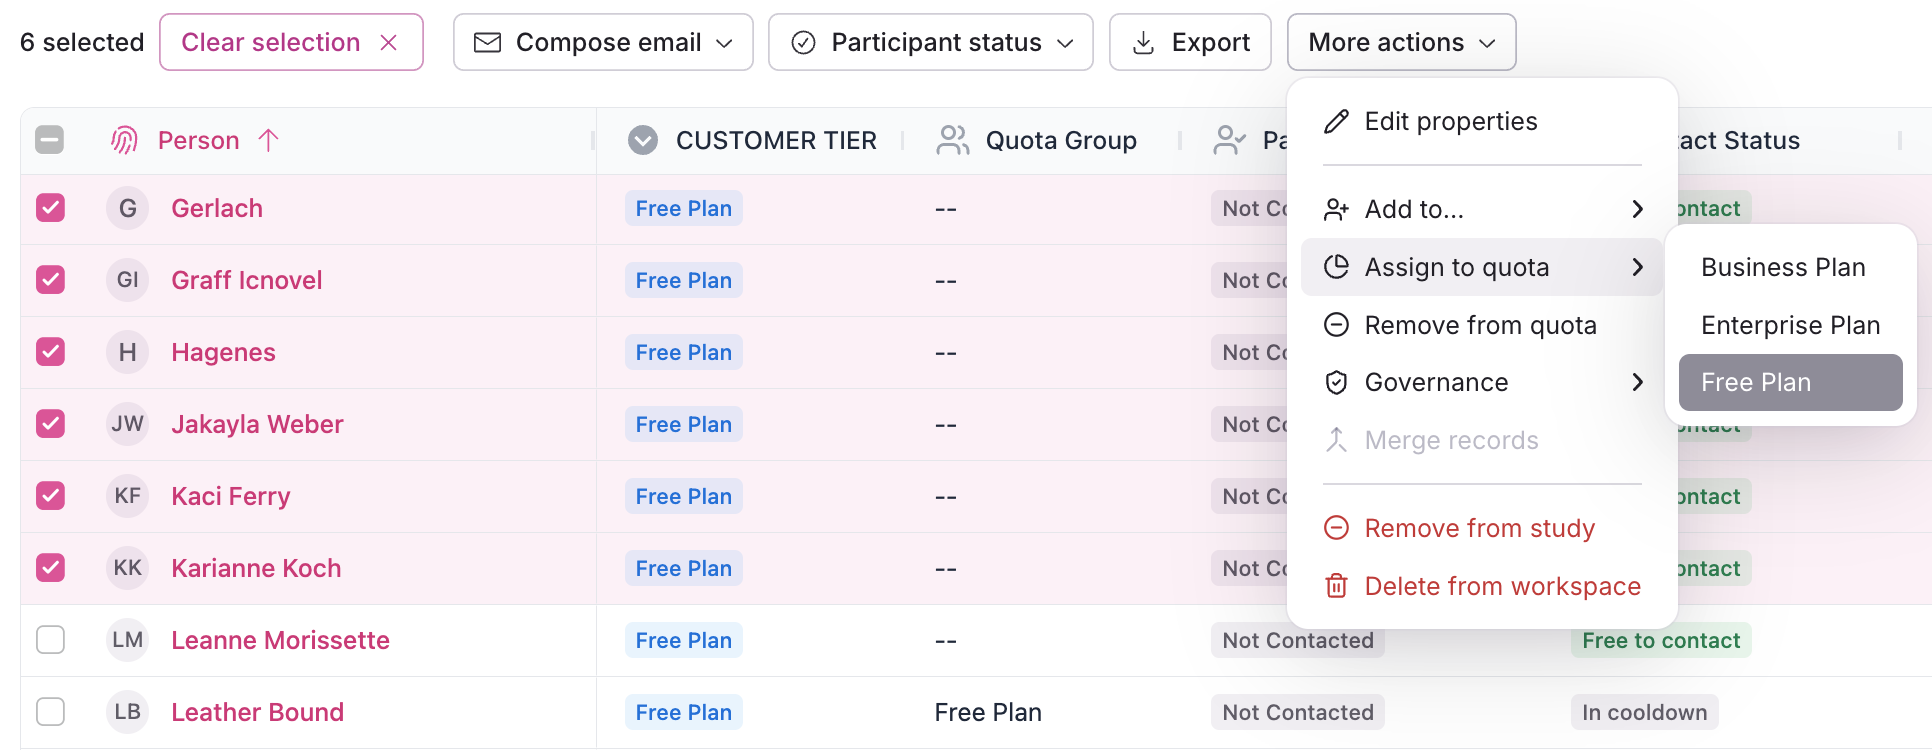
To assign one participant, select the three dots (...) next to their name, then Assign to quota.
From a population
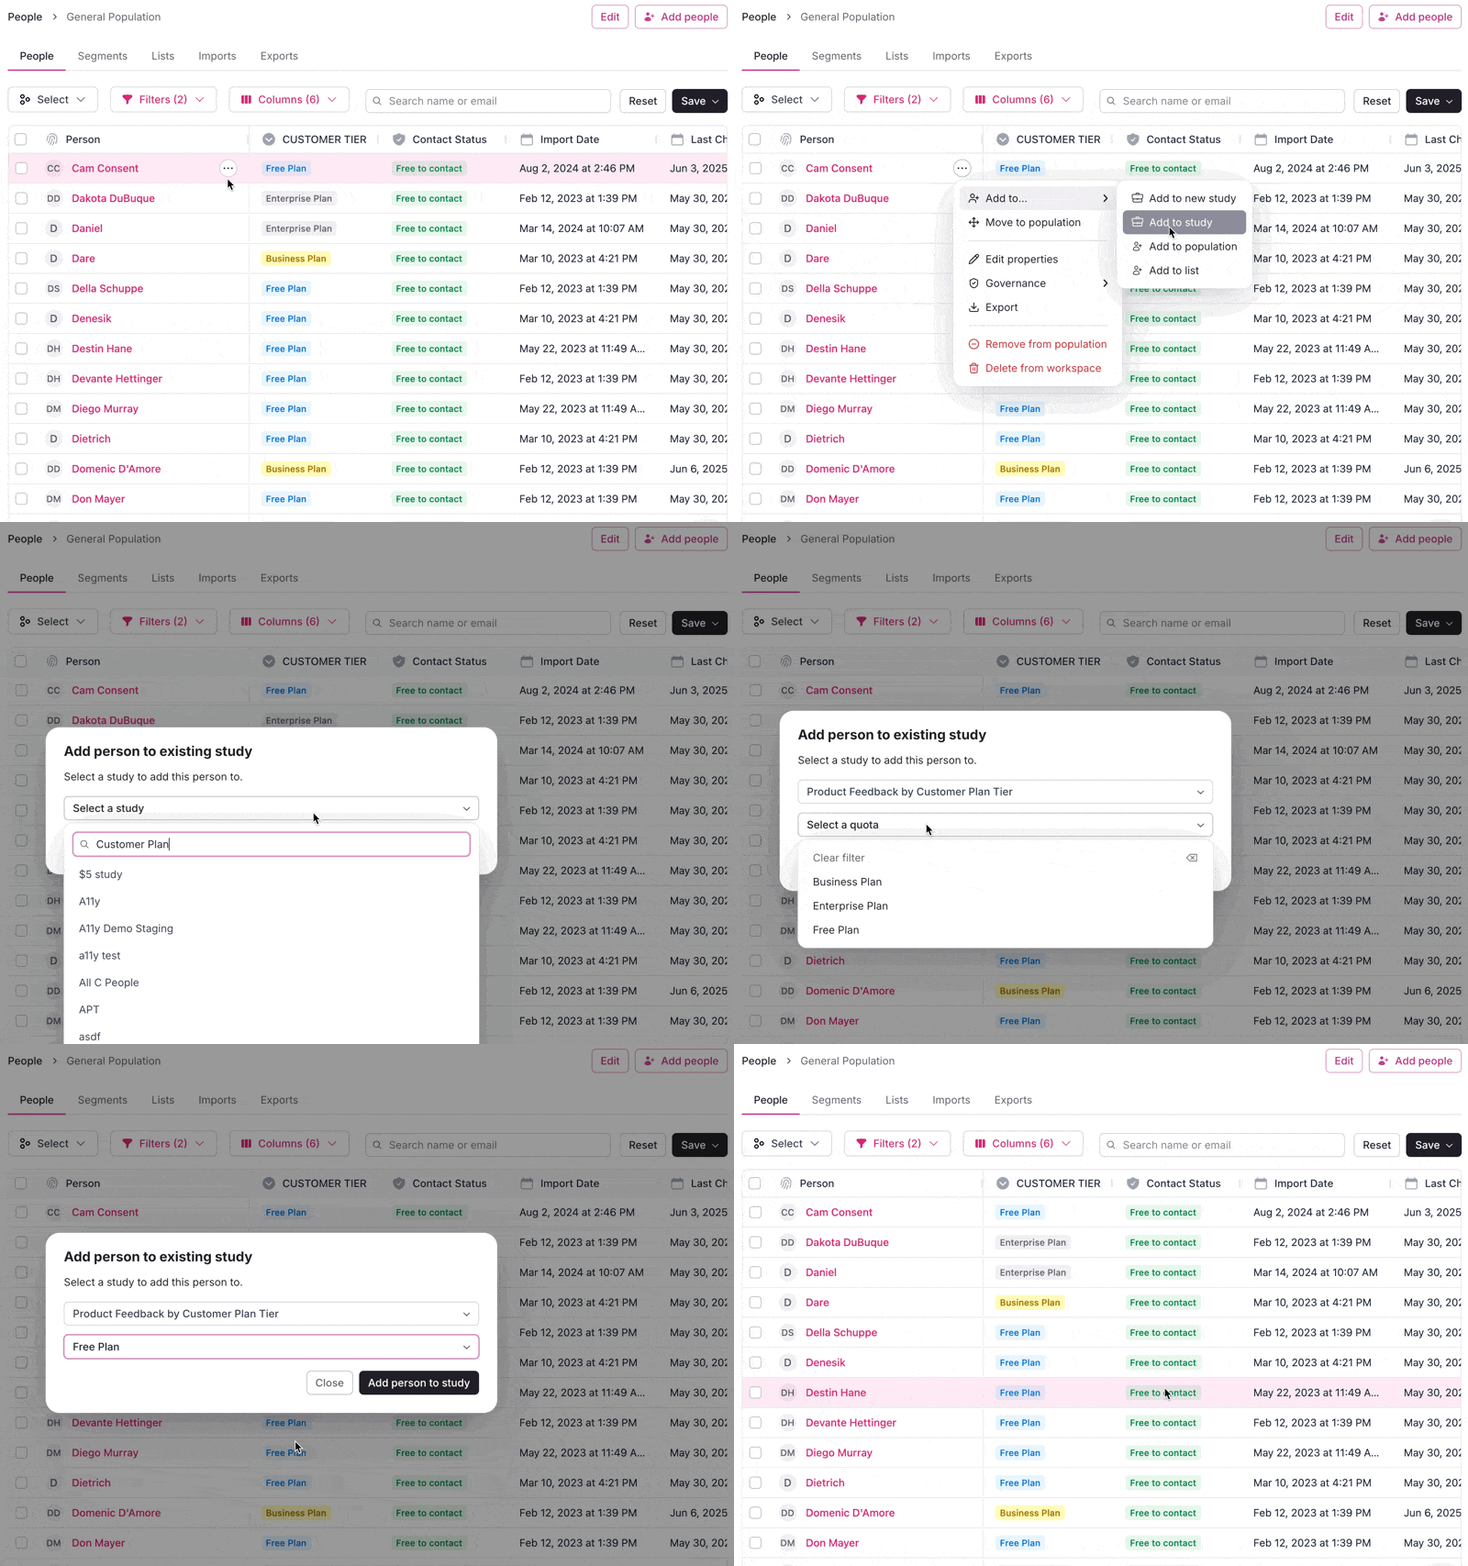
In a population, select participants, then Add to... > Add to study.
Select the study. If it has quotas, you can choose one to assign them to.
Select Add people to study.
Remove participants from quotas
Removing a participant from a quota doesn't remove them from the study. They can still be contacted or added to a different quota. You can remove participants from the Participants > Everyone page or from a quota's page.
Select participants using the checkboxes.
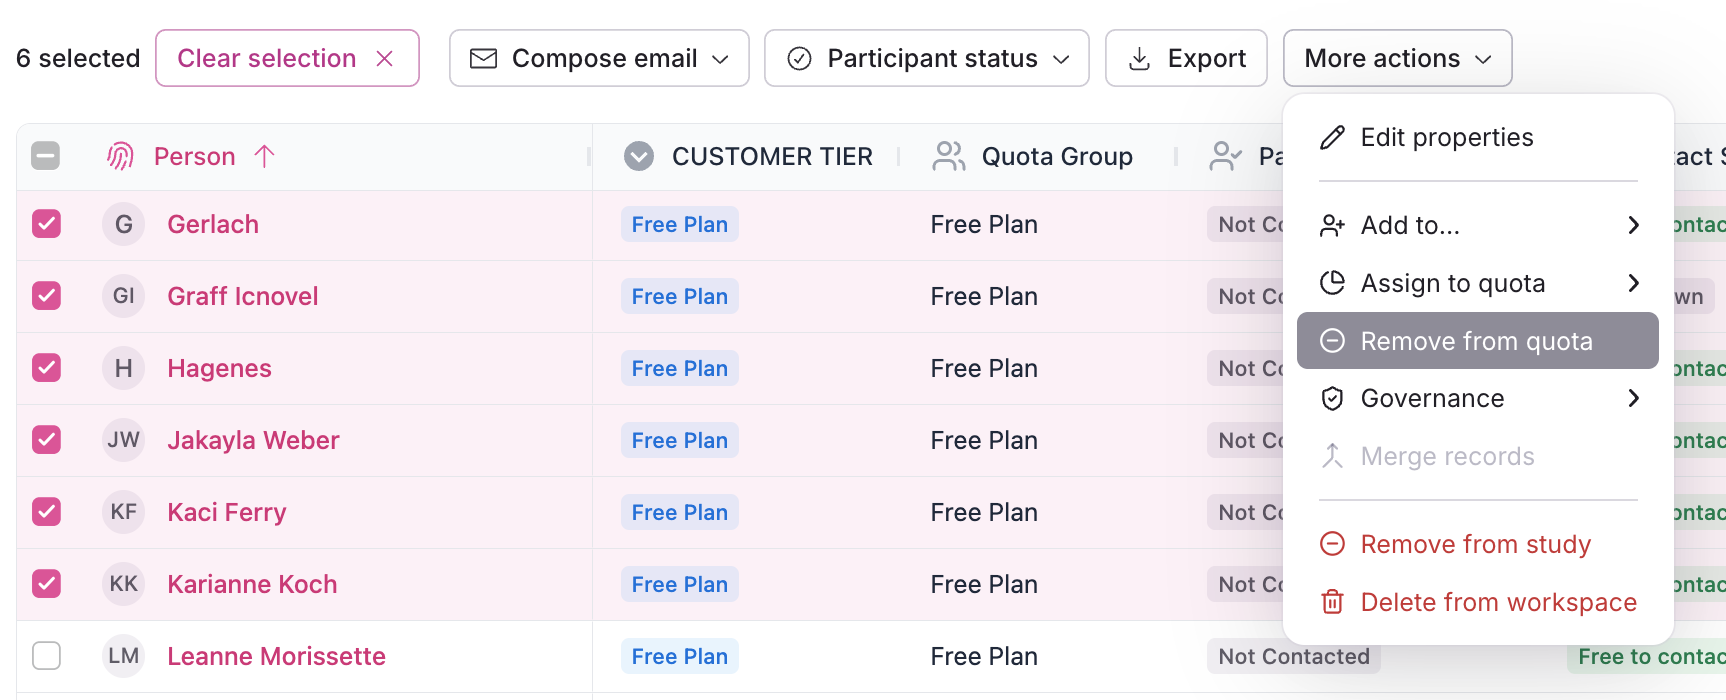
Select More actions at the top of the table, then Remove from quota.
Review the warning, then select Unassign from quota.
To remove one participant, select the three dots (...) next to their name, then Remove from quota.
Track quota progress
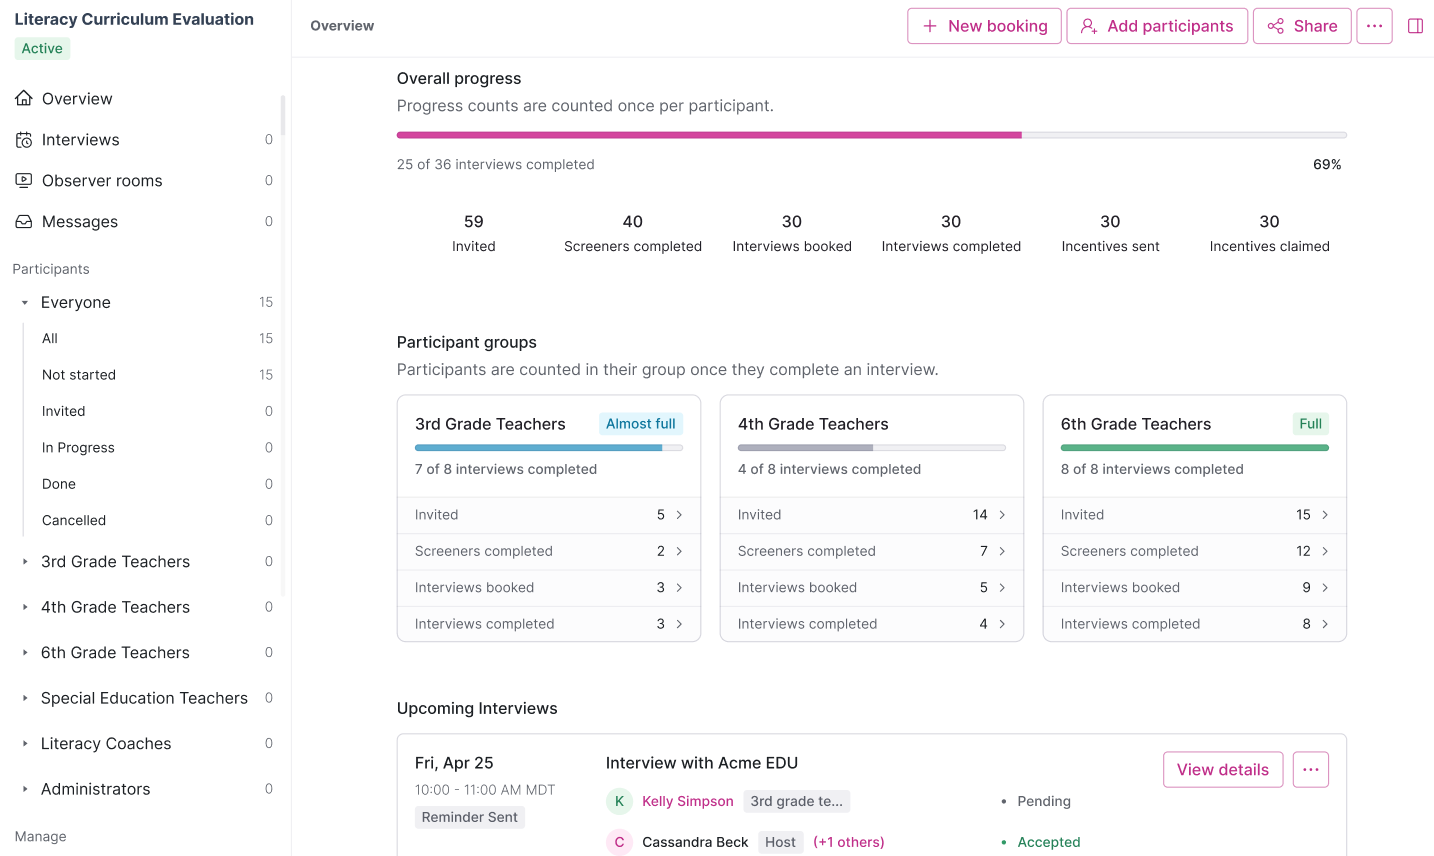
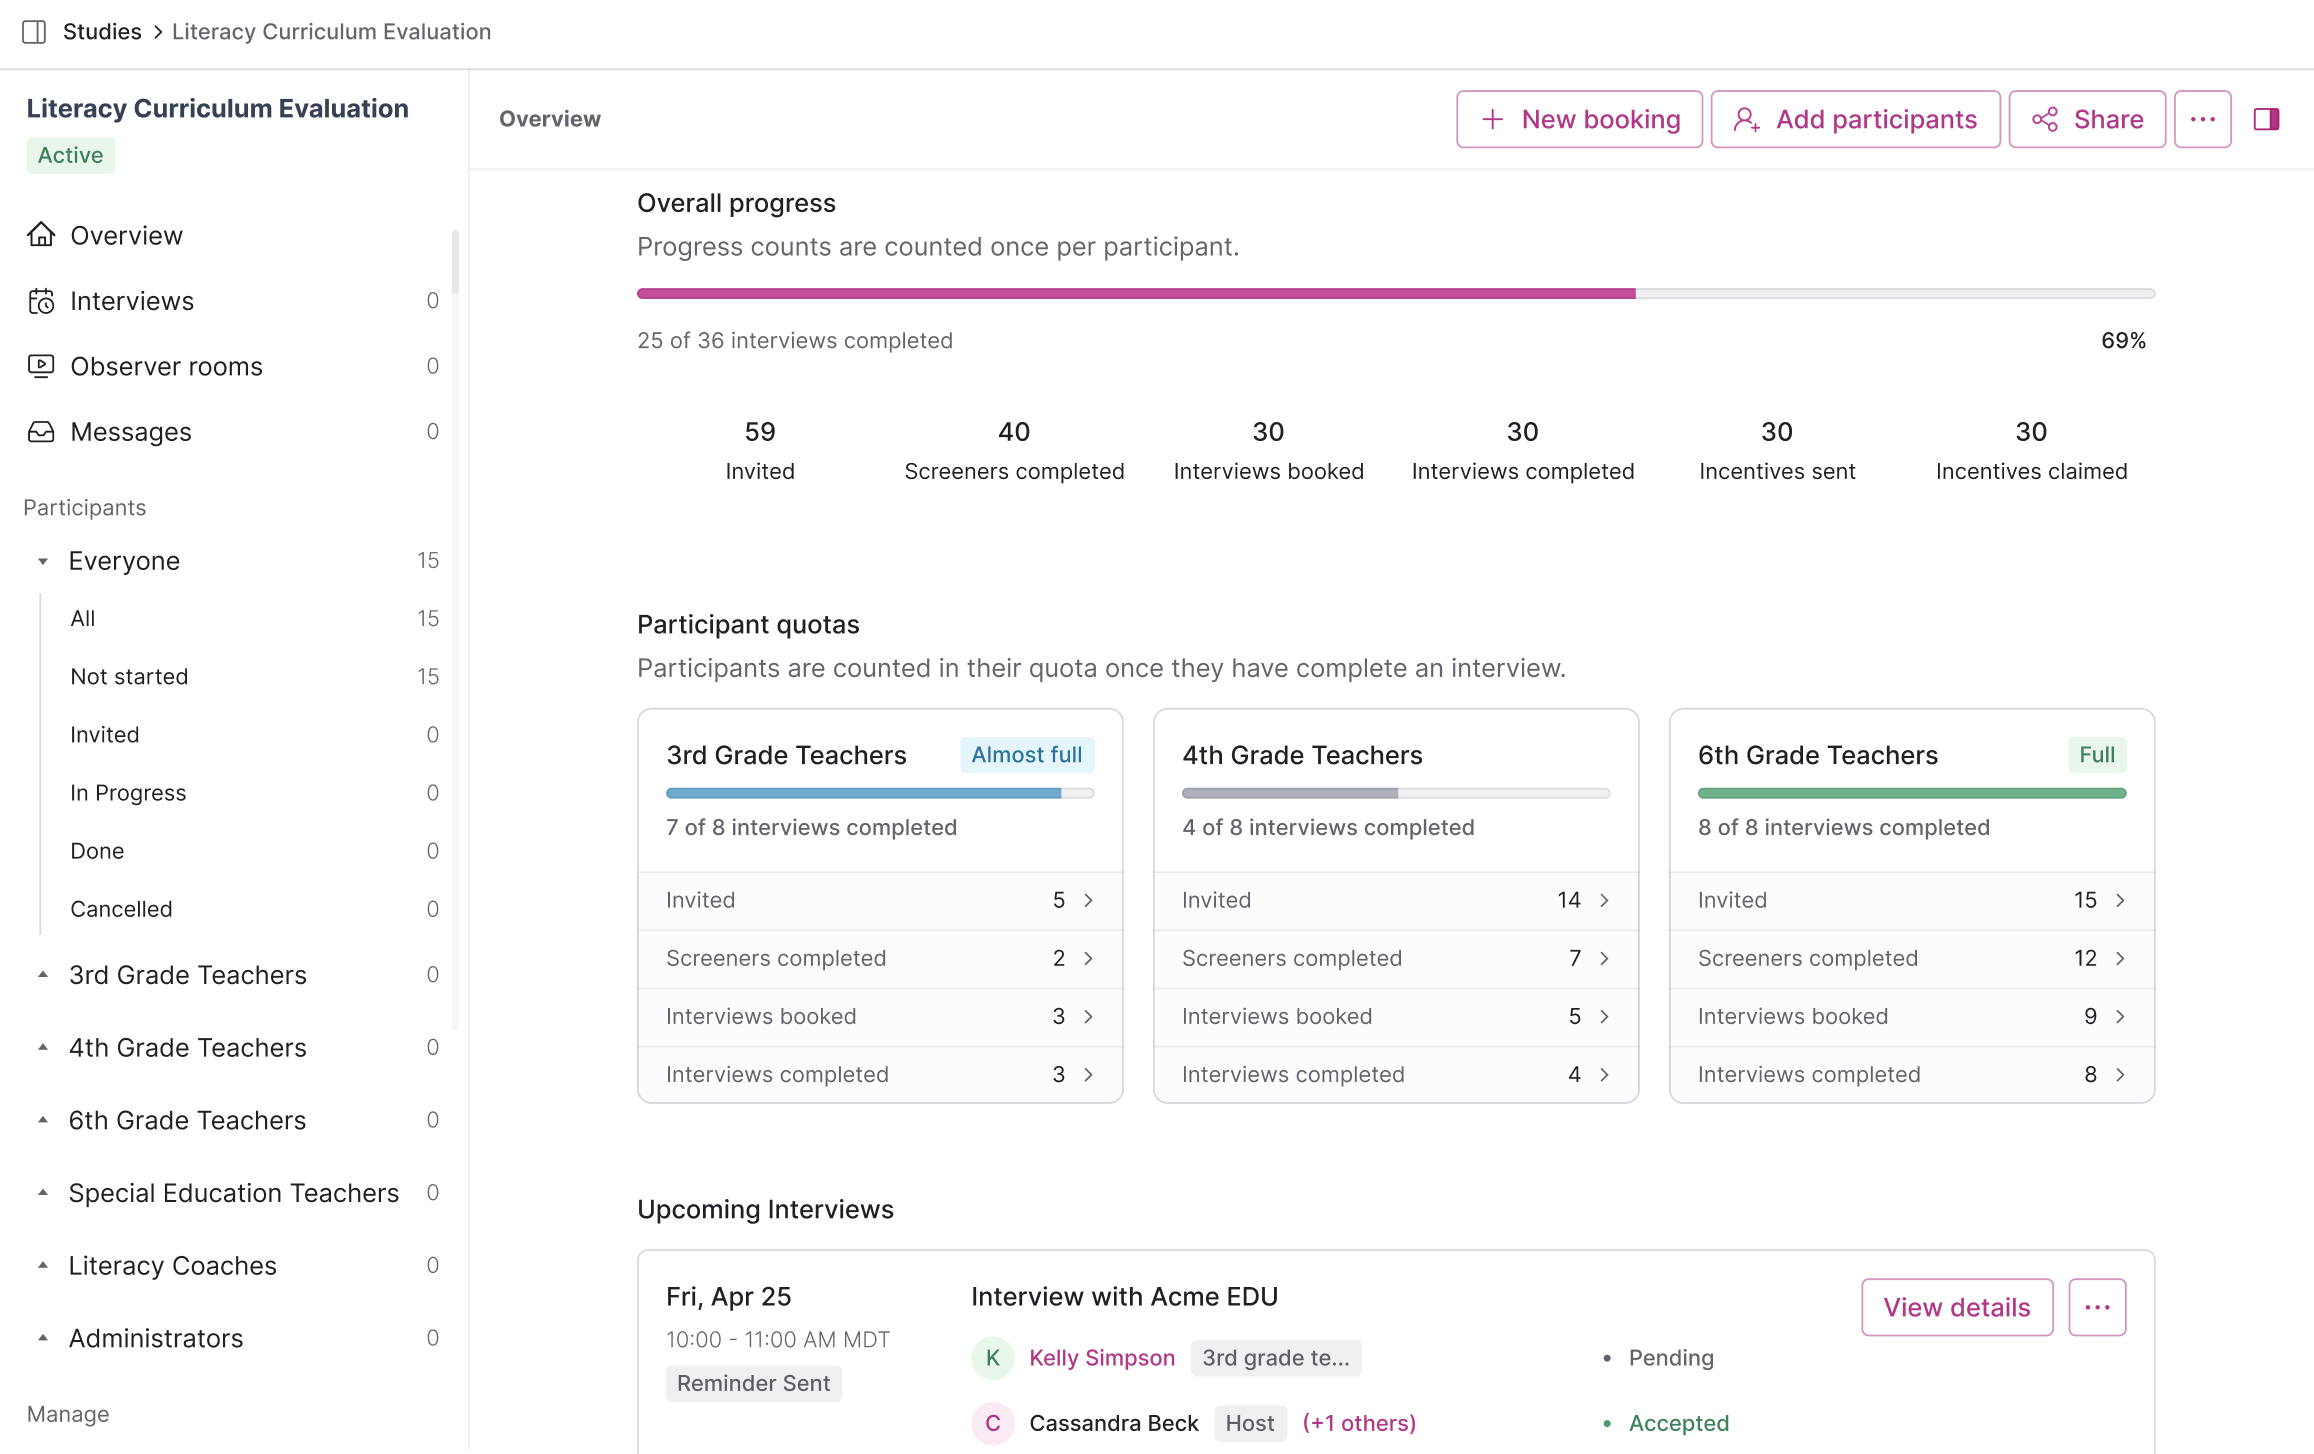
The study overview shows a card for each quota with its progress and status counts, and marks quotas that are Full or Almost full. To see which quota each participant is in, add the Quota column to a participants table. Quota assignments are also included in study CSV exports.
Edit quotas
Select the three dots (...) in the top right of the study, then Edit study.
In the Plan step, rename quotas or change their Max limit.
Select + Add quota to add more, or the trash icon to delete one.
Select Update Study in the top right to apply your changes.
Deleting a quota doesn't remove its participants from the study or change their status. They stay in the study without a quota.
Other ways to manage quotas
CSV imports: you can't assign quotas during a CSV import. Import participants first, then use Assign to quota.
Rally Agent and MCP: if your workspace uses the Rally Agent or Rally MCP, you can turn quotas on or off, add and edit quotas, toggle auto-close, and assign participants from there.