Create an Interview Study + Recruit from External Panel
Last updated: April 14, 2026
Abbreviated Table of Contents
Create an Interview Study + External Panel
Observer Rooms - Record, livestream, and download interviews (optional).
🚨 Participation limit cannot be increased after you start recruitment. Consider setting the limit to the highest potential number of participants you may wish you invite, as you can always close your study early before the limit is met to stop recruitment, finalize payment, and release the remaining unused reserved funds.
Reject or mark a participant as a no-show within 24 hours after their interview end time to avoid auto-payment after 24 hours, or report a participant for fraud or false representation
Helpful Guides:
💰 Incentive Calculator Calculate the right incentive amount to recruit high quality participants for your user research study.
📖 Panel Book Get an understanding of the audience types in Respondent's panel.
Rally Interview Study + External Panel Recruitment Flow
Recruiting Interview Study Participants with Rally's Respondent integration is quick and easy, allowing you to streamline researching with non-users. This entire process is completed in Rally. Learn more about the general workflow in the steps below.
In Rally: Create an Interview Study with Respondent Recruitment.
In Rally: Review billing & start recruitment on your Study to go live in Respondent.
Funds will be "reserved" in the selected Budget when you start recruitment.
In Respondent: Relevant applicants submit screener responses to be reviewed.
In Rally: Review applicant profiles and screener responses and invite or reject.
In Respondent: Invited applicants schedule interviews with Rally.
In Rally: View and conduct interviews with selected conferencing integration.
In Rally: Update successful Participants to "Complete & Send Payment".
In Respondent: Incentives are automatically paid to Participants 24 hrs after interview completion if no action is taken by the researcher in Rally.
Note: After interview completion, there is a 24 hour window for you to mark as No Show or report before a Participant is marked as completed in Respondent.
In Rally: Update Study status to "Closed" to finalize payment & stop access.
Any unused reserved funds are released and returned to "Available" in the selected Budget after Closing the Study and finalizing payment.
💡 Create new Studies much faster and more reliably by setting up custom Question Templates (used in screeners and surveys) that can be leveraged by your team. This saves you significant time and allows you to ensure the right questions are being asked, connecting you with the most relevant Participants and delivering better insights.
Create an Interview Study + Recruit from External Panel
There are 5 key steps when setting up an Interview Study, detailed below:
After completing all Study setup steps, you can either (1) publish it to an "Active" status to start recruitment and begin receiving applicants immediately, or (2) save and exit to keep it in a "Draft" state to return later. Learn more about Study Statuses.
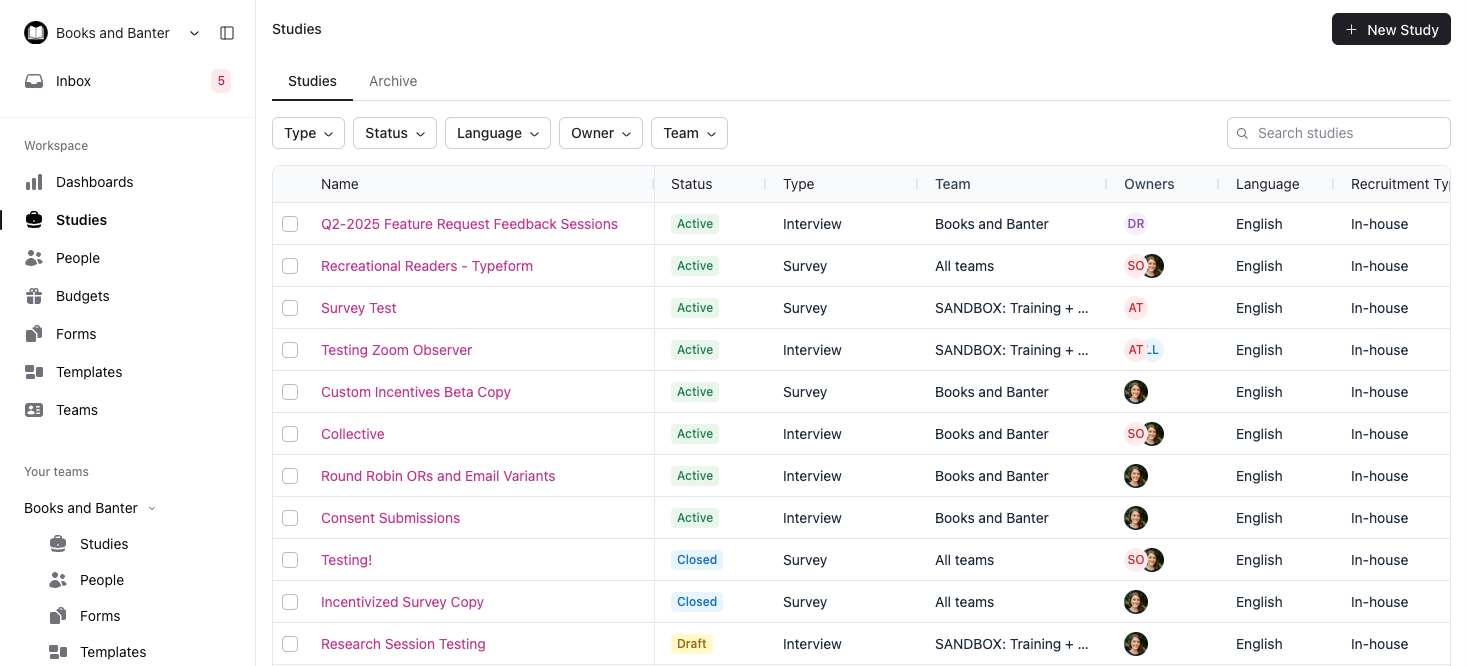
Navigate to Studies from the left navigation bar.
We recommend opening Studies within the Team you plan to create the Study in, but this can also be done from the Workspace level Studies page.
Select + New Study and select + Create from scratch to start fresh. Or, Use a template to choose from your team's Study Templates as available and advised.

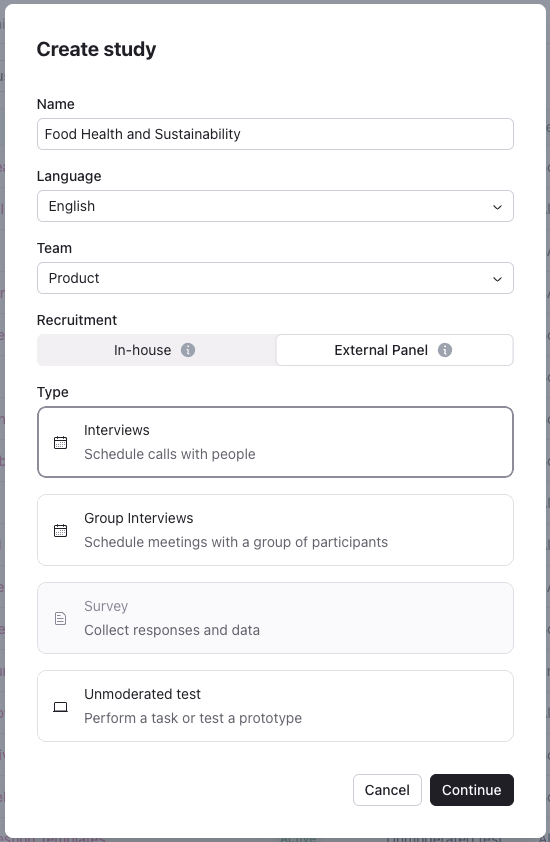
Enter a Study Name.
Language defaults to English, or select another option to translate your Study.
Select the Team the study will be created in.
Set Recruitment to External Panel to recruit participants from an external panel integration, like Respondent.
Select the study type Interviews.
Select Continue to open the study builder.
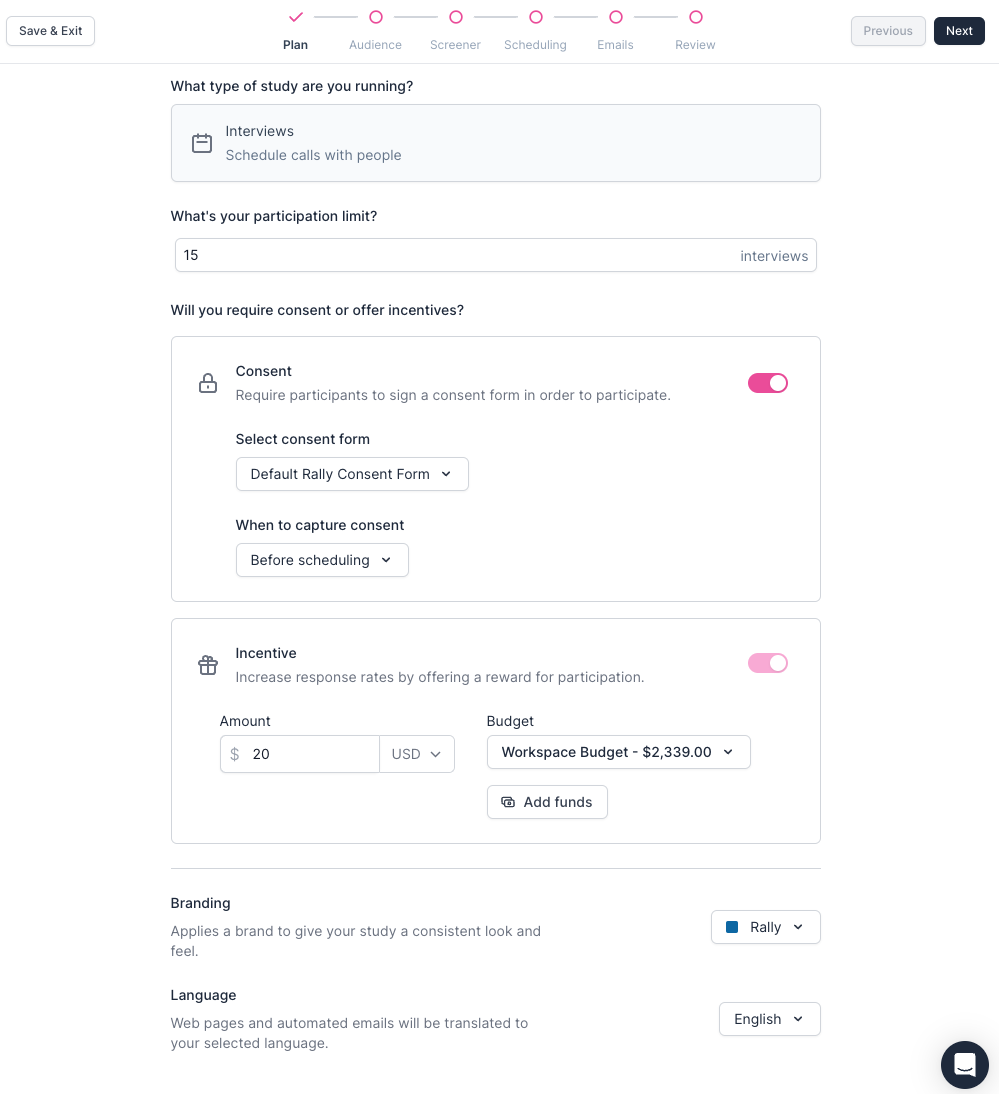
Plan
Start by setting up the key details of your Study.
Internal Study Name: Give your study a clear and descriptive name to easily identify it in your workspace.
Internal Research Goal (optional): Define the specific goal or objective of your research study to guide your team.
Internal Research Plan (optional): Provide additional details about your research plan, such as methodology or target audience.
External Panel: This Study will recruit external participants from Respondent's panel.
External Study Name: A short, informative name describing the ideal participants.
External Study Description: A clear description of the ideal participants you are looking for and a summary of the research being conducted in the Study.
Examples of successful external Study Names and Study Descriptions:
External Study Name: Seeking IT Experts for cutting edge product development
External Study Description: We are a multi-national IT company that would like to receive feedback from people who work in the IT, DevOps, and Operations spaces. Your feedback will help us develop the next generation of cloud operations software!
External Study Name: Chatting to Brides and Grooms to-be!
External Study Description: Are you getting married in the next 12 months? Are you considering doing the invitations (Save The Date, RSVPs, etc) online instead of in the mail? We want to talk to you about your plans and designs!
External Study Name: Calling all Managers, VPs, and Directors in the Travel & Hospitality Industry!
External Study Description: We are a well-established website testing tool to help companies create great user experiences, but we’re considering some new services and features aimed at managers in your role. We’d like to talk with you about your priorities and challenges, to explore whether we’re on the right track.
Study Type: Confirm the Study type 'Interviews' is correct before proceeding.
Participant Limit: Set a maximum number of Participants for your Study.
Note: Participation limit cannot be changed after you start recruitment. Consider setting the limit to the highest potential number of participants you may wish you invite, as you can always close your study early before the limit is met to stop recruitment, finalize payment, and release the remaining unused reserved funds.
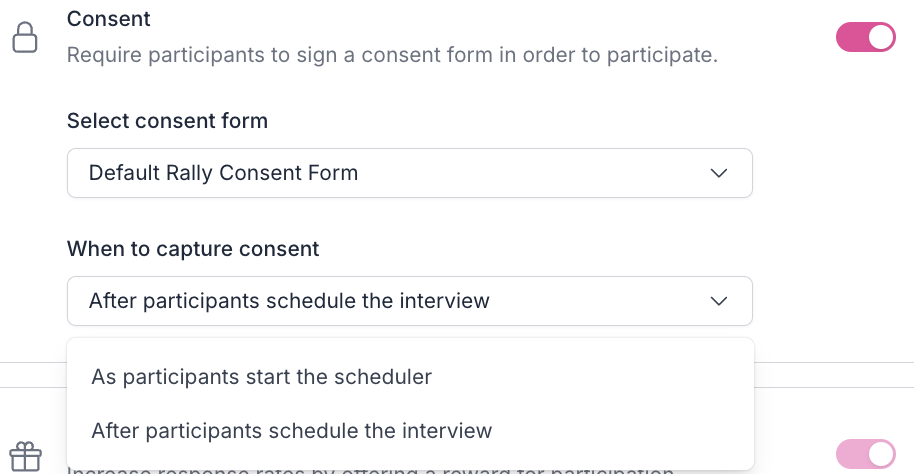
Consent (optional): You can add a consent form to ensure Participants understand and agree to Participate in your Study. Choose which consent form to use and determine its placement within the signup process by selecting when to capture consent as "As participants start the scheduler" or "After participants schedule the interview".
Upload Documents, such as NDAs, and create custom Consent Forms to select from in Studies.
Incentive: Specify the amount or reward you will provide Participants for their participation. Incentives are required for external panel recruitment. The incentive amount is at your discretion between $5min-1000max, though higher incentives typically receive faster response rates, especially for B2B audiences.
Users can 'Add Funds' to the selected Budget here, or wait to add funds before starting recruitment later. This may require manager approval.
Use Rally's Incentive Calculator to calculate the right incentive amount to recruit high quality participants for your Study.
Branding: Personalize your Study with your company's logo and brand colors to create a cohesive experience.
Set up and manage Brands for your workspace.
Language (optional): Select from the options to translate your Study into another language. Currently, each Study can only have 1 language set; for example, choosing Spanish will not show an English option for users.
Note: Web pages and automated emails will be translated by Rally to your selected language, but any customizable elements that your team creates or includes (such as custom screener and survey questions or question templates, custom emails or email templates, and consent forms) will not be automatically translated by Rally and should be prepared in advance by your team.
Review everything carefully before selecting the 'Next' button in the top right corner to continue.
Audience
Define who you want to recruit from the external panel to target by location, job title, industry, skills, demographics, and more to reach the ideal audience. This step is important to receive the best possible applicants for the specific research being done.
Respondent uses the audience filters you select in the Study builder to match you with the best applicants. Applicants will see your Study details and apply for your Study, going through your screener. Depending on your needs, you may consider setting the audience filters more broadly and use your screener questions to more precisely qualify applicants. Visit Rally's Panel Book to get an understanding of the audience types in Respondent's panel.
For guidance deciding between Industry Professionals (B2B) or General Population (B2C) Participants, and to learn best practices for recruitment, visit our guide:
How Recruitment Works & Best Practices

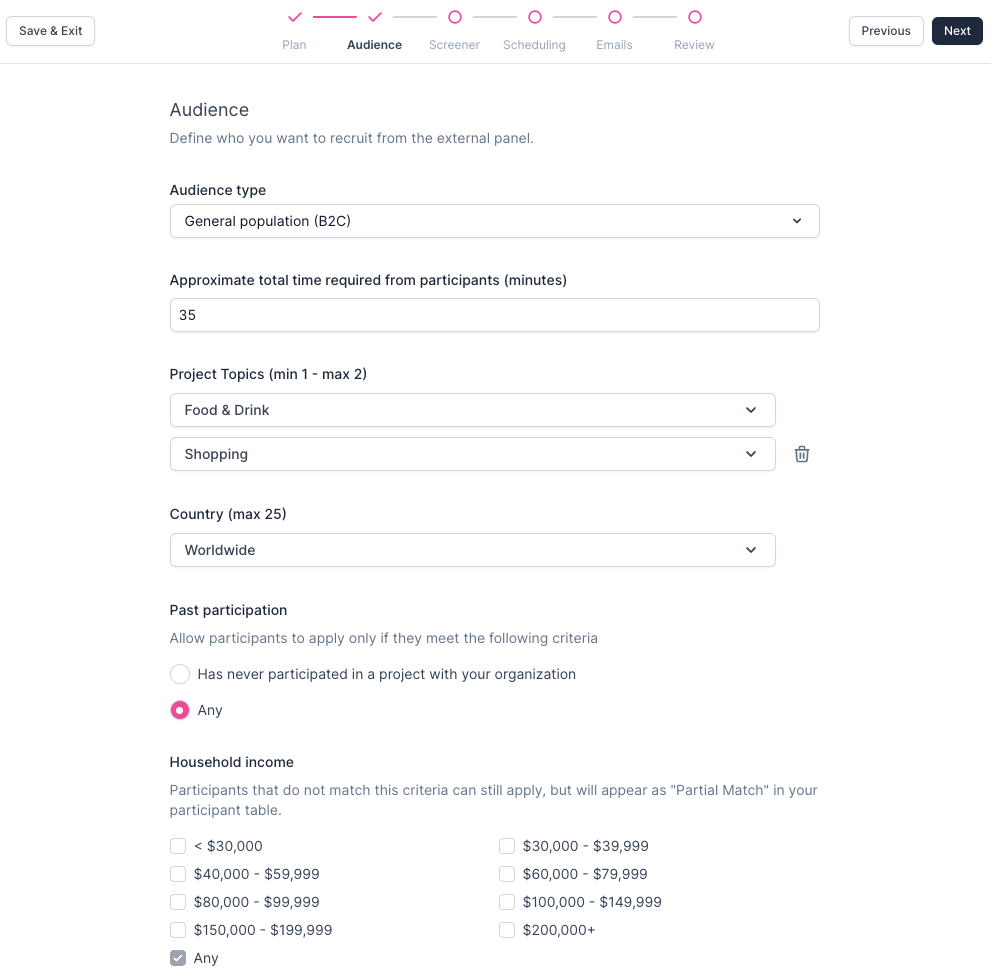
Audience Type: Select your preferred audience type:
General population (B2C)
Industry professionals (B2B)

Note: Some target characteristic options will change depending on the Audience Type selected.
Approximate total time required from participants (minutes): Set the total amount of time required to participate, including an estimated time for completing the screener plus the length of the interview.
Some additional target characteristics are available only for the "General Population (B2C)" Audience Type:
Project Topics (min 1 - max 2): Select 1-2 topics from Respondent's available options that best relate to the Study context to find the best Participants.
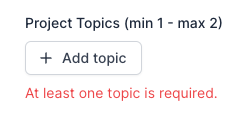
Select the trash icon next to the second topic to delete it.
Some additional target characteristics are available only for the "Industry professionals (B2B)" Audience Type:
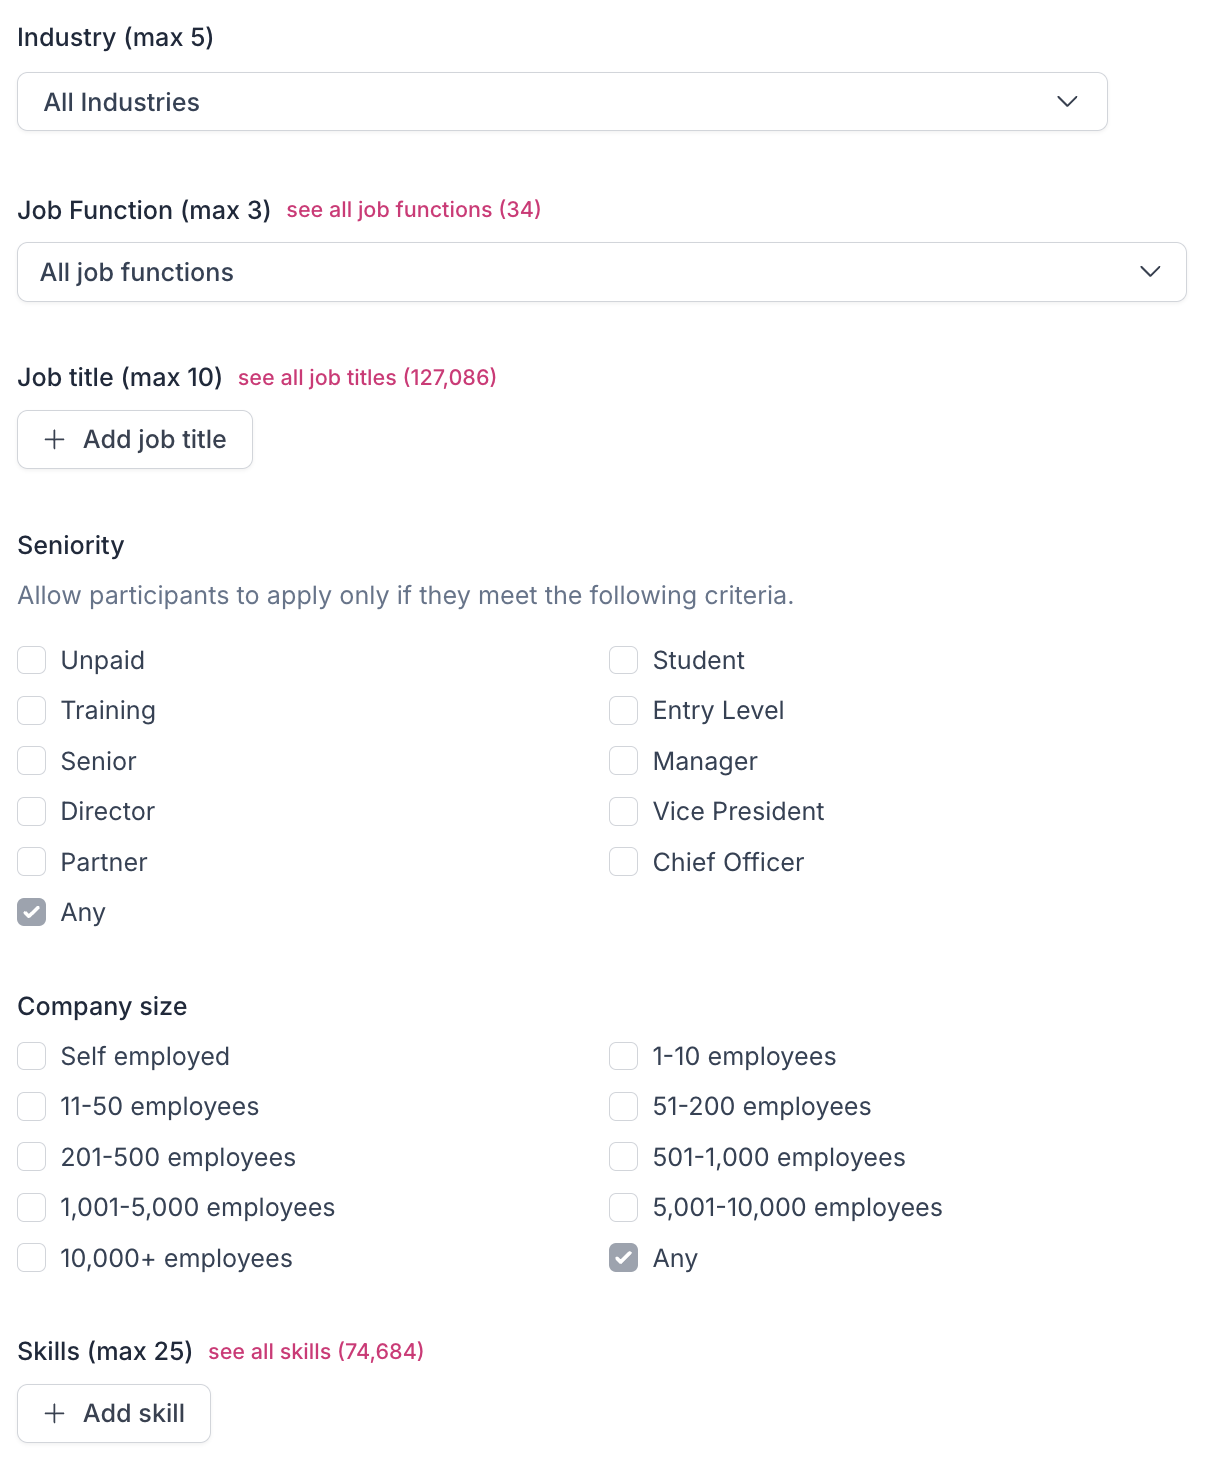
Industry (max 5): Select up to 5 industries, or leave this as "Any industries" to broaden your search.
Job Function: Select up to 3 job functions, or leave this as "All job functions" to broaden your search. Here you can view all available options.
Job Title (min 1 - max 10): Select "+ Add job title" to recruit people with specific job titles. Click "see all job titles" to browse thousands of options.
Seniority: Allow participants to apply only if they meet the selected criteria, or leave this as "Any" to broaden your search.
Company Size: Allow participants to apply only if they meet the selected criteria, or leave this as "Any" to broaden your search.
Skills (max 25): Add skills to refine your participant search. Click "see all skills" to browse the list of over 74,000 available skills.
Country (max 25): Select up to 25 specific countries to refine the geographic location of your Participant pool, or simply leave this as "Worldwide" to allow Participants from any country to apply.
Past Participation: Select an option to allow participants to apply only if they meet the following criteria:
Has never participated in a project with your organization
Any
Household Income: Specify which income ranges to allow, or leave this as "Any" to broaden your search. Participants that do not match the criteria you set for this field can still apply, but will appear as "Partial Match" in your participant table.
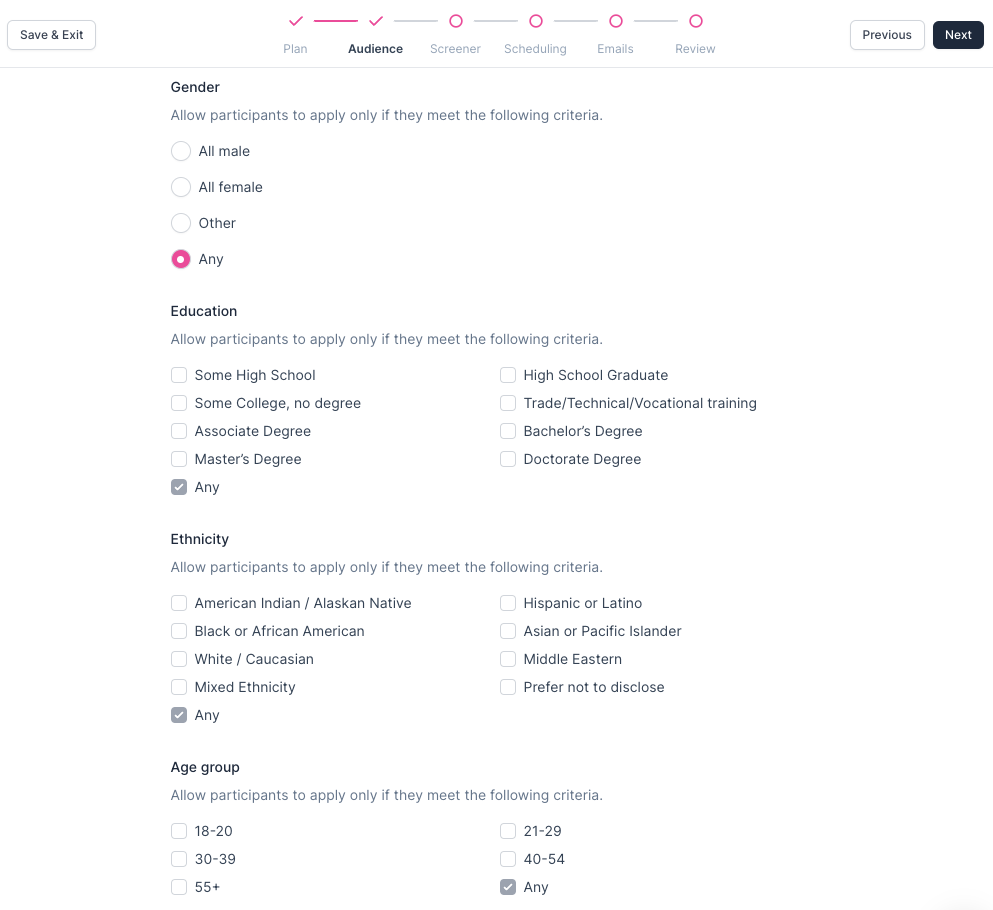
Gender: Allow participants to apply only if they meet the selected criteria, or leave this as "Any" to broaden your search.
Education: Allow participants to apply only if they meet the selected criteria, or leave this as "Any" to broaden your search.
Ethnicity: Allow participants to apply only if they meet the selected criteria, or leave this as "Any" to broaden your search.
Age Group: Allow participants to apply only if they meet the selected criteria, or leave this as "Any" to broaden your search.
Review everything carefully before selecting the 'Next' button in the top right corner to continue.
Screener
Ask qualifying questions to gather more information and "pre-qualify" or "disqualify" applicants for your Study with Rally's native screener tool before inviting them. The screener must have at least two questions for external panel recruitment, but Respondent has found that around 10 questions works best. You may want to include at least one open-ended question in order to assess how articulate and expressive a participant can be on your topic. We suggest including enough targeted questions to narrow your participant pool to only the most relevant candidates. Quality screeners are important to receive the best possible applicants for the specific research being done.
💡 Tip: Use conditional logic in screener questions to automatically label applicants that should potentially be invited or rejected at a quick glance. Conditional logic in external panel recruitment Studies will not invite or reject applicants, but can help to prioritize reviewing "auto-qualified" applicants first.
How To Create External Panel Screeners & Best Practices
Survey tool: Rally's native survey tool is used by default for a seamless experience.
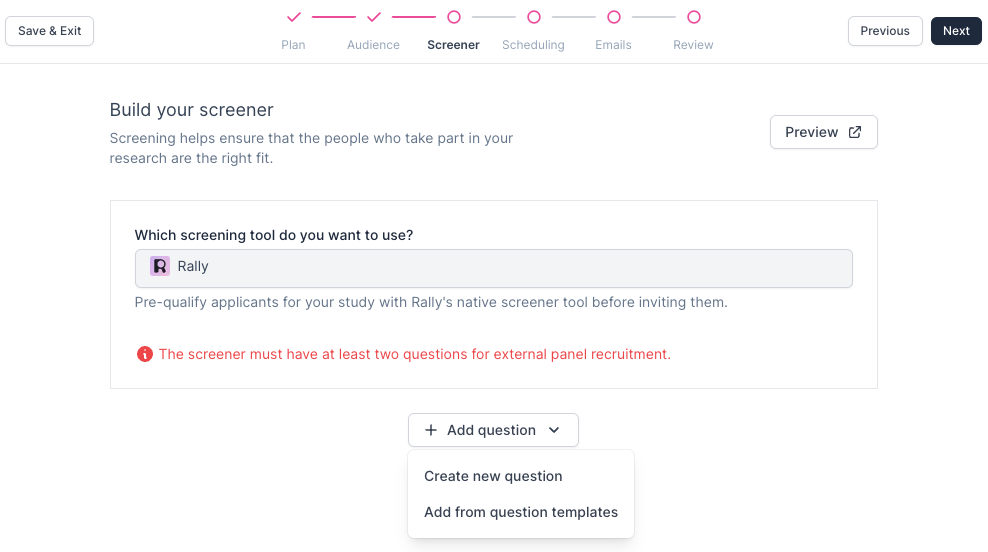
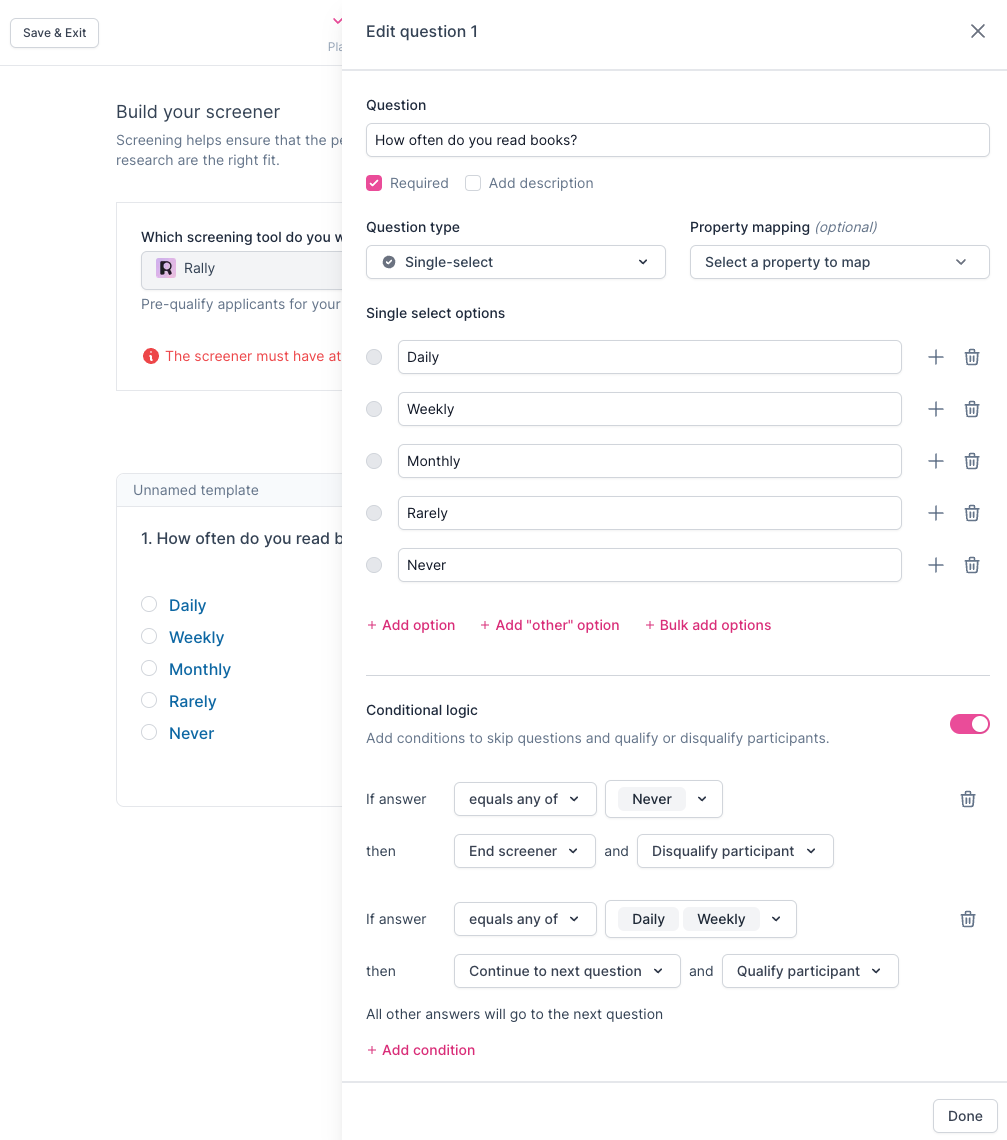
Build Screener: Create your screener by adding questions and implementing conditional logic to tailor the screening process. Select '+ Add Question' and either:
Create New Question: Learn how to create new questions and optionally save them as new Question Templates as you go.
Add From Question Templates: We recommend creating custom Question Templates in advance to allow your team to quickly and easily build quality screeners.
When editing or creating new questions, mark questions as Required to ensure a response.
Add conditional logic to skip questions and "auto-qualify" or "disqualify" applicants based on their answers to speed up the applicant review process. Note: Multi-select question conditional logic does not allow skip logic or 'end screener' at the moment.
Review everything carefully, making sure all relevant questions are included and conditional logic is set before selecting the 'Next' button in the top right corner to continue.
💡 Screeners cannot be submitted twice by a Participant for the same Study. This avoids overwriting original responses or any Participants attempting to bypass a disqualification with an additional submission attempt.
Scheduling
Set your calendar event details and manage availability for your team with Rally's robust Scheduler. Carefully configure scheduling for your specific needs for a seamless Study.
Rally Scheduling is organized into 6 subsections:
Already a Rally Scheduler pro? Okay, boss! Jump to the next section to set up Emails.
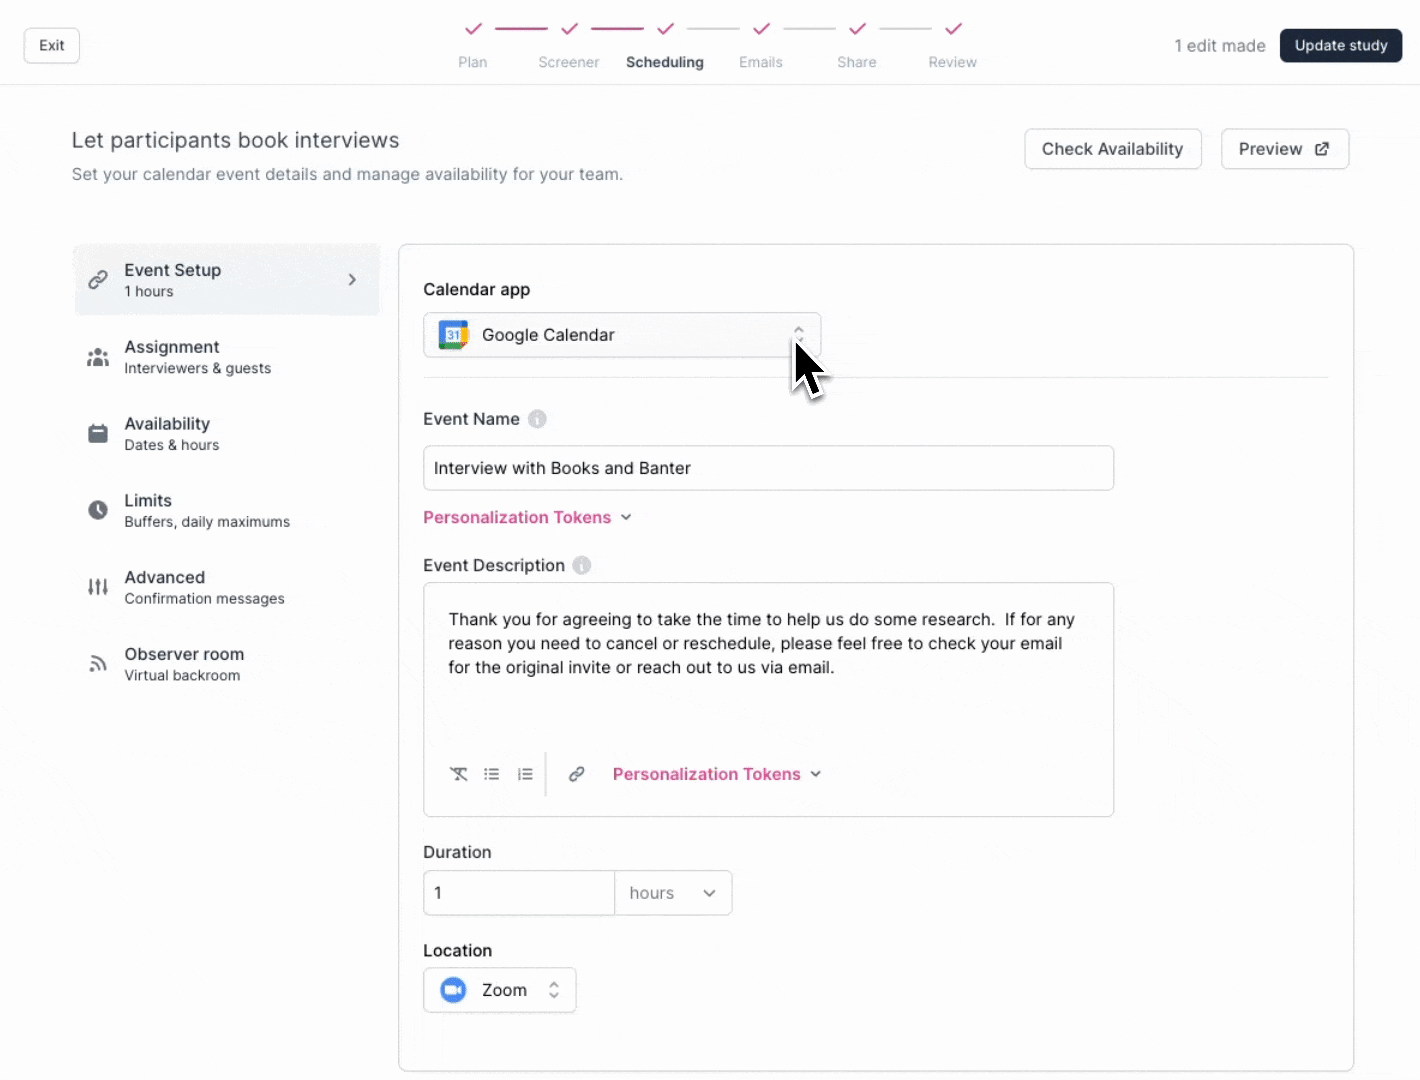
Event Setup
Select your preferred Calendar App.
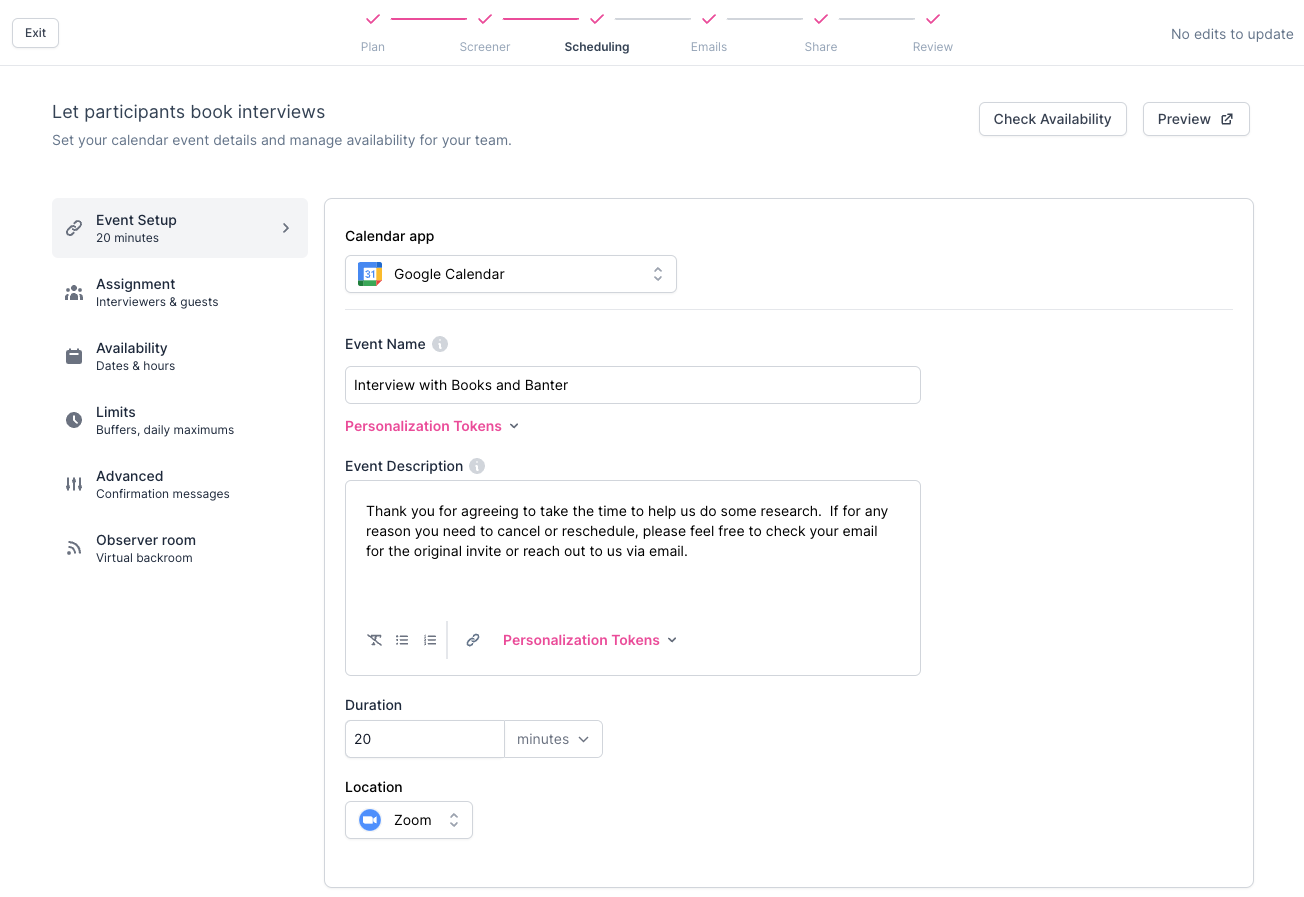
Add the Event Name and Event Description.
We suggest using Personalization Tokens to customize outreach, such as including "First Name" or "Interview Length (minutes)".
Set the interview Duration in minutes or hours.
Specify the Location.
Select 'Zoom', 'Google Meet', or 'Microsoft Teams' for online interviews with our integrations. Selecting one of these options is required to enable Observer Rooms.
Select 'Custom Location' for in-person interviews or to use an alternative video conference app.
For alternative video conference apps, include the link in the additional Calendar Location text field.
For in-person interviews, if the location for all in-person interviews for this Study will be the same, use the additional Calendar Location text field to add the physical address and room where interviews will take place, or leave this field blank to add later in location details for each event.
Select 'No Location' to exclude locations during scheduling and manually update the location later in your own calendar tool.
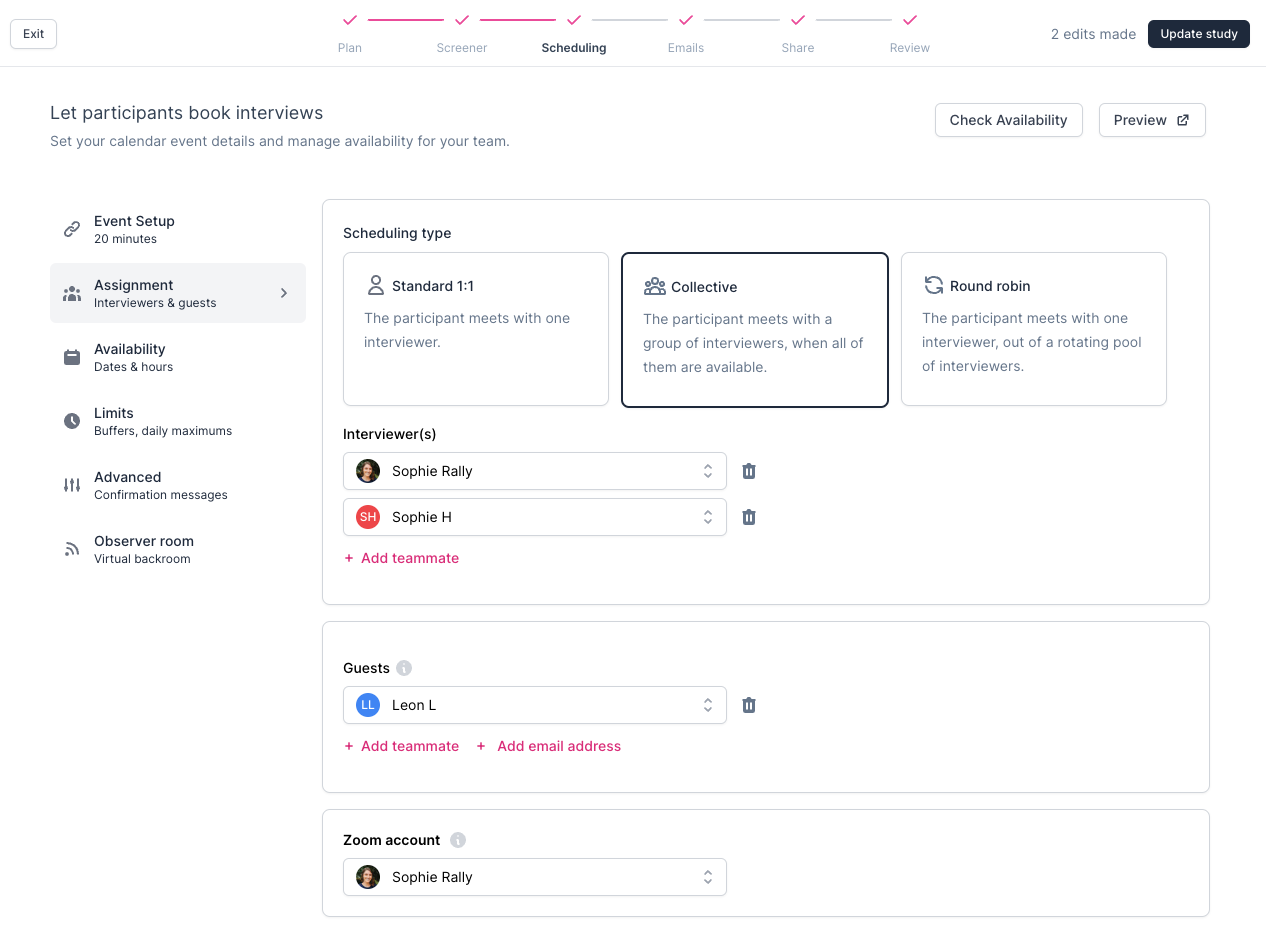
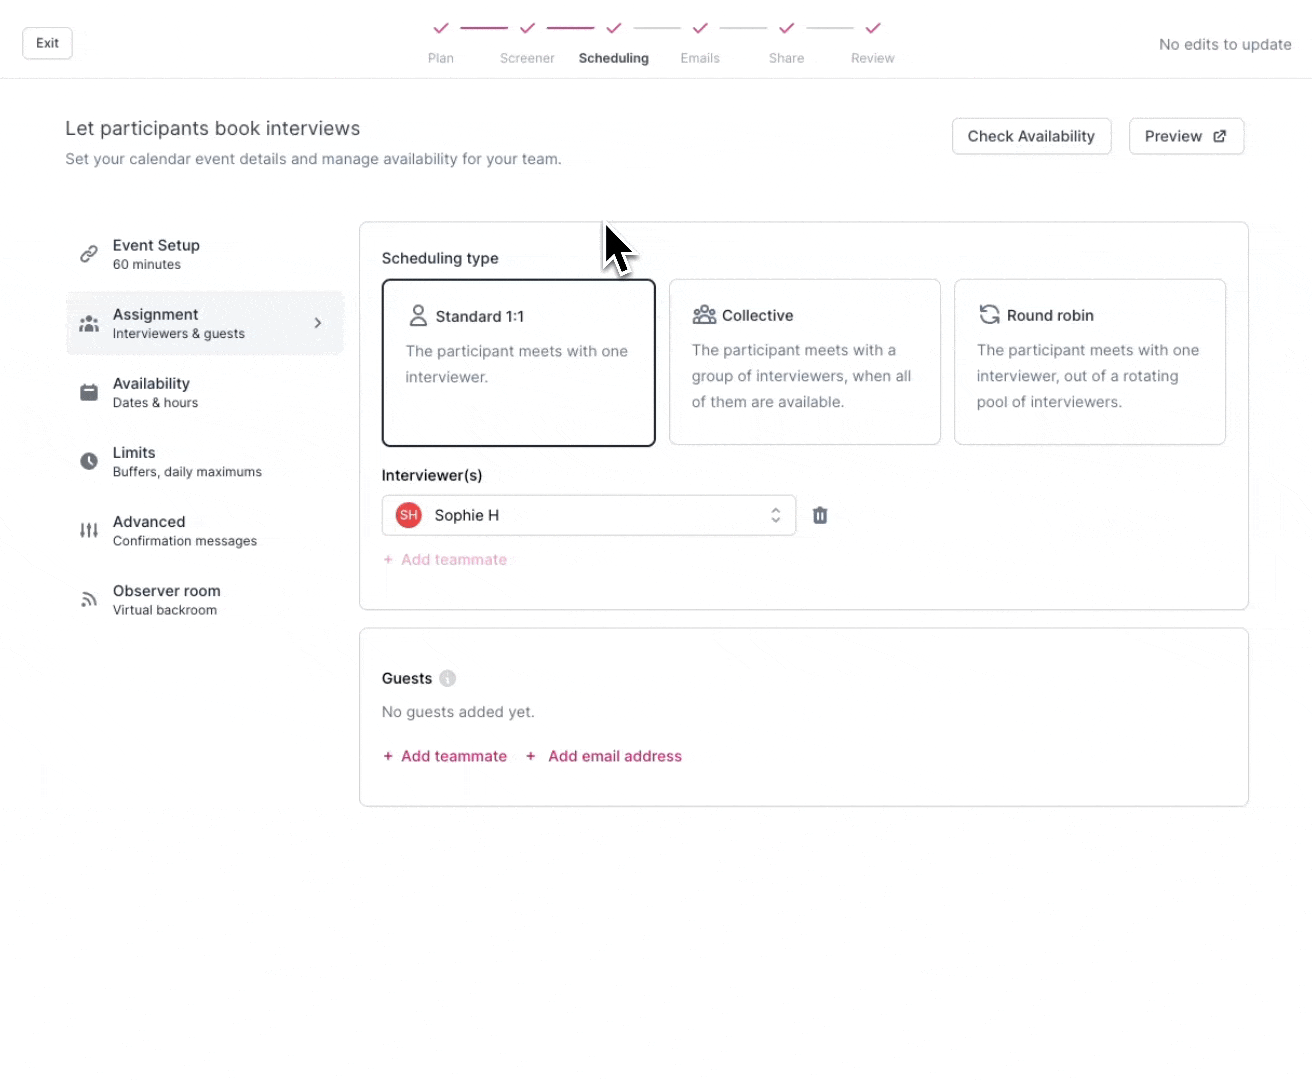
Assignment
Choose your Scheduling Type from the following 3 options:
Standard 1:1: The Participant meets with one interviewer.
Collective: The Participant meets with a group of interviewers when all of them are available.
The Rally Scheduler will only show Participants times when all interviewers are available, so this may result in less available timeslots if the interviewers have different schedules and/or are in different timezones, etc.
Round Robin: The Participant meets with one interviewer out of a rotating pool of interviewers.
As long as at least one of the hosts is available, Rally shows the slot as available. Then we randomly select one of the available hosts as the interviewer. This optimizes for the maximum number of available slots.
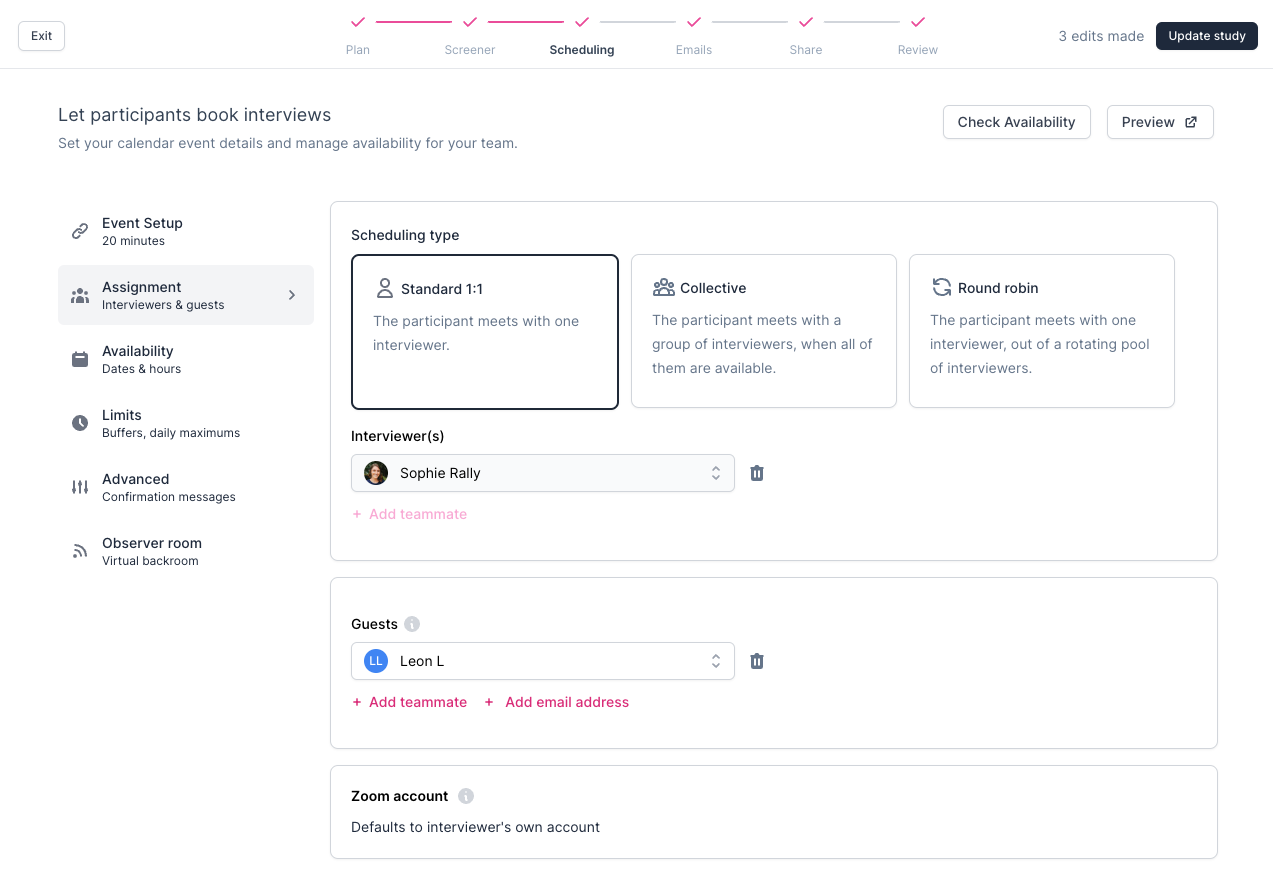
Add Interviewers.
By default, the person creating the Study will be set as the first interviewer.
Admins or managers can create a Study on someone else's behalf and assign another Rally user as the interviewer.
For Collective and Round Robin scheduling, include multiple Interviewers by selecting + Add teammate and selecting from the list or typing to search.
You can add other Rally users as "Interviewers" to consider their availability during scheduling as well, including Rally users with the Observer role type. Developers cannot be added as Interviewers as they do not have calendar connection capabilities, but they can be added as Guests. To include other users as attendees without having their availability affect scheduling availability for Participants, add them as Guests.
Optionally, you can also add Guests. Guests will be included in all interview invites, regardless of their availability and can include users without calendars connected.
Select + Add teammate to select from the list or type to search Rally users.
Select + Add email address to enter the email address of a teammate not on Rally to include as a Guest in the interview.
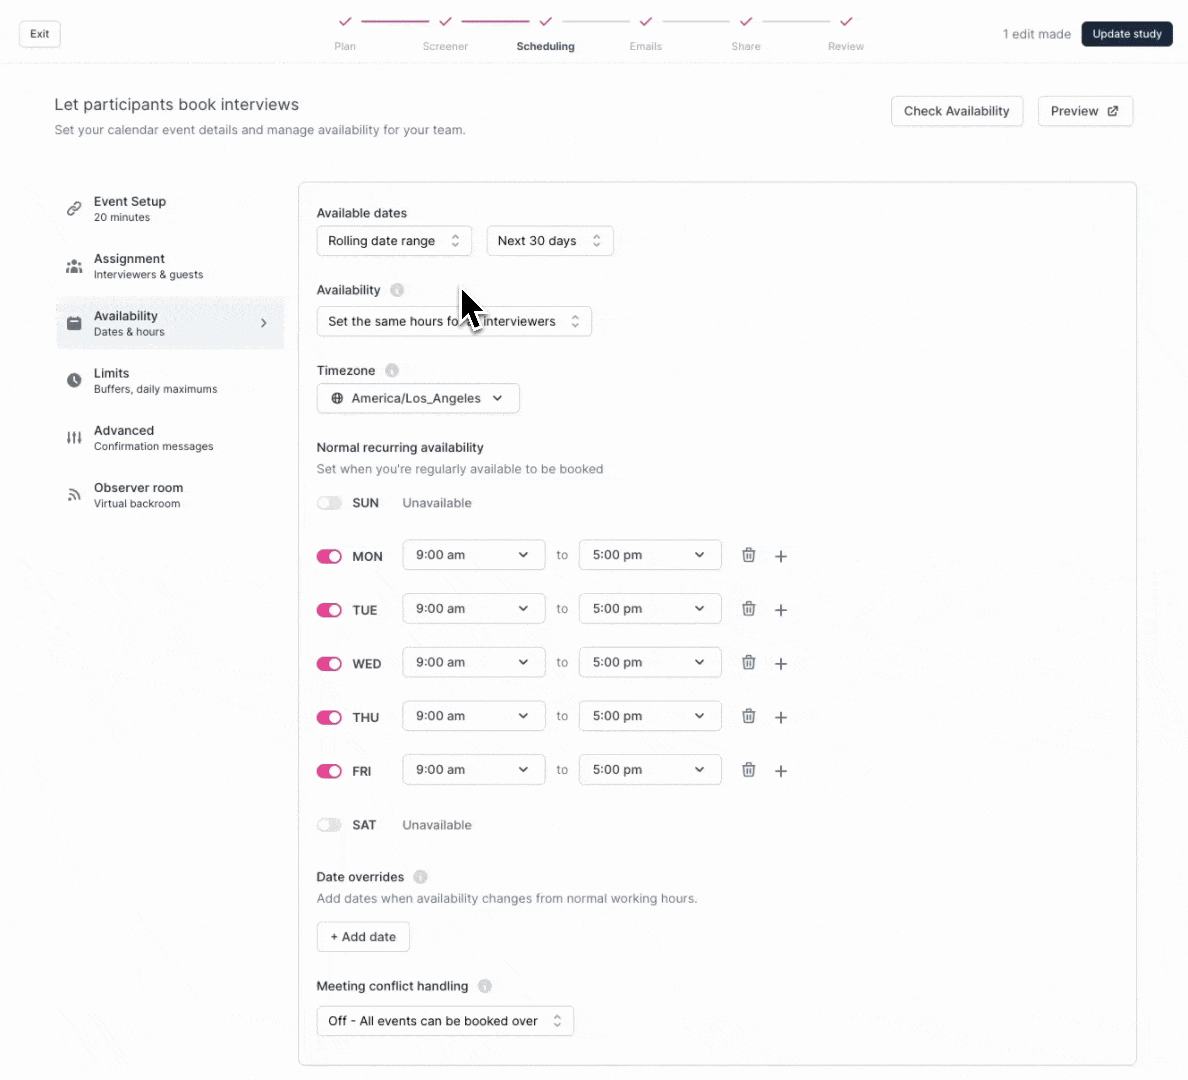
Availability
Available Dates: Select either a Rolling Date Range or a Fixed Date Range.
Rolling Date Range: This option allows you to book continuous interviews up to 3 months in advance by selecting the number of days available in advance.
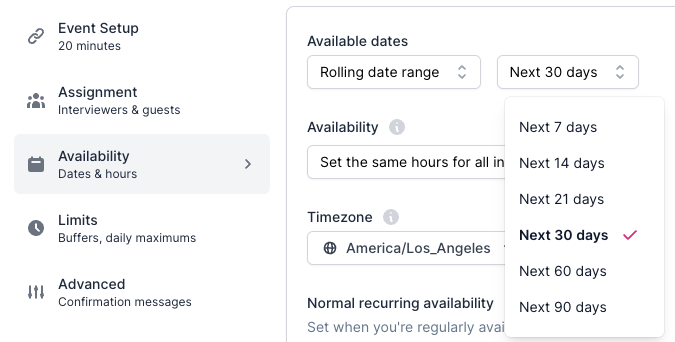
Fixed Date Range: Choose a specific start and end date.
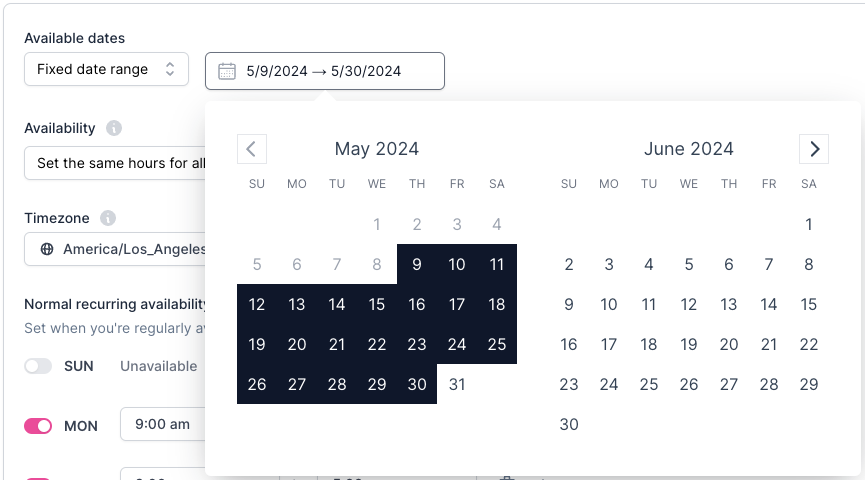
Any Participants trying to access the Scheduler to book time after the set date range has passed will see a "We're Fully Booked" page. You can always return to update or extend the dates by editing the Study.
Availability: Defaults to using each individual interviewer's Personal Schedules for availability, or set a Common Schedule for all interviewers.
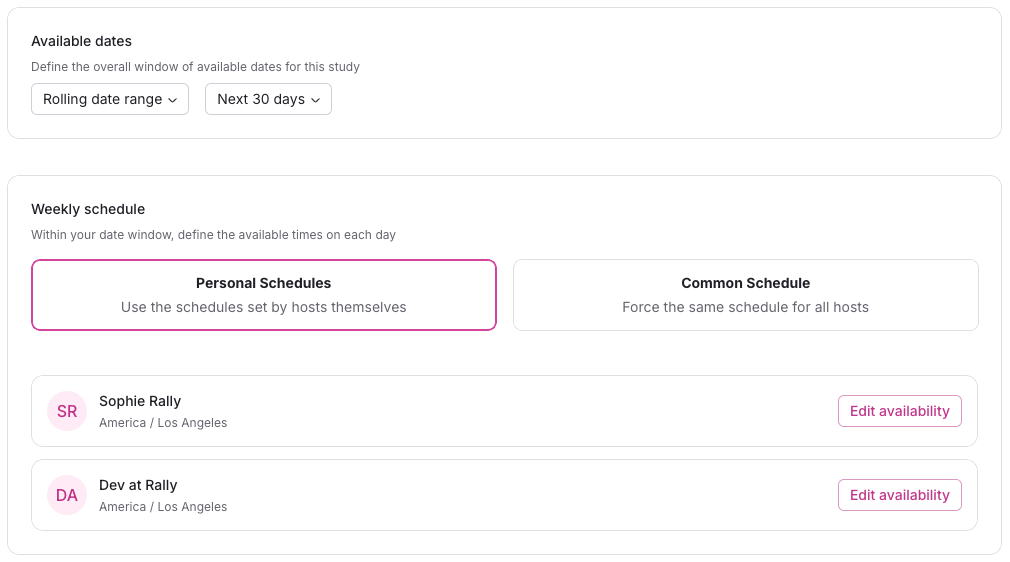
Personal Schedules: Use each interviewer's general availability, including Date Overrides for OOO, which can be customized by each Rally user in the Availability section of Settings.
If there are multiple interviewers, you can view their shared availability by clicking the Check Availability button in the top right corner.
If their shared availability is limited, Admins can override it to update an interviewer's availability. Learn more about Conflicts and Overrides.
Select Edit availability next to an interviewer to change and configure their personal availability for this study and Save changes to apply.
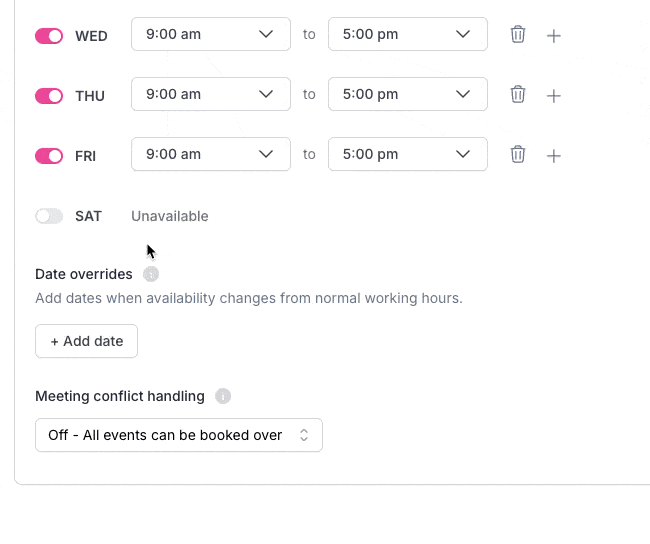
Common Schedule: Force the same schedule for all hosts by setting the days and hours you want interviews to be held. In the following steps, you can also select specific dates that override the common schedule and set the avoid meeting conflict setting.
If you selected Common Schedule, you have additional configuration options.
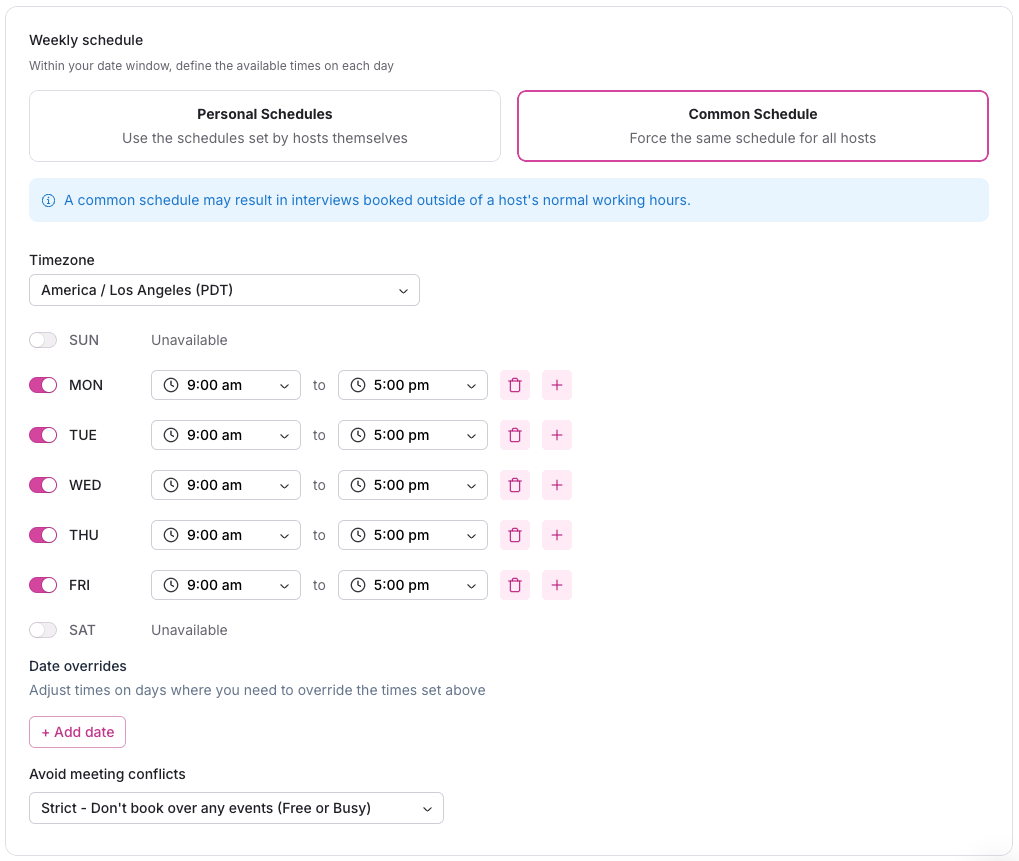
Select a default Timezone for this study, and set the available days and times.
Date Overrides: Add dates when availability changes from normal working hours.
This may include added availability on specific dates, reduced availability on specific dates, or blackout dates with no availability.
Add availability: Add date overrides with specific times to update that date's available timeslots to use those set here.
Block availability: Add date overrides with no specific times to mark that date as unavailable and remove all timeslots.
Avoid meeting conflicts: Decide how Rally's Scheduler treats your interview team's other calendar events when booking new interviews.
Default - Don't book over Busy events
This option will show tentative and "free" bookings as available.
Note: "Busy" bookings that have tentative ("maybe") or unconfirmed attendance will show as available with this setting.
Example: Company meetings you've been invited to but have not yet marked yourself as attending can be booked over by Participants.
Strict - Don't book over any events (Free or Busy)
This option will show any booking (even tentative) as unavailable.
Off - All events can be booked over
This option will not allow participants to schedule over Rally interviews from the same study, but may allow participants to schedule over Rally interviews from a different study. This can provide increased availability when you're on a time crunch, but proceed with caution!
💡 See our Scheduler FAQ for more detailed information on understanding why you may be seeing more or less availability than expected.
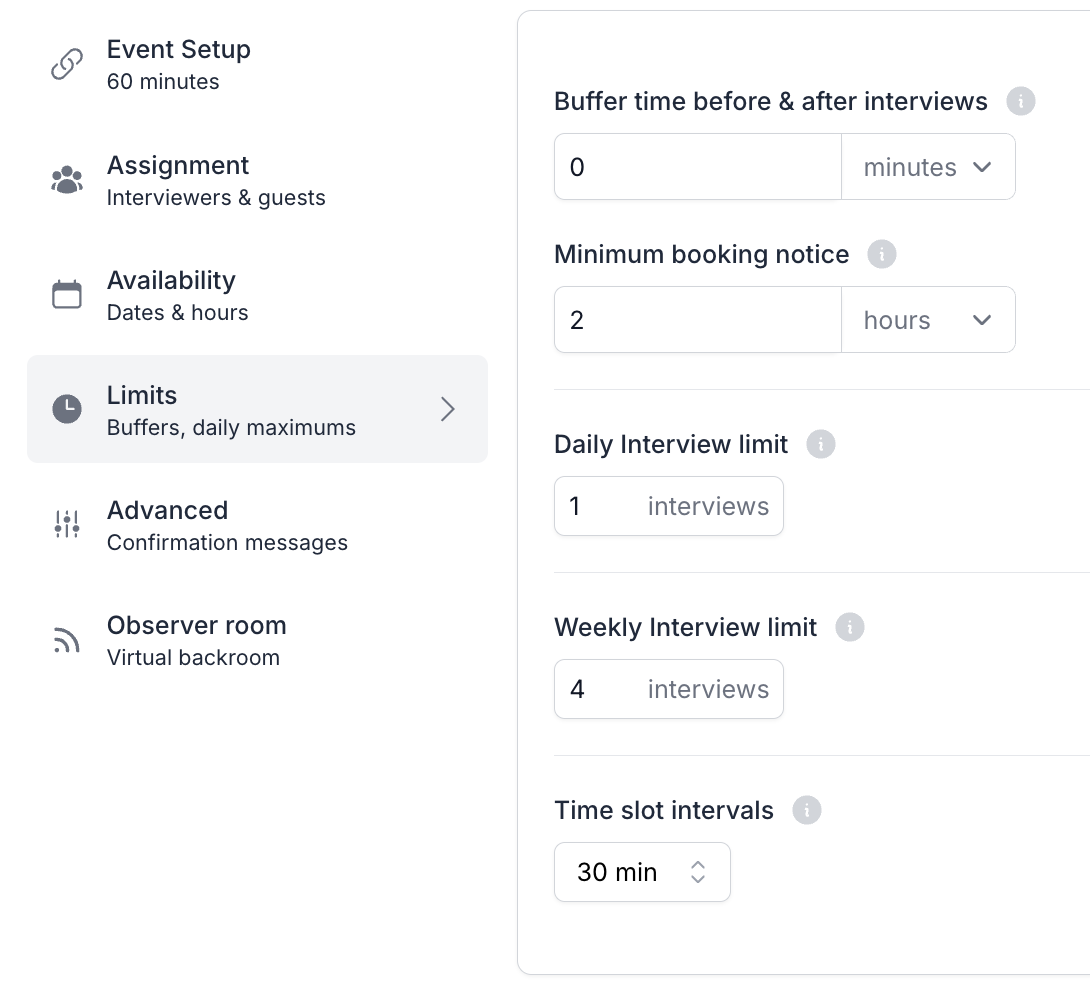
Limits
Buffer time before and after interviews: Optionally allow for preparation and wrap-up. When enabled, the buffer time will be included both before and after every scheduled interview, which may reduce the number of available interview time slots.
Minimum booking notice: Specify your preference for how far in advance an interview needs to be scheduled, such as 12 hours, to avoid last-minute booking surprises and allow time to prepare. Time slots within the minimum booking notice window won't be displayed to Participants.
Daily and Weekly Interview Limits: These rules can effect each other. For example, daily interview limit = 1 and weekly interview limit = 4 means that only 1 interview can be booked each day, until a total of 4 are booked for the week.
Daily Interview Limit: Restrict the number of interviews that can be booked on a given day for the study. Leaving it blank means unlimited interviews per day.
Weekly Interview Limit: Allows limiting the number of interviews to book in a given week for the study. No value means unlimited interviews per week.
Note: Interview limits are not currently available for Round Robin scheduling.
Time Slot Intervals: Set the frequency of available time slots on the booking page. For instance, with 30-minute intervals, time slots are available at 9:00, 9:30, 10:00, etc. Smaller increments will provide more available options for Participants.
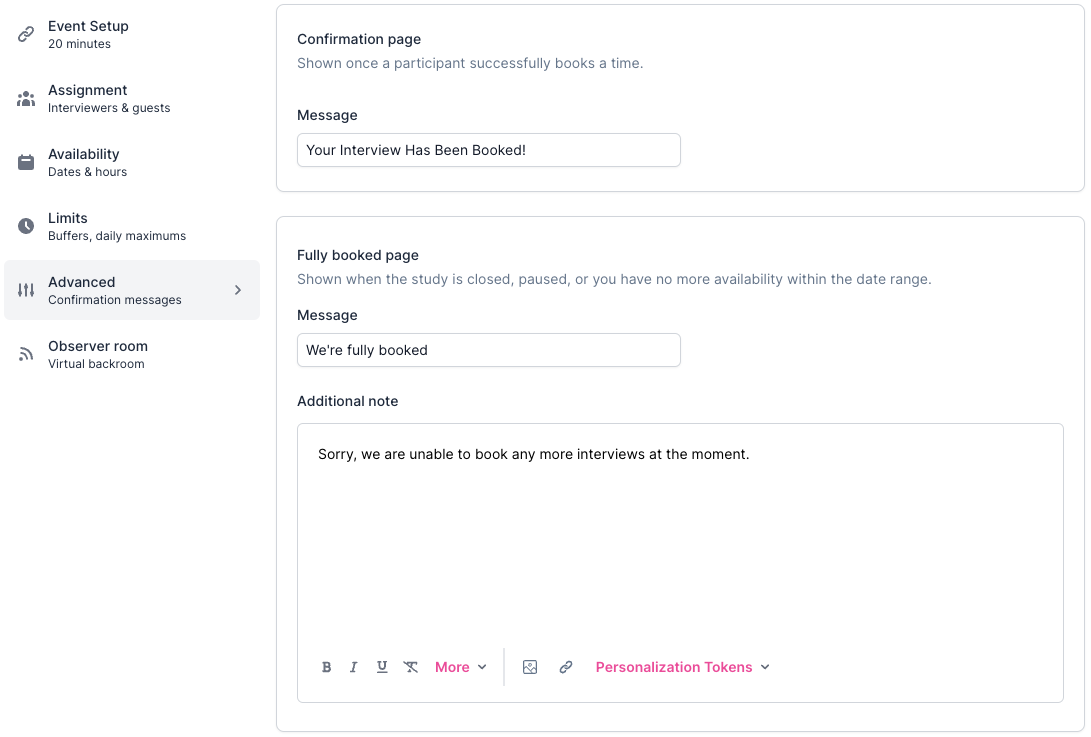
Advanced
Customize the Participant's view after booking an interview or once the study's interview limit is reached.
Confirmation Page: Edit the message shown once a Participant successfully books a time.
Fully Booked Page: Edit the message shown when the Study is closed, paused, or you have no more availability within the date range.
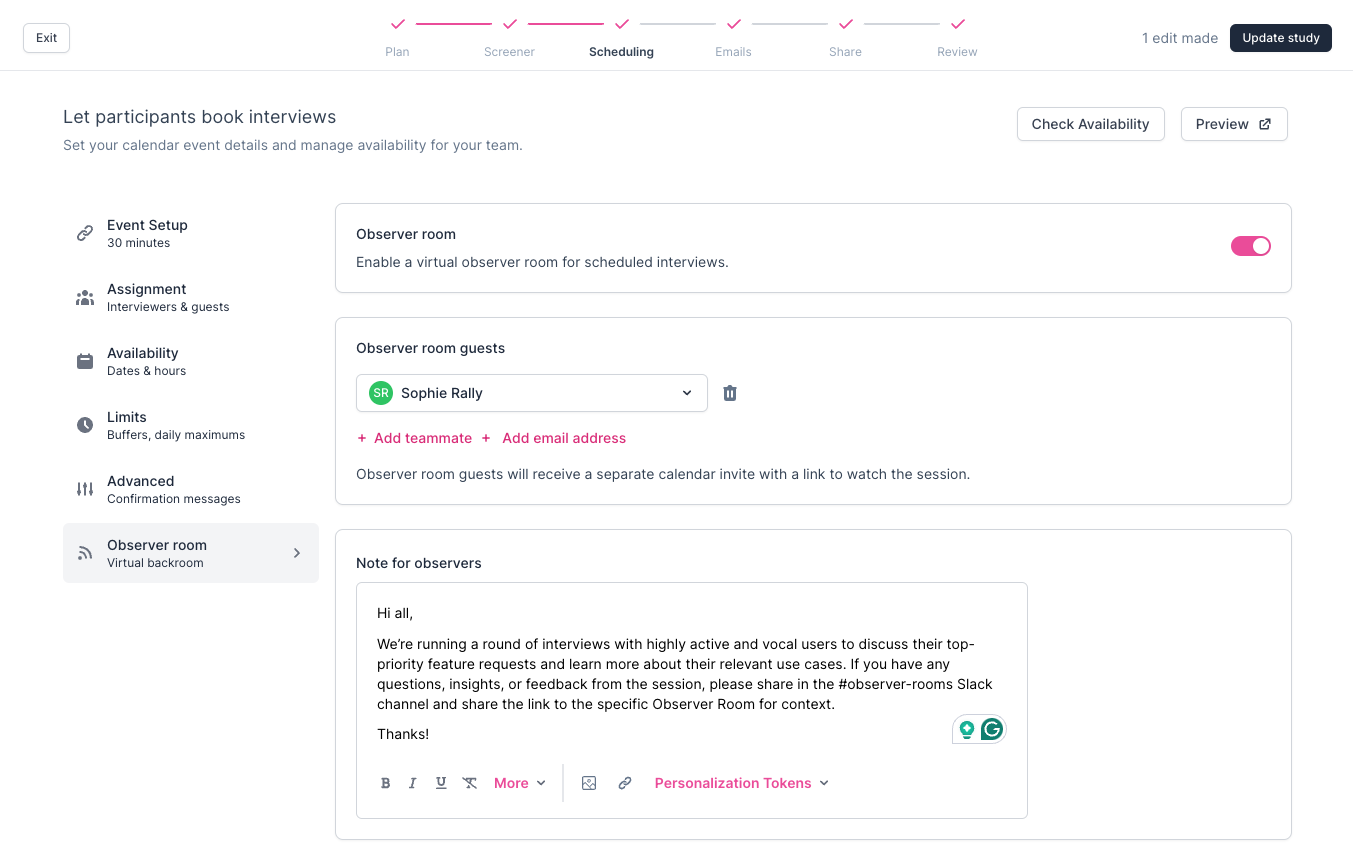
Observer Room
Optionally, enable a virtual Observer Room to invite stakeholders or teammates to view a live stream of your user research interviews without distracting Participants. Enabling Observer Rooms requires having either Zoom, Google Meet, or Microsoft Teams set as the interview Location in the 'Event Setup' section.
Enable Observer Room
Toggle on the Observer Room to continue with setup.
Observer Room Guests
Select '+ Add Teammate' and type or select their name from the dropdown.
Select '+ Add Email Address' to input any email address of teammates or stakeholders that do not have a Rally account in your workspace.
Note for Observers
Add a custom message for the Study that only Observers will see during the livestream.
This is a great place to add context on the specific research you'll be conducting during this interview, or to let Observers know where they can best share their thoughts and feedback on the session.
Once interviews are scheduled, if you are the interviewer, you will see both your scheduled interview event and your Observer Room event on your calendar.
Learn more about Observer Rooms and Observer Room Settings.
Become a scheduling expert by learning about Schedule Conflicts and Overrides.
Rally also allows the flexibility to Manually Book Interviews to bypass host availability, interview limits, and other scheduling restrictions, and log past interviews or interviews outside of Rally to ensure a Participant's history stays up to date.
Messages
💡 Preparing your emails upfront keeps your messaging consistent. You can always return to edit them later. We highly recommend setting up custom Email Templates (including specific templates for external panel recruitment) for your team in advance to save time and ensure approved communication is used in all emails. Email Templates can then be selected when reviewing and editing messages during the Email setup step.
💡As we currently do not support Respondent's in-app messaging feature, there is not yet a defined method for Participants to contact the researcher(s) if they encounter issues. We recommend including the email address of the main Study owner/creator in the automated messages email body when setting them up to allow invited applicants to reach out should they encounter issues.
As sending emails directly to external panel participants is not supported, the emails setup step of the Study building only includes the following Automated Messages:
Interview Confirmation: Automatically confirm the interview details to the Participant after successful scheduling. Includes links to cancel, reschedule, or confirm their interview.
Interview Reminder: Send one or more reminder emails to Participants before their interview. Includes links to cancel or reschedule. By default, new studies include two reminders: one at 24 hours before and one at 3 hours before the interview.
To add a reminder, select + Add reminder and set the send time.
To remove a reminder, select the delete icon next to any reminder.
Interview Cancellation: Inform Participants if their interview was canceled.
Note: Interview Confirmation & Reminder emails will include the meeting link and links to reschedule or cancel.
Edit and Preview Outreach Emails
Select the pencil icon next to each email to customize and carefully preview each one. 💡 Visit Email Templates for complete steps and additional important information.
Select Template: Select from pre-made Email Templates for consistency.
Layout: Select Plain Text or choose Branded for more professional outreach.
Subject: Edit the email subject as needed. Optionally, include Personalization Tokens to auto-populate such as Participant's First Name.
Body: Edit the email body as needed (less relevant for Email Templates). Optionally, further customize formatting and add Personalization Tokens to auto-include relevant information, such as Study Name, Incentive Amount, or Interview Details.
Include Unsubscribe Link: Include a link at the bottom of your emails allowing recipients to stay unsubscribed. It will help you stay compliant with local spam laws and improve deliverability. Unsubscribe links are required for branded emails.
Send Test: Optionally, send yourself a test email.
+ Save As New Template: Save any new email you create as an Email Template for later reuse.
Done: Select Done to close the editor.
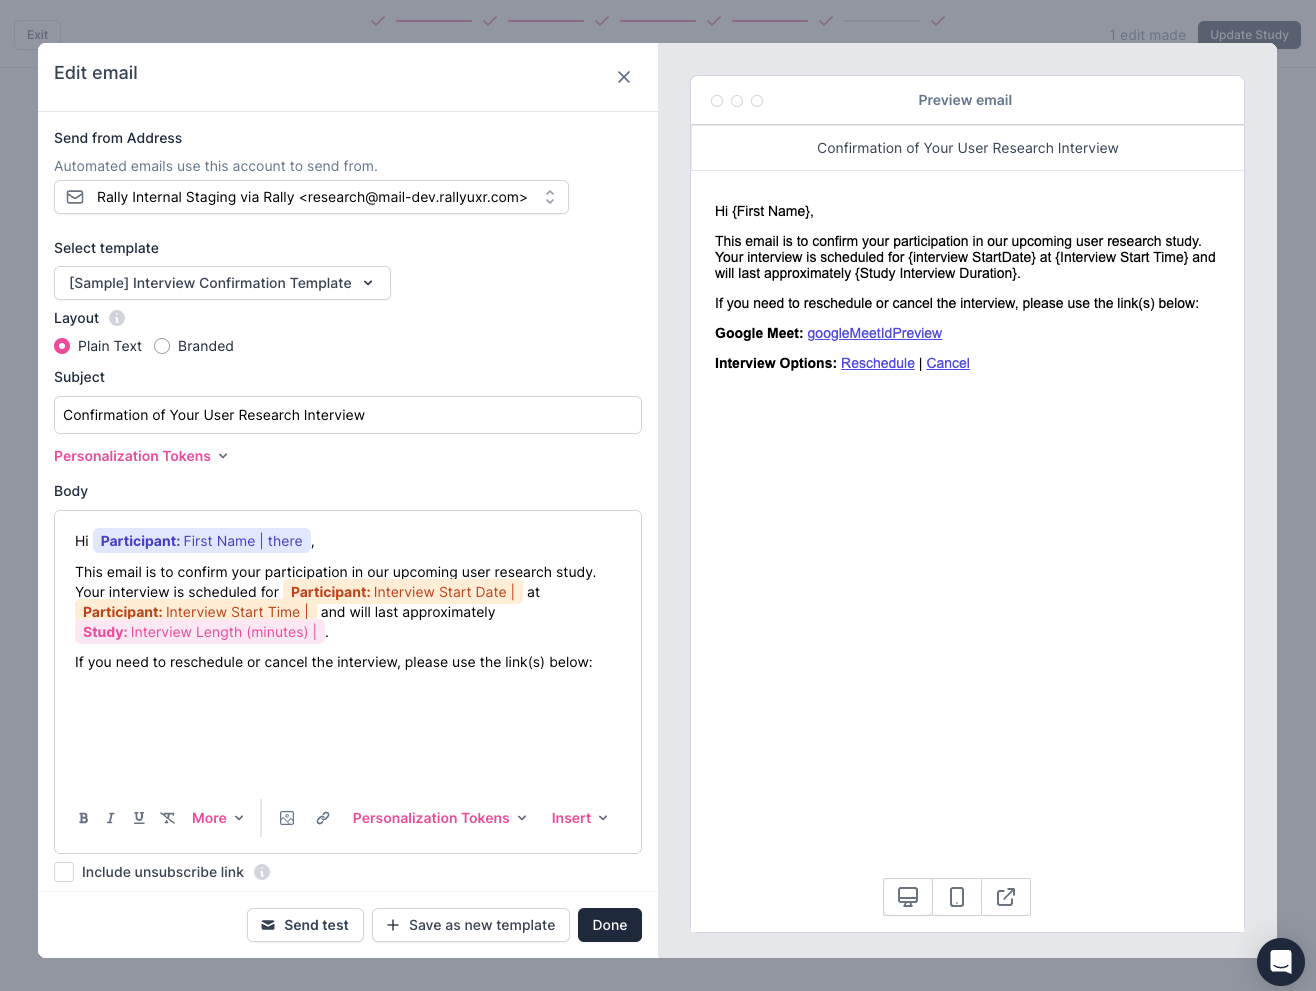
Carefully review each email to ensure everything looks correct before selecting the 'Next' button in the top right corner to continue.
Adding a confirm attendance link
You can add a confirm attendance link to any Interview Reminder or Interview Confirmation email to let Participants verify they're still planning to attend. When a Participant confirms, a double blue checkmark appears on their interview card in the Interviews view and in the activity feed.
To add a confirm attendance link to an email:
Select the pencil icon next to the reminder or confirmation email to open the editor.
Select Insert and choose Insert confirm attendance link.
Customize the link text or style it as a button as needed and select Save.
Review
Confirm everything is correct or add any missing info to ensure your Study is complete.
Review the core components of your Study: Rally will check for any known errors or missing details in your Study setup for you to make necessary edits.
Important core components to review for accuracy include team (which Rally users are included as teammates that can collaborate on this Study), recruitment type, study type, dates, length (# questions, duration of interview in minutes), interview limit, selected consent form, and incentive amount and type.
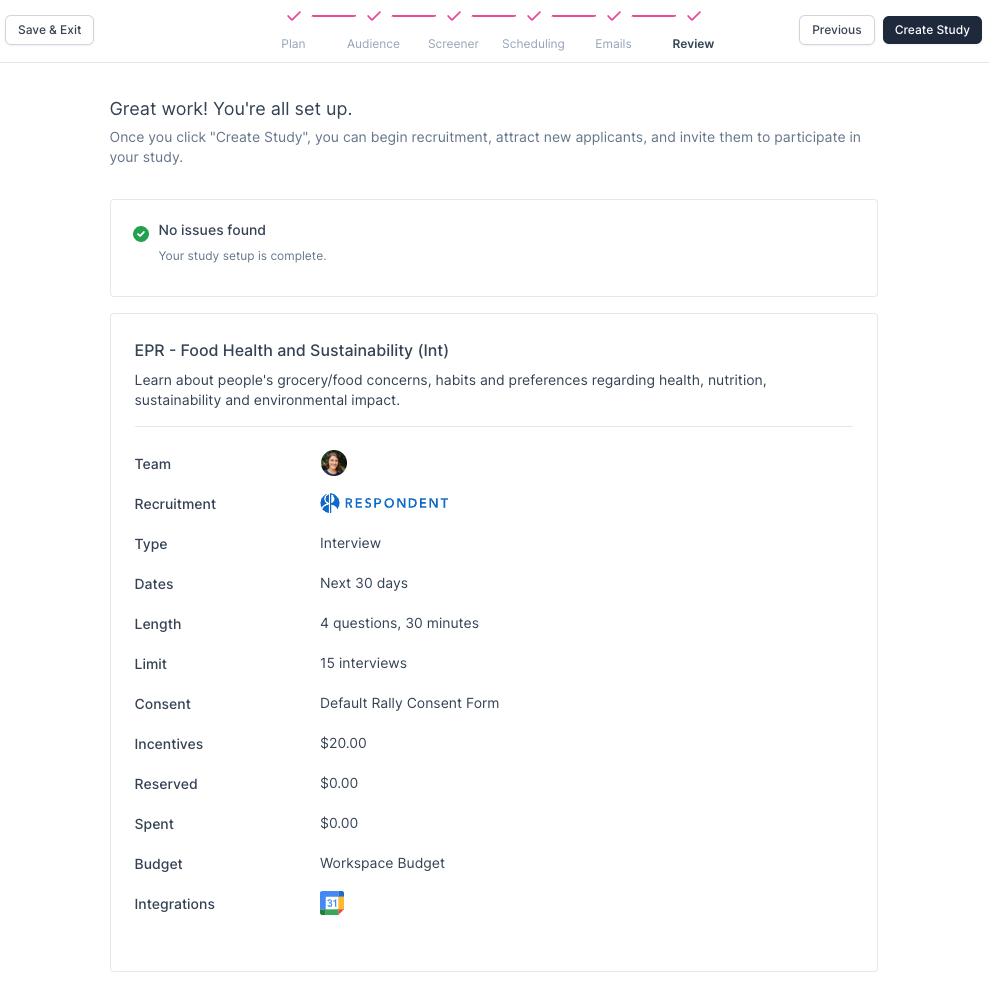
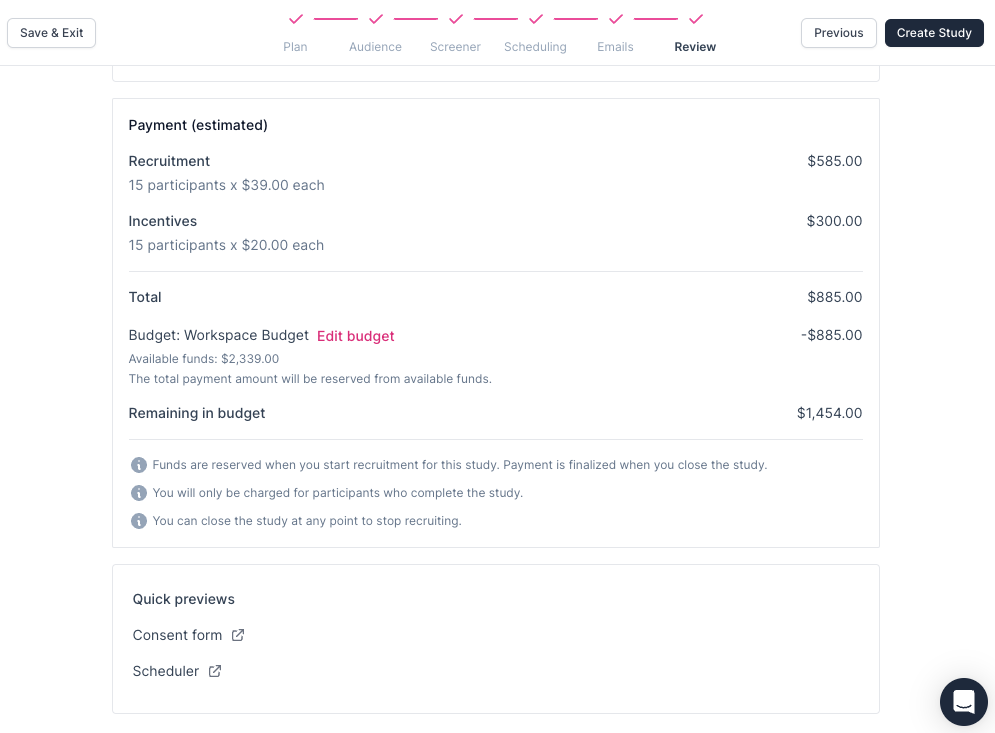
Review estimated costs: A calculation of the incentive and recruitment costs for the set participant limit number. You will only be charged for participants you've accepted who completed the Study, and you can close the Study at any point to stop recruiting.
Recruiting Participants via Respondent requires:
Incentives: The incentive amount is at your discretion, though higher incentives typically receive faster response rates.
Recruitment: A recruitment fee for every Participant you accept who completes the Study.
Available Funds: If the selected budget does not contain the required amount for this Study, you may select a different budget now, or wait to add funds via a credit card on file when you start recruitment in the next steps.
Quick Previews: You can preview different elements of your Study, such as the Consent Form or Scheduler, from the Participant's perspective by selecting the "Quick Previews" links at the bottom of the page.
Select 'Create Study' in the top right to launch the Study as "Active" and get started! This will not start recruitment or reserve funds yet.
If you're not ready to publish it, select 'Save & Exit' in the top left to save it in a Draft state to return later.
Recruitment
Starting recruitment on an external panel study can only be done by any Admin user, or by an Ops Manager user added to the study as a teammate.
Recruiting with Rally's Respondent integration allows you to configure the audience your Study is shared with in order to target participants by job title, industry, skills, demographics, location, and more, ensuring only the best participants. Building comprehensive and high quality screeners and using conditional logic in screener questions can help to prioritize reviewing "auto-qualified" applicants first when inviting applicants to a Study.
Review the general workflow in the steps below to familiarize yourself with the process.
In Rally: Create an Interview Study with Respondent Recruitment.
In Rally: Review billing & start recruitment on your Study to go live in Respondent.
Funds will be "reserved" in the selected Budget when you start recruitment.
In Respondent: Relevant applicants submit screener responses to be reviewed.
In Rally: Review applicant profiles and screener responses and invite or reject.
In Respondent: Invited applicants schedule interviews with Rally.
In Rally: View and conduct interviews with selected conferencing integration.
In Rally: Update successful Participants to "Complete & Send Payment".
In Respondent: Incentives are automatically paid to Participants 24 hrs after interview completion if no action is taken by the researcher in Rally.
Note: After interview completion, there is a 24 hour window for you to mark as No Show or report before a Participant is marked as completed in Respondent.
In Rally: Update Study status to "Closed" to finalize payment & stop access.
Any unused reserved funds are released and returned to "Available" in the selected Budget after Closing the Study and finalizing payment.
How Recruitment Works & Best Practices
Start Recruitment
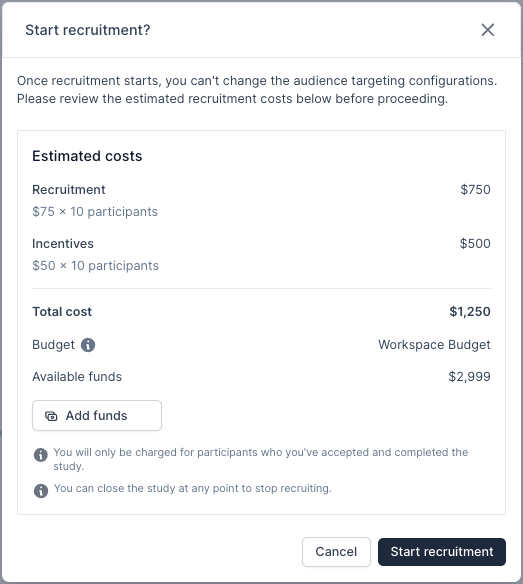
Once your Study has been published, you may be ready to start recruitment. Once recruitment starts, you can't change the audience targeting configurations or incentive amount or increase the participation limit, so thoroughly review your selections in the Study editor before proceeding. Starting recruitment immediately reserves the total estimated costs from the Budget. When you update the status to "Closed" to complete your Study, any unused reserved funds will be restored to available Budget funds.
You must have enough funds in the selected Budget to cover the total estimated costs for this Study in order to start recruitment and reserve funds.
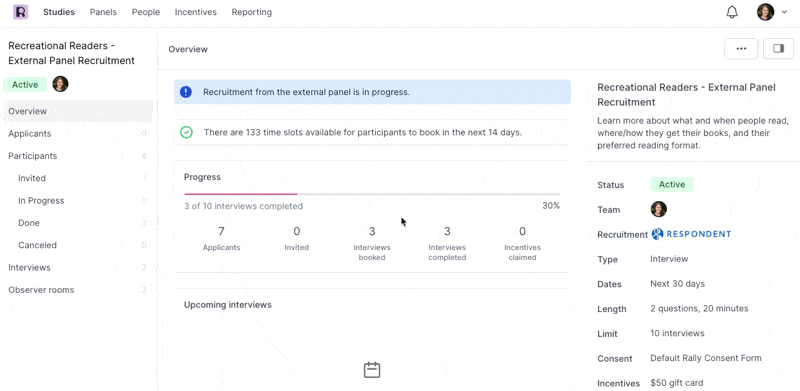
From the Study Overview, select 'Start Recruitment'.
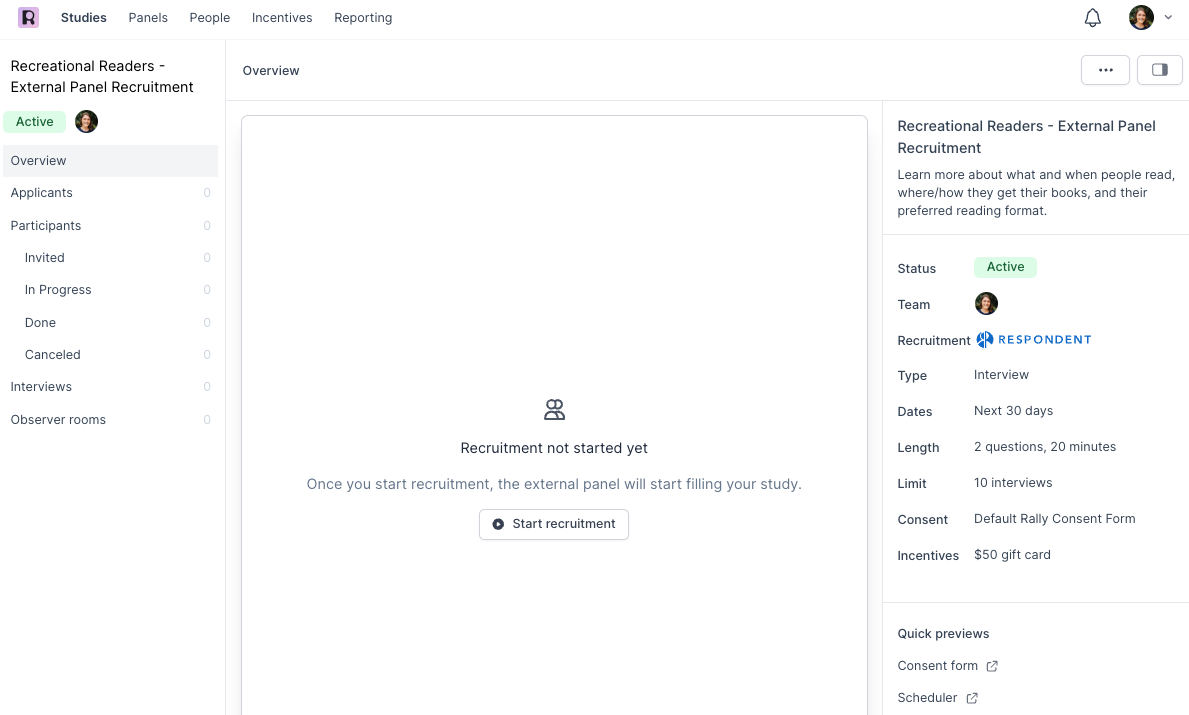
Review the estimated recruitment costs before proceeding. If the selected budget does not contain the required amount for this Study, you may select 'Add Funds' to add funds via a credit card on file.
If everything looks correct, select 'Start Recruitment' to launch your Study on Respondent and begin allowing applicants.
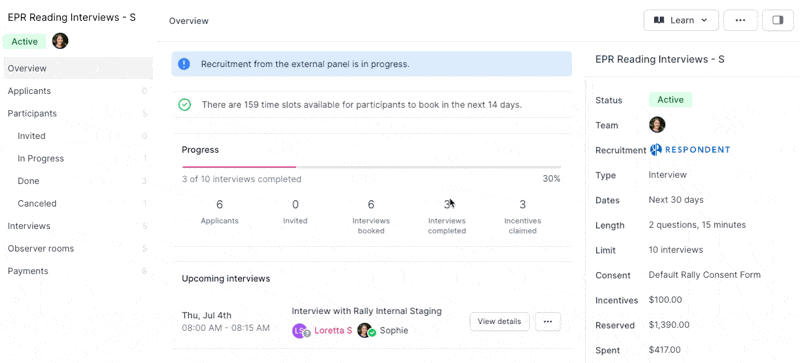
Once you start recruitment, you will see an alert that recruitment is in progress. Come back soon to review applicants and begin your research.
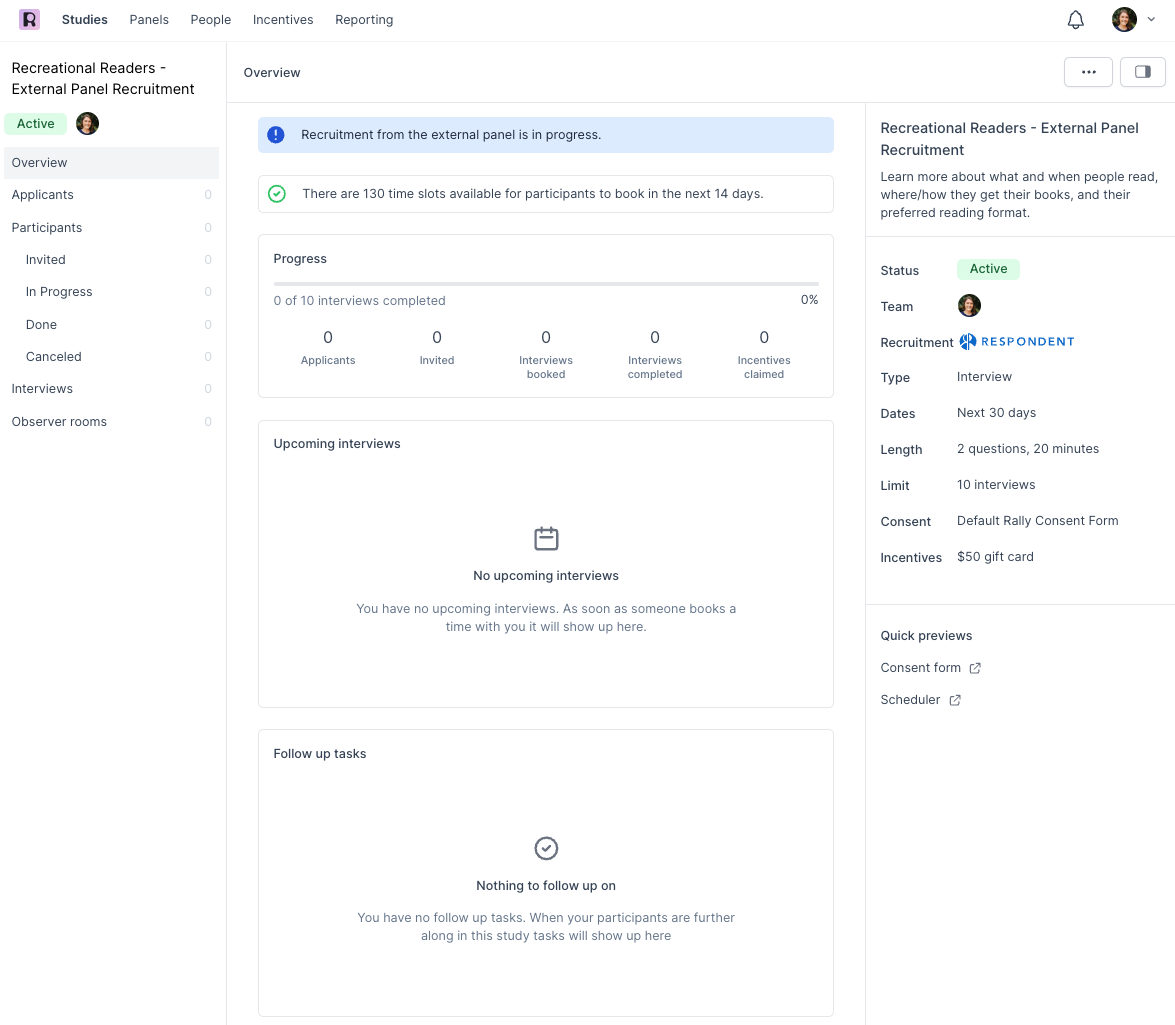
Estimated Payments & Running Total Spent
View the total estimated payment and breakdowns by incentives and recruitment fees from the bottom of your Study Overview.
From the Study Details right side panel throughout the Study, view the set incentive amount, amount of reserved funds, amount spent, and the associated Budget.
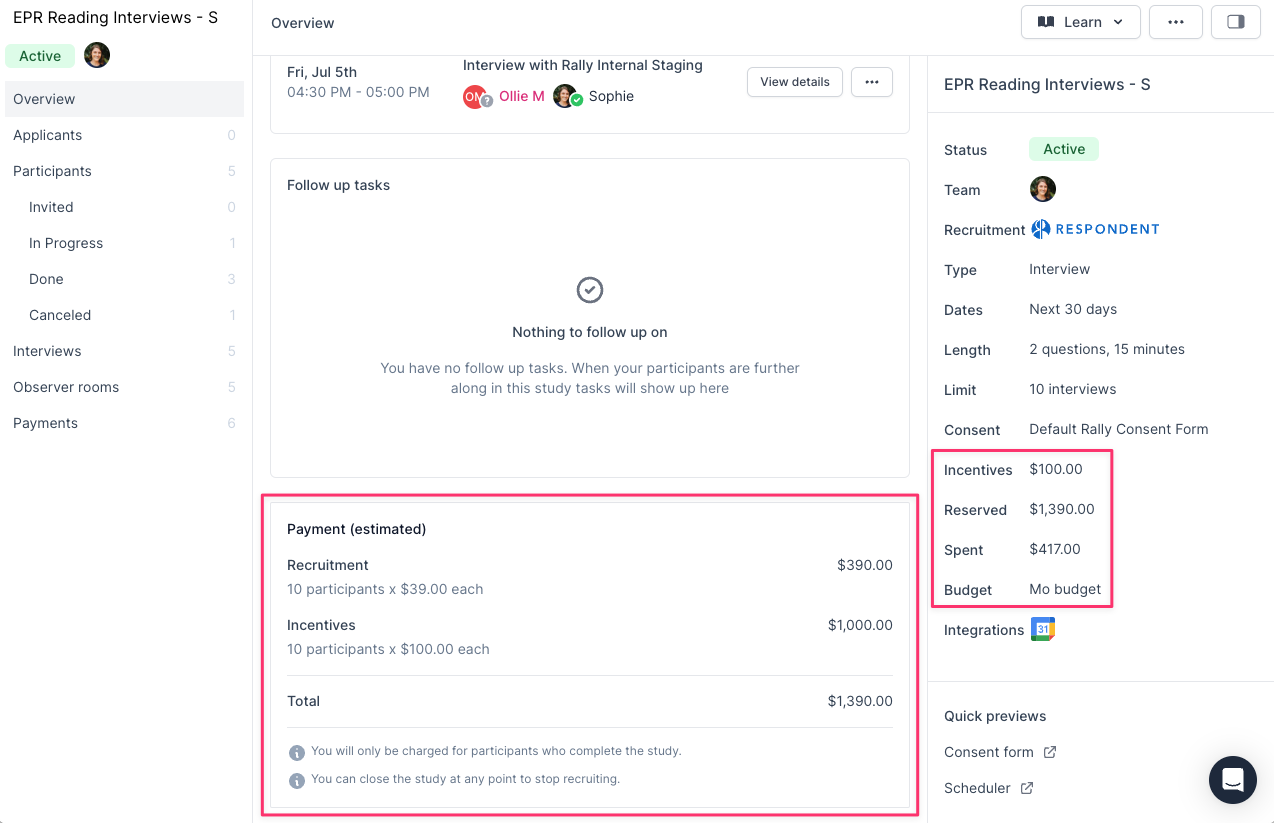
Note: After completing your research and closing this Study, the Study Overview will update automatically to show the final billing details and a receipt will be emailed.
Note: Studies will stop accepting participants once the participant limit is met. (# of Participants that have completed the Study matches the participation limit)
Stop Recruitment
Studies will automatically stop accepting new applicants once the participation limit is met. You can also stop recruitment at any time by updating the Study Status to Paused (temporary) or Closed (permanent). Please learn more about these updates in the Manage Study Status section below.
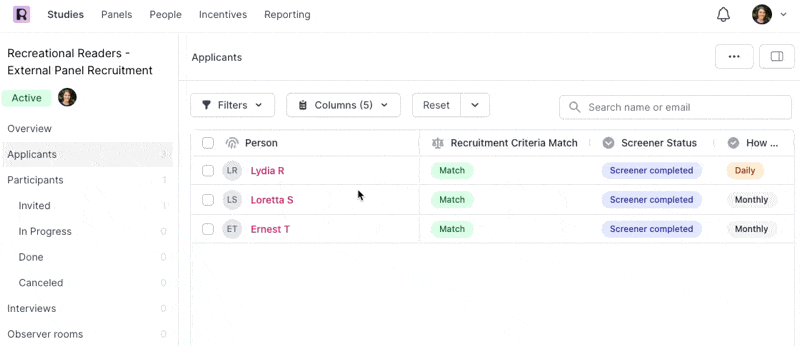
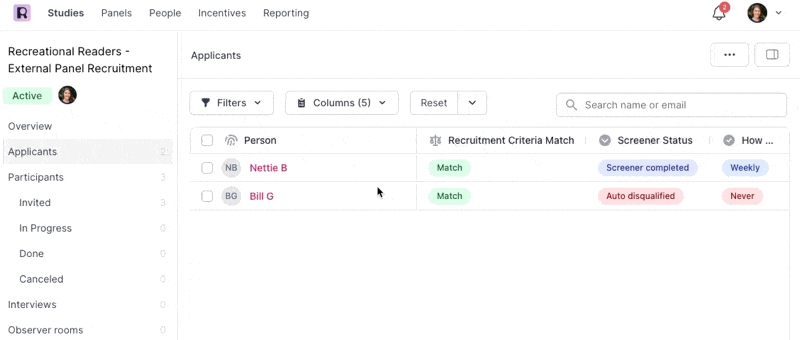
Review Applicants
Once you've started recruitment, you'll begin receiving applicants from Respondent. You will only be charged for Participants you've accepted who complete the Study. Invited applicants will receive an invitation email to schedule an interview.
Review screener responses to determine who to invite and reject.
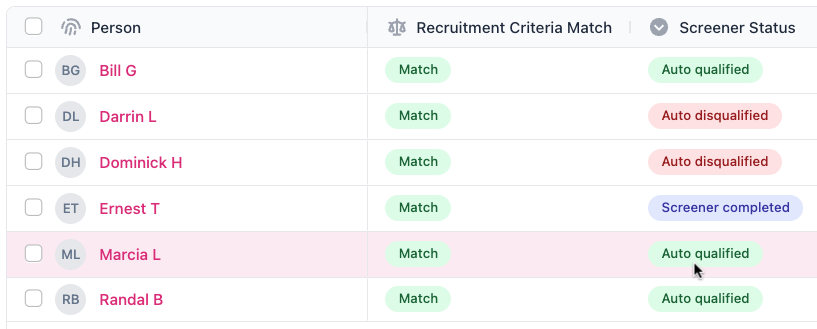
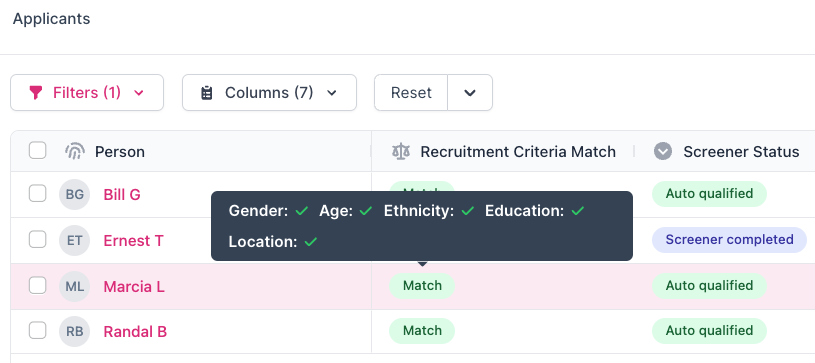
Review external profile details in Person Profiles to verify applicants. Hover over Recruitment Criteria Match results for a quick-glance.
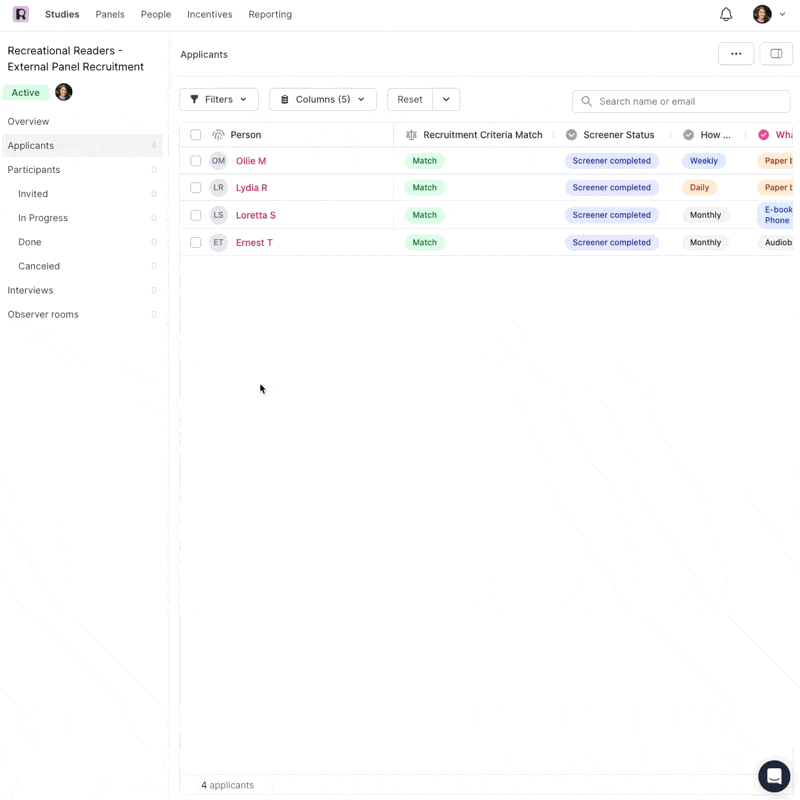
Navigate to your Study Overview and select 'Applicants' from the left side panel.
Hover over anyones Recruitment Criteria Match result to see at a glance which core demographics they do and do not match. Note: Any audience filters that you set to "Any" during Study setup will show as a match for all applicants.
Scroll to the side to view all screener responses.
Select a name to view an applicant's external profile and personal information.
Select the 'Screener Submissions' tab and select 'View Responses' to view an applicant's complete screener submission.
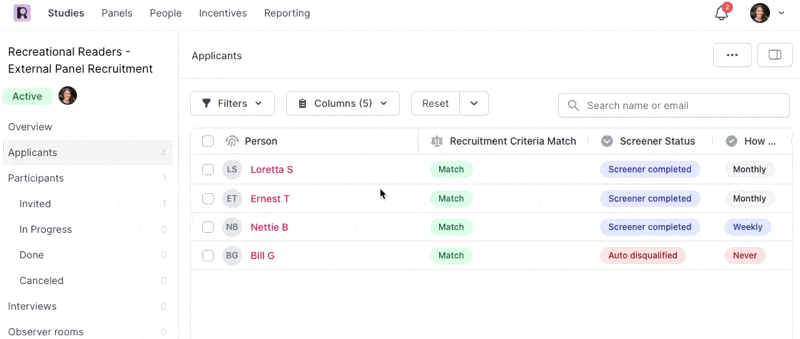
After reviewing all available information, invite or reject each applicant - one at a time, or carefully in bulk.
Invite Applicants
✓ Invited applicants will have their Participant Status in Rally updated to "Interview Invite Sent". This will update to "Interview Scheduled" once they book an interview.
Invite 1 applicant: Hover over their name to select the ✓ and select 'Invite applicant' in the popup to confirm.
Invite multiple applicants: Select the checkboxes next to each applicant.
Select the 'Invite to study' button at the top of the table and select 'Invite applicants' in the popup to confirm.
Reject Applicants
✕ Rejected applicants will be removed from your Study and no longer be visible in Rally.
Reject 1 applicant: Hover over their name to select the ✕ and select 'Reject applicant' in the popup to confirm. Rejecting an applicant is final.
Reject multiple applicants: Select the checkboxes next to each applicant.
Select the 'Reject from study' button at the top of the table, type in the number of applicants to reject for safety, and select 'Reject applicants' in the popup to confirm.
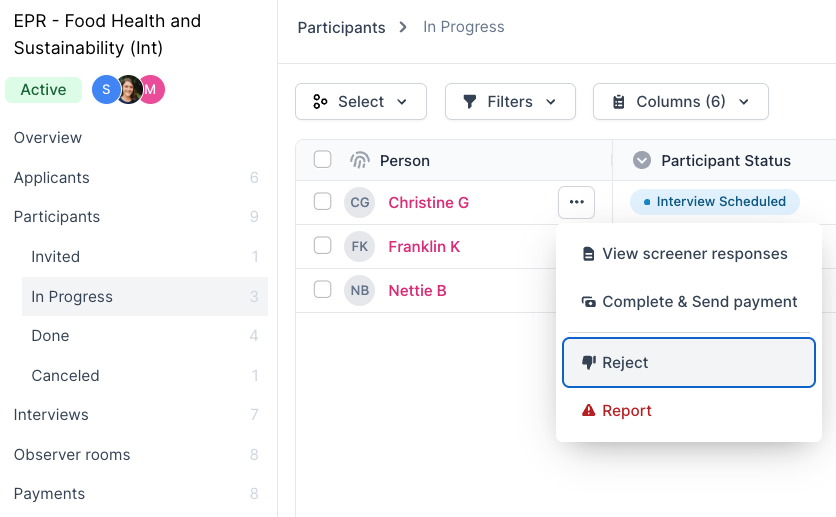
Reject Participants
Rejecting applicants or participants can be done at any point, even if they've already been invited to the Study and began. Please note that rejecting a participant cannot be reversed. We will not be able to issue refunds for participants rejected after being paid.
Conduct and Manage Interviews
Respondent Participants will stay informed through email notifications from Respondent when they are invited to schedule, when they receive a booking confirmation upon scheduling, if an interview is rescheduled or cancelled, a reminder email before their interview, confirmation if you manually marked them as having attended, and a notice if you marked them as no-show.
From Rally, view and conduct all scheduled interviews as usual. For more information, see Manage Interviews.
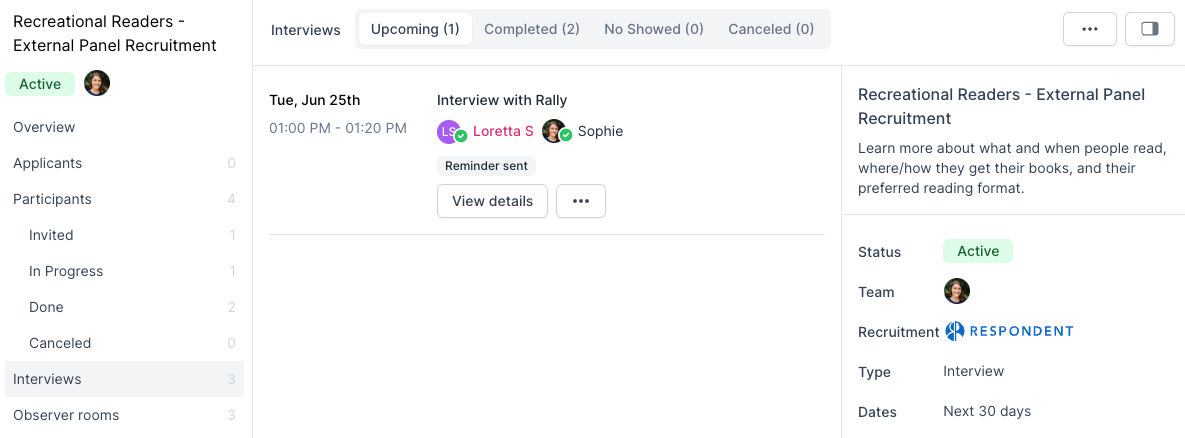
View Interview Activity and Event Details
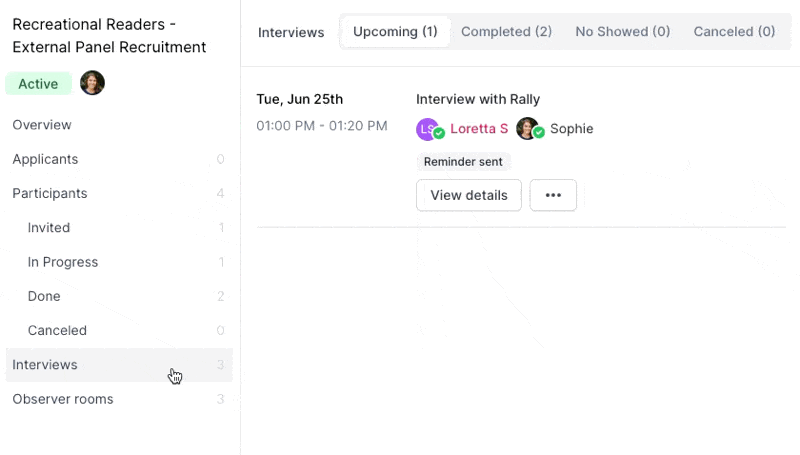
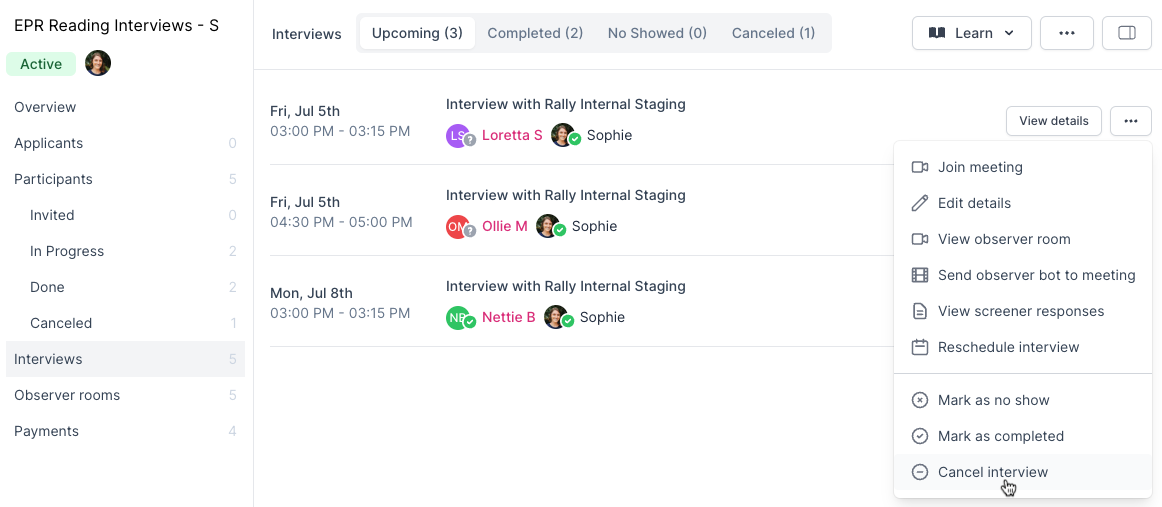
From within your Study, select 'Interviews' from the left sidepanel and select from the Interview Status tabs: Upcoming, Completed, No Showed, and Canceled.
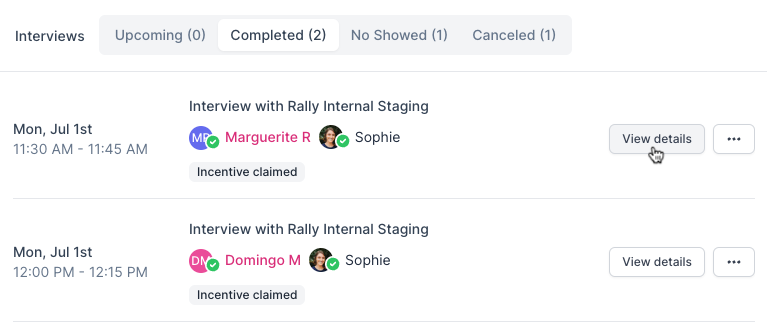
Select the 'View Details' button on any interview to see all event details including the meeting link, as well as view a timeline feed of activity that shows:
When and who scheduled the interview
When the Participant’s RSVP status changes
When any event details change
When the event is canceled, rescheduled, or marked as no-show
When the Participant receives an interview-related email:
“Confirmation” email
“Reminder” email

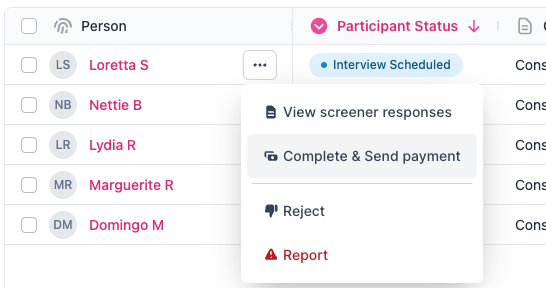
Mark as Complete & Send Payment to Participants
After an interview is done or the end time has passed, it will automatically move to the "Completed" tab. You are not required to manually mark them as completed or send their incentive as the incentive and recruitment fee for each Participant will be automatically logged and sent 24 hours after interview completion. However, we recommend taking this action right after a successful interview to close the loop and better manage your Study.
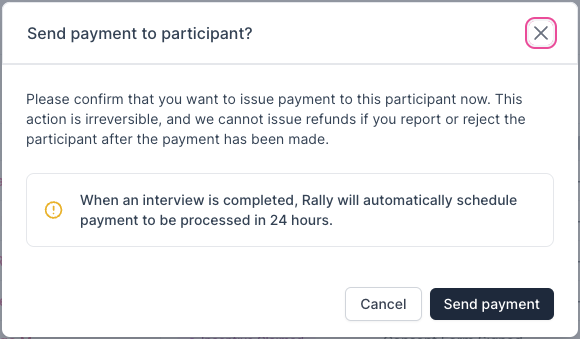
Manually mark a Participant as complete and immediately send payment after completing a successful interview. Be cautious as this action is irreversible and we cannot issue refunds if you report or reject the Participant after payment has been made.
Select the three dots ... next to their name and select 'Complete & Send Payment'.
Carefully review the confirmation message before selecting 'Send Payment'.
If the Participant did not attend, be sure to mark them as a No Show right away.
After an interview is completed or the interview end time has passed, there is a 24 hr hour window for you to mark a Participant as a No Show. You will not be charged an incentive or recruitment fee for Participants marked as No Show within 24 hours of the meeting.
Mark a Participant as No Show
No Shows must be logged within 24 hours of the interview start time.
Participants are automatically marked as completed once their interview end time has passed. If a Participant did not attend their scheduled interview, you have a 24 hour window from the original interview start time to mark them as a No Show. You will not be charged for No Shows logged within 24 hours of the interview start time. If you do not complete this action in time, you will be charged the full amount for this Participant.
In the Study Overview, select 'Interviews' from the left sidepanel.
Select the Completed tab from the top.
Navigate to the relevant interview and select the three dots ... to open the action menu.
Select 'Mark as no show' from the dropdown action menu (scroll down if needed).
In the popup, select 'Set as no show' to confirm.
Note: Participants marked as No Show will be removed from your Participants list, but their Interview booking and details will remain visible in the 'No Showed' tab.
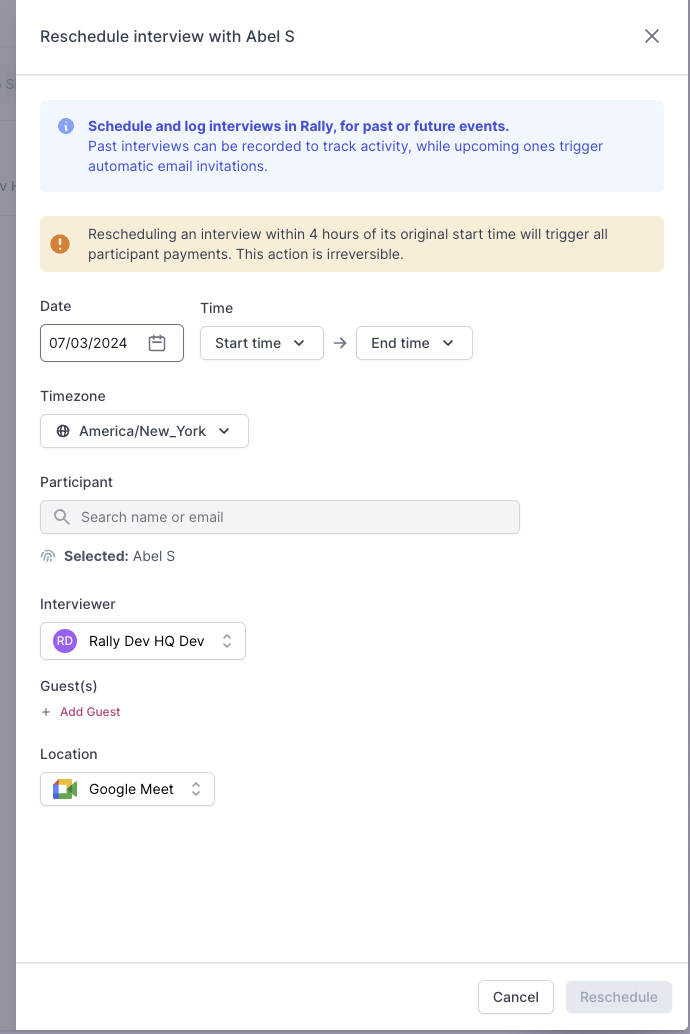
Reschedule Interview
If there is a scheduling conflict or change in availability, you can manually reschedule the interview with the Participant, which automatically sends a reschedule email with details.
Canceling an interview within 4 hours of its original start time will trigger all participant payments. This action is irreversible. Use caution before confirming.
Select Interviews from the left side panel and locate the relevant interview.
Select the three dots ... on the right and select 'Reschedule Interview'.

Fill in the correct date and times to reschedule to and ensure everything is correct.
Select 'Reschedule' in the bottom right to confirm.
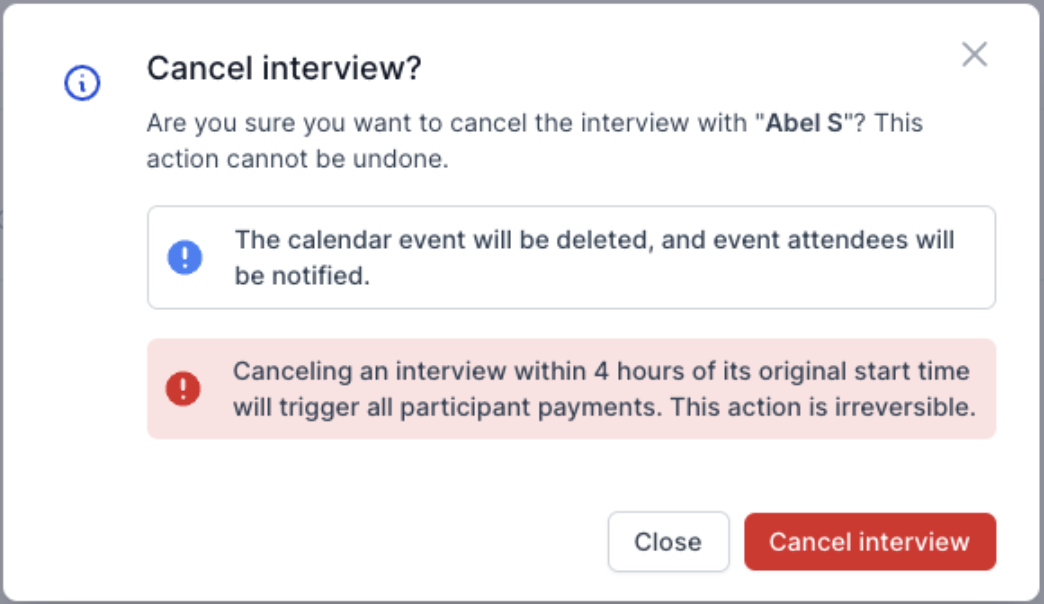
Cancel Interview
Canceling an interview is an irreversible action. Use caution before confirming.
If for any reason you need to cancel an interview, you can manually reschedule the interview with the Participant. We suggest exercising caution when canceling interviews as this action cannot be undone. Where relevant, consider rescheduling instead if you'd like to retain access to this participant within the Study.
Select Interviews from the left sidepanel and locate the relevant interview.
Select the three dots ... on the right and select 'Cancel Interview' at the bottom.
Carefully review the confirmation message before selecting 'Cancel Interview'.
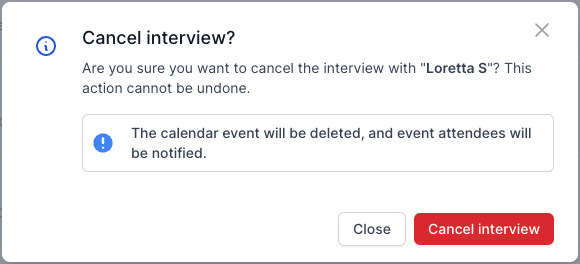
Canceling an interview within 4 hours of its original start time will trigger all participant payments. This action is irreversible. Use caution before confirming.
Report Participant
If you would like to remove an applicant or Participant from your Study, we strongly suggest using the "Reject Participant" action to remove them without payment.
If needed, you can anonymously report a Participant for misrepresenting themselves or providing false information. This Participant will be removed from this Study and will not appear in future projects with your workspace. Additionally, their account may be subject to disciplinary action by Respondent, which could include suspension or permanent removal.
Please exercise caution and discretion before reporting Participants as this action cannot be reversed and requires a valid reason and justification.
Select the three dots ... next to a person's name and select 'Report'.
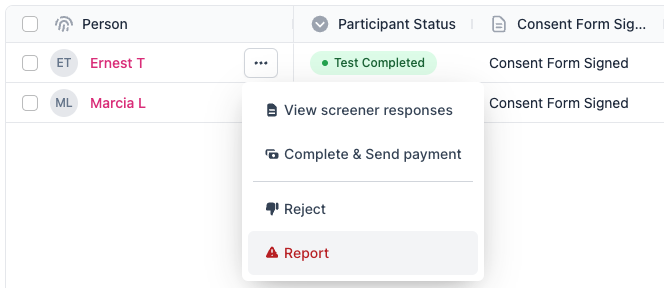
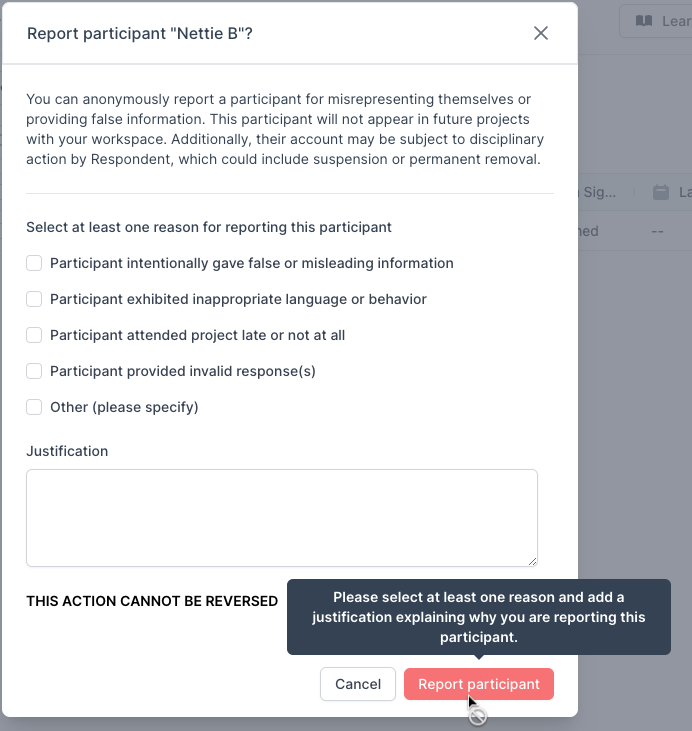
Carefully review all warnings and instructions in the popup to definitively confirm that reporting this participant is the appropriate action to take.
Select at least one (or more) of the following reasons for reporting this Participant:
Participant intentionally gave false or misleading information
Participant exhibited inappropriate language or behavior
Participant attended project late or not at all
Participant provided invalid response(s)
Other (please specify)
Provide a written justification for reporting in the text box.
Carefully review everything before selecting 'Report Participant' to confirm. This action cannot be reversed.
Completed Payments Per Study
While a combined total spent so far on this Study is visible from the Study Details right side panel throughout, you can also view all completed payments within the Study.
Select 'Payments' from the left side panel to view a complete log of payment activity, including the person, participant status, payment status, amount, sent at, and payment sender.
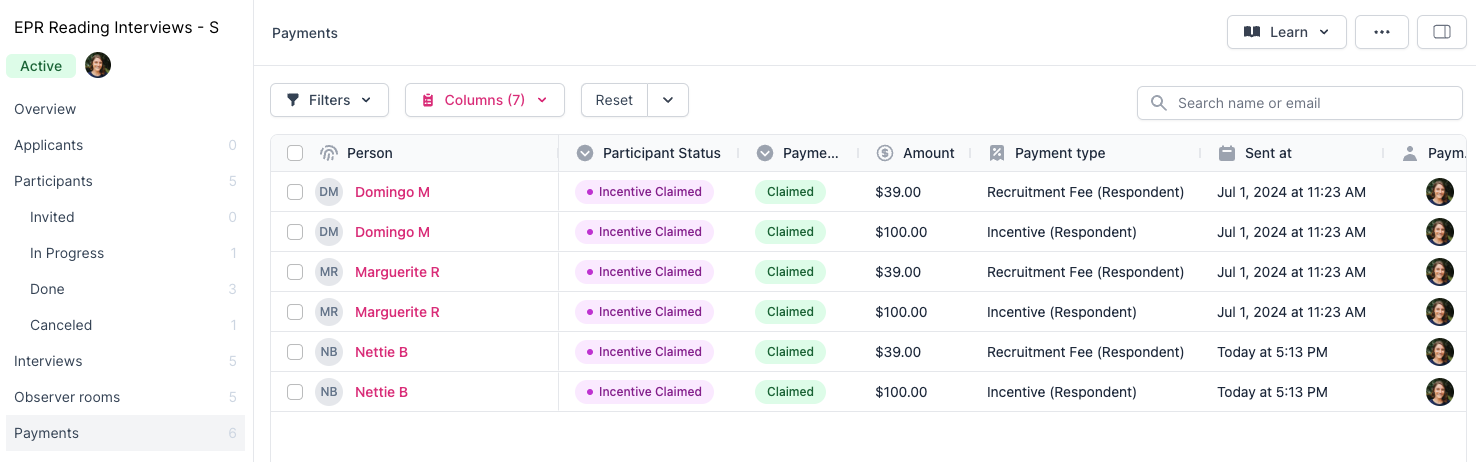
Select 'Columns' to search and add the "Payment Type" column to see which are incentives and which are recruitment fees.
Budgets: View all payments & reservations by workspace, or by Budget or Study.
Manage Study Status
Note: This Study will stop accepting Participants once it reaches the limit.
Update a published Study's Status to pause recruitment without closing the Study, return to Active to resume recruitment if the participation limit has not yet been met, or close the Study to stop recruitment and access to the test and release any remaining unused reserved budget funds. Follow the steps below to change the status of a Study, then keep reading for more information on each Status.
From the Study Overview, select the three dots button ... in the top right corner.
Select 'Change Status'.
In the popup, select an option from the Study status dropdown:
Continue reading each section below for more important information and warnings.
Confirm your choice by selecting 'Update'.
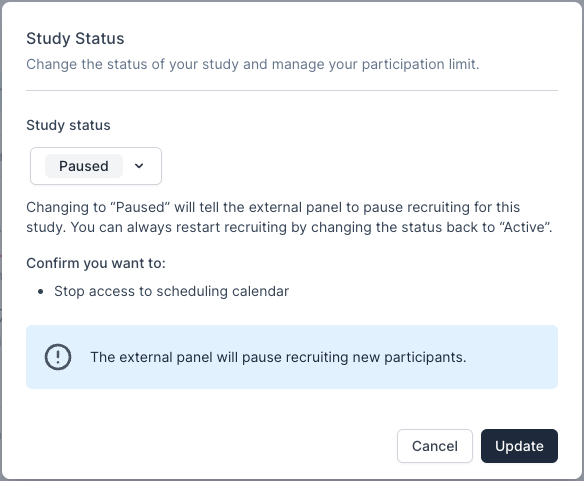
Pause Study
If you'd like to stop recruitment without closing your Study, you can update the Study Status to "Paused".
Changing to “Paused” will tell the external panel to pause recruiting for this Study. You can always restart recruiting by changing the status back to “Active”.
Reserved budget funds will remain reserved while paused.
Select the three dots button ... in the top right corner and select 'Change Status'.
In the popup, select 'Paused' from the Study status dropdown.
Select 'Update' to confirm and pause recruiting.
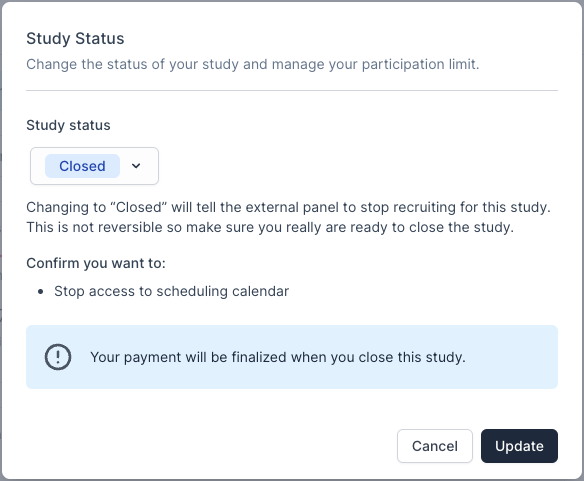
Close Study
After your participation limit has been met and all research is completed, you can update the Study Status to "Closed".
Changing to “Closed” will tell the external panel to stop recruiting for this Study, and will stop access to the scheduling calendar. This is not reversible so make sure you really are ready to close the Study.
Closing an external panel recruitment Study before the participant limit is met will release the remaining unused reserved budget funds for the # of participants not not met.
Select the three dots button ... in the top right corner and select 'Change Status'.
In the popup, select 'Closed' from the Study status dropdown.
Select 'Update' to confirm and irreversibly end this Study.
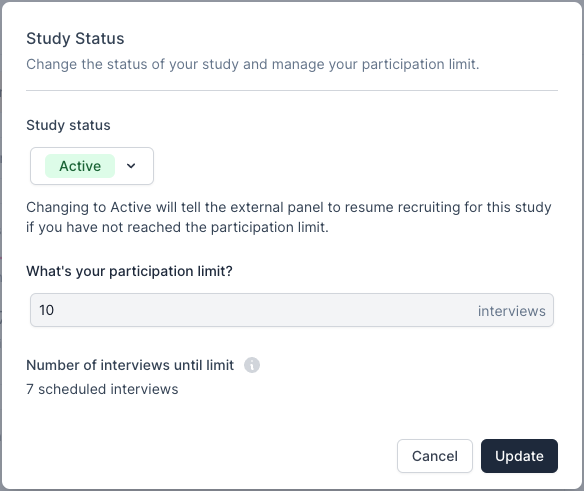
Unpause Study
If you paused your Study to stop recruitment without closing the Study, you can update the Study Status to "Active".
Changing to Active will tell the external panel to resume recruiting for this Study if you have not reached the participation limit.
Select the three dots button ... in the top right corner and select 'Change Status'.
In the popup, select 'Active' from the Study status dropdown.
Select 'Update' to confirm and resume recruiting.
Complete Study
Permanently stop recruitment and release any unused reserved funds to make them available again by closing your external panel recruitment Study.
Your Study is completed when you have finished all research activity with Participants and reviewed each Participants engagement or submissions to verify, and each one has been marked as completed and sent payment. You may decide that your Study is completed before or after your set participation limit is met.
To finalize your Study, you must Close it by updating the Study Status to Closed.
Update the Study Status to "Closed" after all research is completed. This is not reversible so make sure you really are ready to close the Study.
Changing to “Closed” will tell the external panel to stop recruiting for this Study, and will stop access to the scheduling calendar. Your payment will be finalized when you close this Study, and payments will be charged for any remaining Participants with completed interviews that were not yet paid.
Closing an external panel recruitment Study before the participant limit is met will release the remaining unused reserved budget funds for the # of participants not not met.
From the Study, select the three dots ... button in the top right corner.
Select 'Change Status'.
In the popup, select "Closed" from the Study status dropdown:
Carefully review the confirmation message before selecting 'Update'. This action cannot be undone.
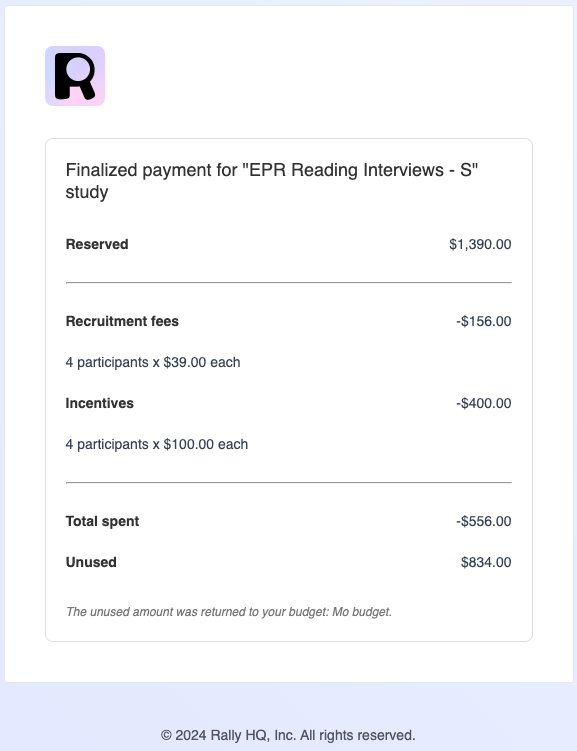
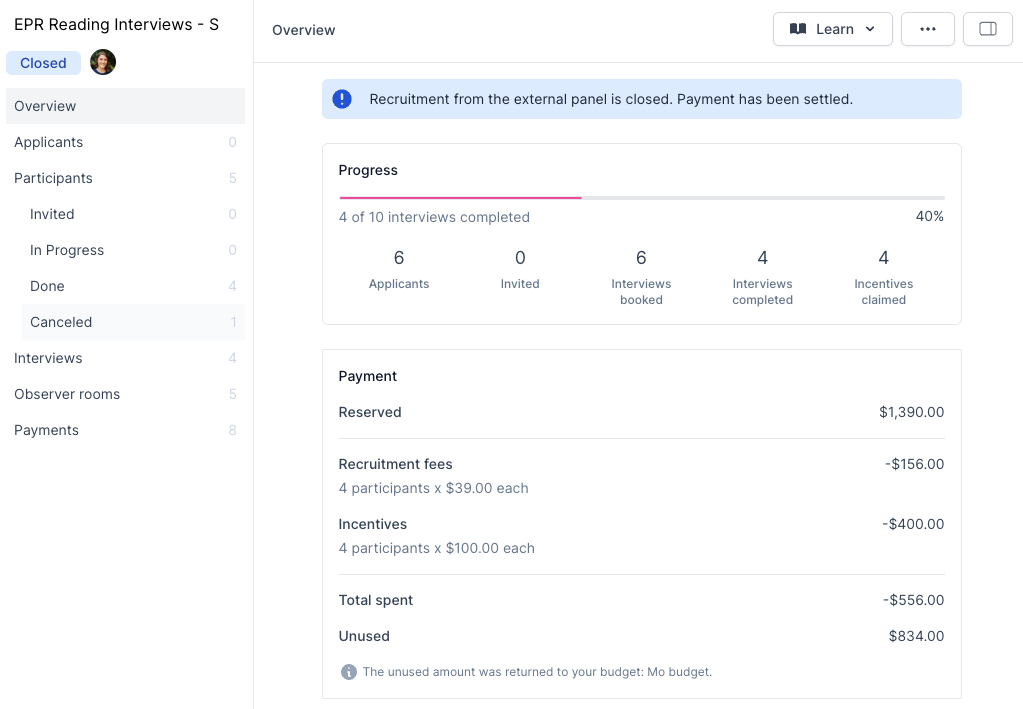
Once you close your Study, Rally will update your Study Overview with the final billing details. A final billing details receipt will also be emailed to the user who closed the Study. The following details will be included in your Study Overview and email receipt:
Reserved (total reserved when recruitment started)
Recruitment Fees - total deducted from budget
# participants x $ recruitment fee for each
Incentives - total deducted from budget
# participants x $ incentive amount for each
Total Spent (total final costs deducted from budget)
Unused (the unused reserved amount returned to your budget)
Budget associated
Finalized Payment Receipt Email
If you need an additional copy of this receipt, please contact Rally.
Finalized Payment in Study Overview of Closed Study
External Panel Recruitment FAQ
ℹ What if my project is not matched with enough participants?
If matches aren’t made in a reasonable amount of time, Respondent’s referral algorithm will find participants beyond its pool of 3 million with a potential reach of over 500 million.
ℹ How does Respondent prevent research participant fraud?
Respondent verifies participant work emails every 90 days, detects for screener response inconsistencies, features participant quality scoring and AI-powered monitoring, and more.
ℹ Are applicants/participants recruited from an external panel study with Respondent added to our workspace's people database?
No. Respondent applicants that apply to or participate in studies will not be added to your overall participant database. They will have a person profile in Rally, but it’s only accessible via that specific study and is tagged with the Respondent logo.