Start & Manage External Panel Recruitment
Last updated: November 26, 2025
Learn how to start, manage, pause, and stop recruitment on external panel studies. Understand total estimated costs before you start recruitment, track the running total spent as you conduct research, learn how to release unused reserved funds to make them available again and see finalized payment details after closing a study. Learn how to review, invite, and reject applicants.
Before Starting Recruitment
Start Recruitment
🚨 Starting recruitment on an external panel study can only be done by any Admin user, or by an Ops Manager user added to the study as a teammate.
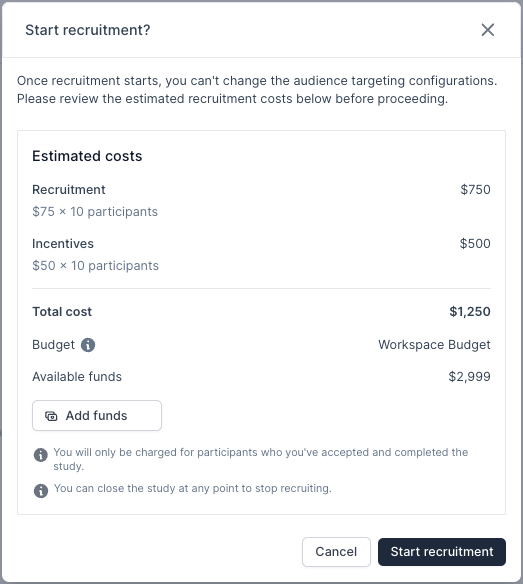
Once your study has been published, you may be ready to start recruitment. Once recruitment starts, you can't change the audience targeting configurations or incentive amount, so thoroughly review your selections in the study editor before proceeding. Starting recruitment immediately reserves the total estimated costs from the Budget. Later, when you update the status to "Closed" to complete your study, any unused reserved funds will be restored to available funds in your Budget.
🚨 You must have enough funds in the selected Budget to cover the total estimated costs for this study to start recruitment and reserve funds. Add funds.
Start Recruitment
From the Study Overview, select 'Start Recruitment'.
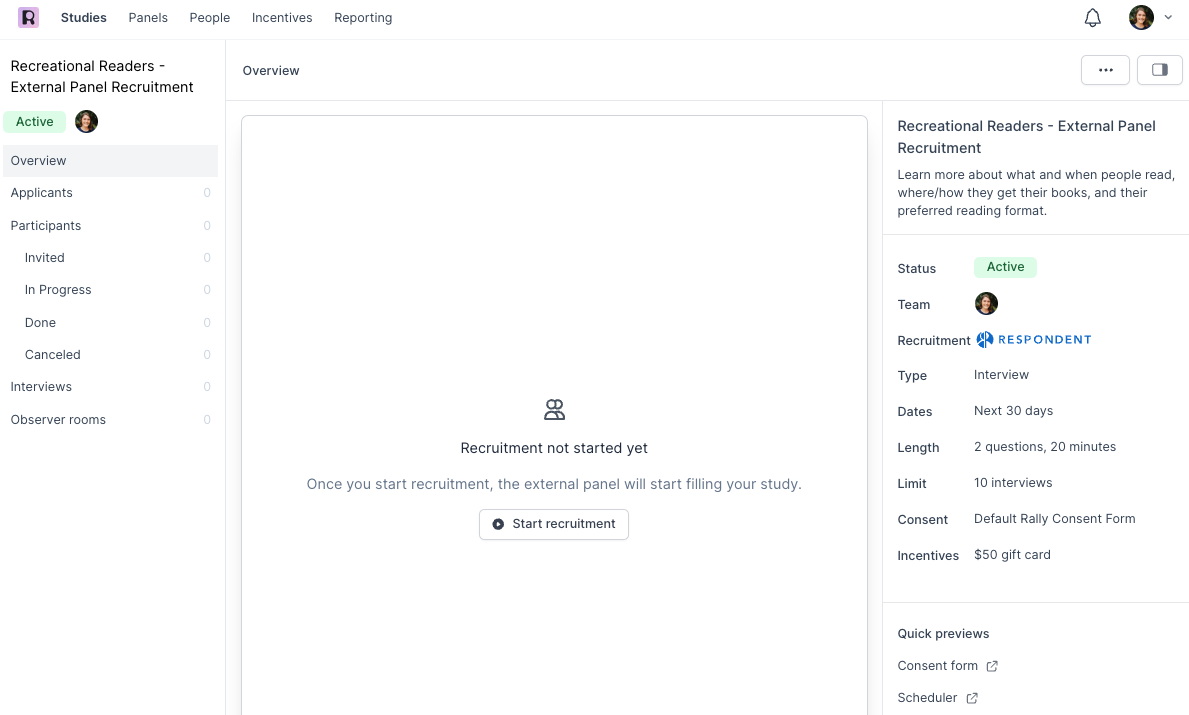
Review the estimated recruitment costs before proceeding. If the selected budget does not contain the required amount for this Study, you may select 'Add Funds' to add funds via a credit card on file. Add funds to Budgets.
If everything looks correct, select 'Start Recruitment' to launch your Study on Respondent and begin allowing applicants.
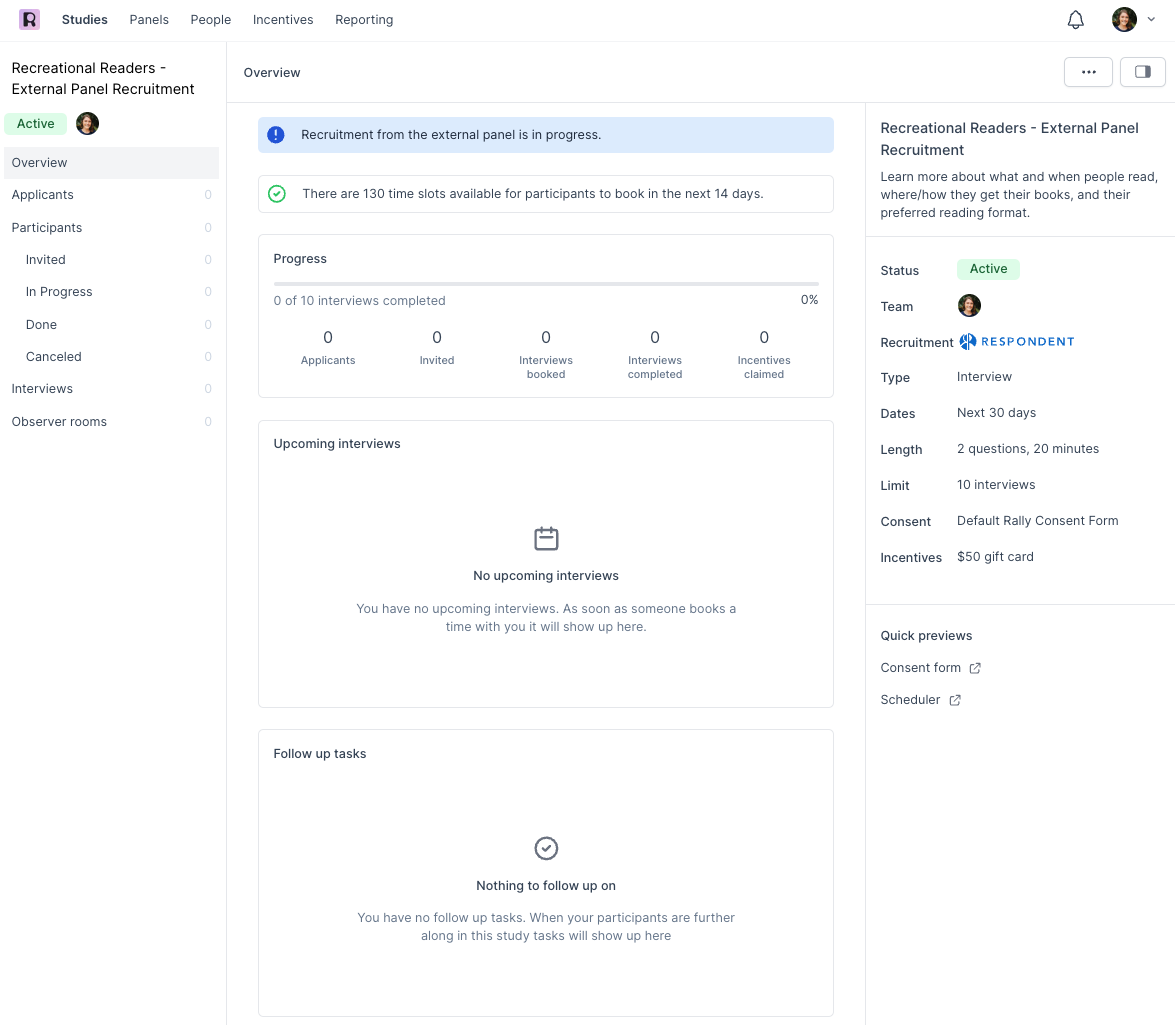
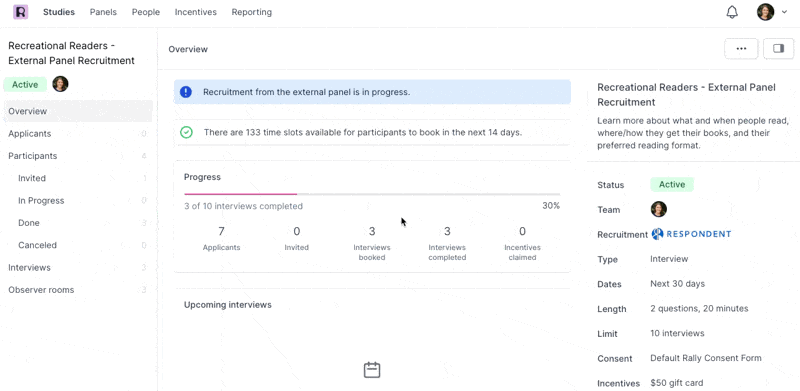
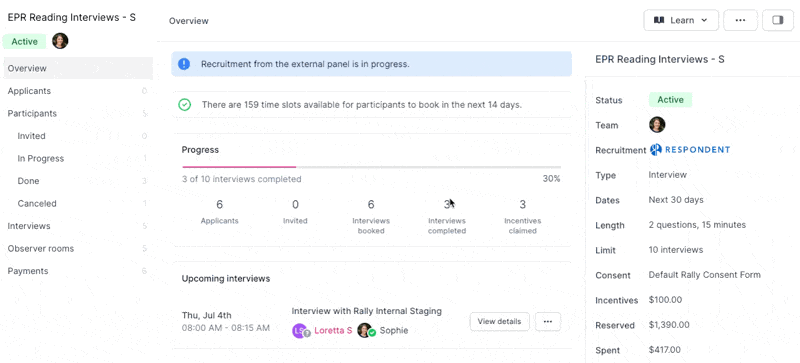
Once you start recruitment, you will see an alert that recruitment is in progress. Come back soon to review applicants and begin your research.
Estimated Payments & Running Total Spent
View the total estimated payment and breakdowns by incentives and recruitment fees from the bottom of your Study Overview.
From the Study Details right sidepanel throughout the Study, view the set incentive amount, amount of reserved funds, amount spent, and the associated Budget.
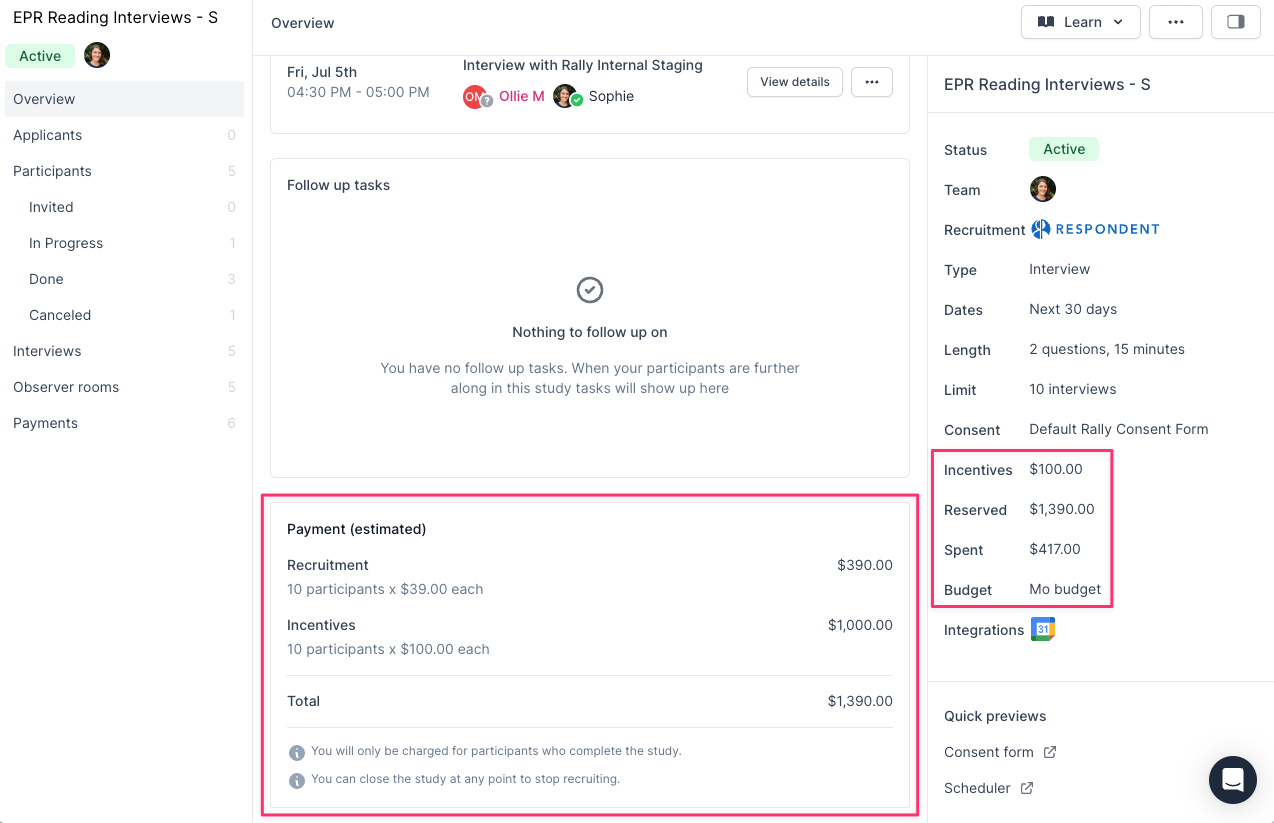
Note: After completing your research and closing this Study, the Study Overview will update automatically to show the final billing details and a receipt will be emailed.
Note: Studies will stop accepting participants once the participant limit is met. (# of Participants that have completed the Study matches the participation limit)
Stop Recruitment
Studies will automatically stop accepting new applicants once the participation limit is met. You can also stop recruitment at any time by updating the Study Status to Paused (temporary) or Closed (permanent). Please learn more about these updates in the Manage Study Status section below.
Review Applicants
Once you've started recruitment, you'll begin receiving applicants from Respondent. You will only be charged for Participants you've accepted who complete the Study. Invited applicants will receive an invitation email to schedule an interview.
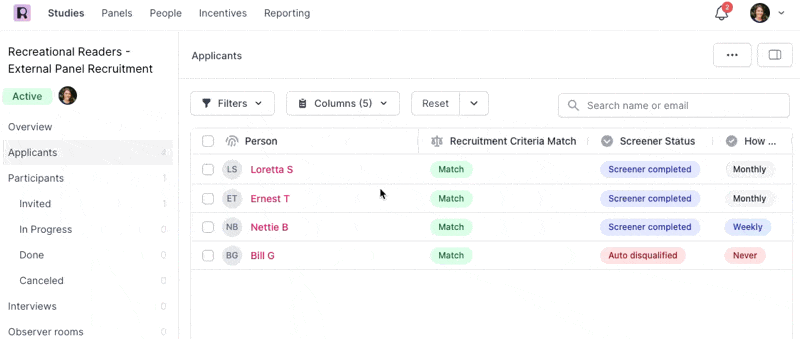
Review screener responses to determine who to invite and reject.
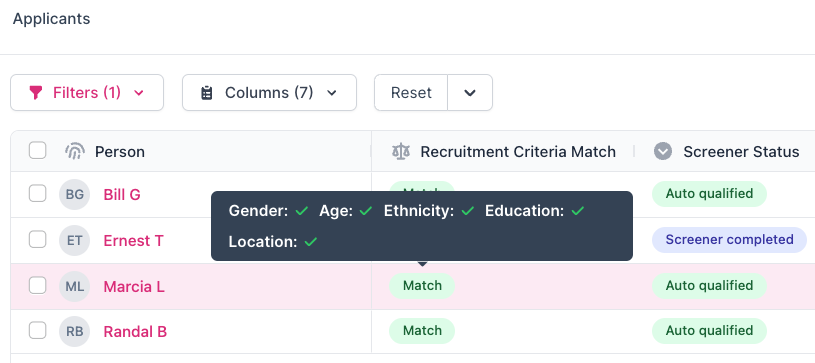
Review external profile details in Participant Profiles to verify applicants. Hover over Recruitment Criteria Match results for a quick-glance.
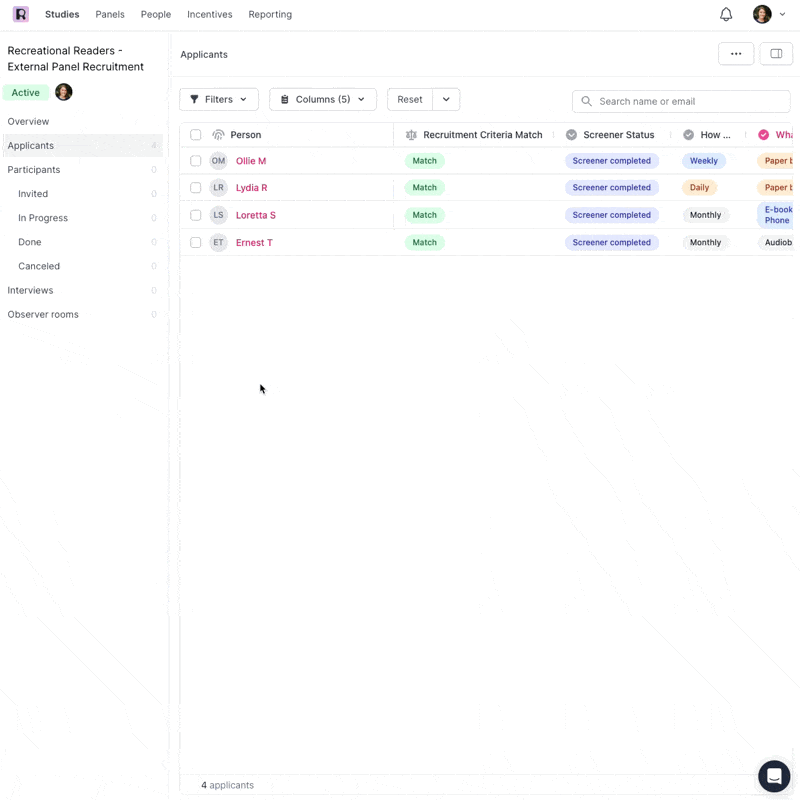
Navigate to your Study Overview and select 'Applicants' from the left sidepanel.
Hover over anyones Recruitment Criteria Match result to see at a glance which core demographics they do and do not match. Note: Any audience filters that you set to "Any" during Study setup will show as a match for all applicants.
Scroll to the side to view all screener responses.
Select a name to view an applicant's external profile and personal information.
Select the 'Screener Submissions' tab and select 'View Responses' to view an applicant's complete screener submission.
After reviewing all available information, invite or reject each applicant - one at a time, or carefully in bulk.
Invite Applicants
✓ Invited applicants will have their Participant Status in Rally updated to "Interview Invite Sent" or "Test Invite Sent". This will update to "Interview Scheduled" once they book an interview or "Test Completed" once they finish the test.
Invite 1 applicant: Hover over their name to select the ✓ and select 'Invite applicant' in the popup to confirm.
Invite multiple applicants: Select the checkboxes next to each applicant.
Select the 'Invite to study' button at the top of the table and select 'Invite applicants' in the popup to confirm.
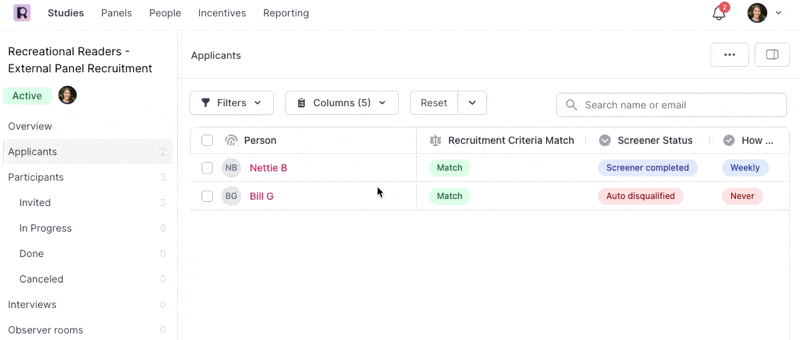
Reject Applicants
✕ Rejected applicants will be removed from your Study and no longer be visible in Rally.
Reject 1 applicant: Hover over their name to select the ✕ and select 'Reject applicant' in the popup to confirm. Rejecting an applicant is final.

Reject multiple applicants: Select the checkboxes next to each applicant.
Select the 'Reject from study' button at the top of the table, type in the number of applicants to reject for safety, and select 'Reject applicants' in the popup to confirm.
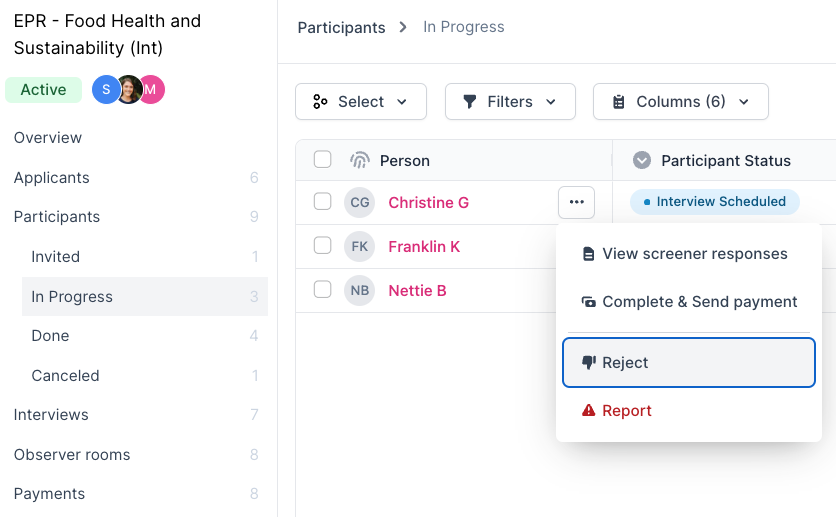
Reject Participants
💡 Rejecting applicants or participants can be done at any point, even if they've already been invited to the Study and began. Please note that rejecting a participant cannot be reversed. We will not be able to issue refunds for participants rejected after being paid. Rejected participants will be removed from your Study and no longer be visible in Rally.
Note: If you've received email or slack notifications about new applicants that don't show in Rally, it's possible the applicant may have canceled their application.
Manage Study Status
Note: This Study will stop accepting Participants once it reaches the limit.
Update a published Study's Status to pause recruitment without closing the Study, return to Active to resume recruitment if the participation limit has not yet been met, or close the Study to stop recruitment and access to the test and release any remaining unused reserved budget funds. Follow the steps below to change the status of a Study, then keep reading for more information on each Status.
From the Study Overview, select the three dots button ... in the top right corner.
Select 'Change Status'.
In the popup, select an option from the Study status dropdown:
Continue reading each section below for more important information and warnings.
Confirm your choice by selecting 'Update'.
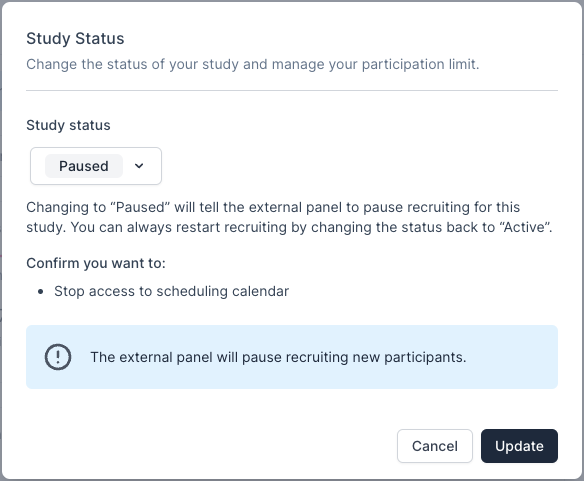
Pause Study
If you'd like to stop recruitment without closing your Study, you can update the Study Status to "Paused".
Changing to “Paused” will tell the external panel to pause recruiting for this Study. You can always restart recruiting by changing the status back to “Active”.
Reserved budget funds will remain reserved while paused.
Select the three dots button ... in the top right corner and select 'Change Status'.
In the popup, select 'Paused' from the Study status dropdown.
Select 'Update' to confirm and pause recruiting.
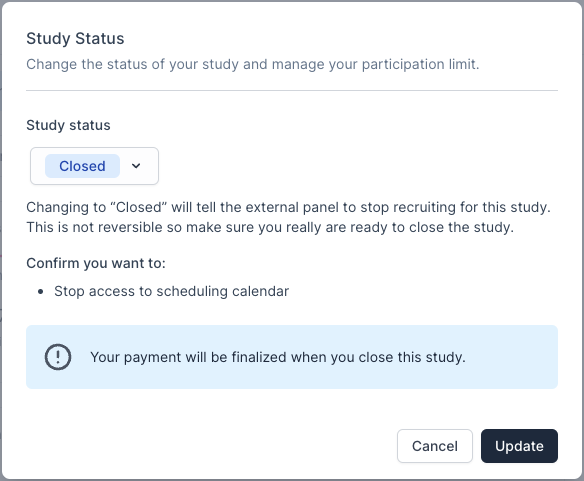
Close Study
After your participation limit has been met and all research is completed, you can update the Study Status to "Closed".
Changing to “Closed” will tell the external panel to stop recruiting for this Study, and will stop access to the scheduling calendar. This is not reversible so make sure you really are ready to close the Study.
Closing an external panel recruitment Study before the participant limit is met will release the remaining unused reserved budget funds for the # of participants not not met.
Select the three dots button ... in the top right corner and select 'Change Status'.
In the popup, select 'Closed' from the Study status dropdown.
Select 'Update' to confirm and irreversibly end this Study.
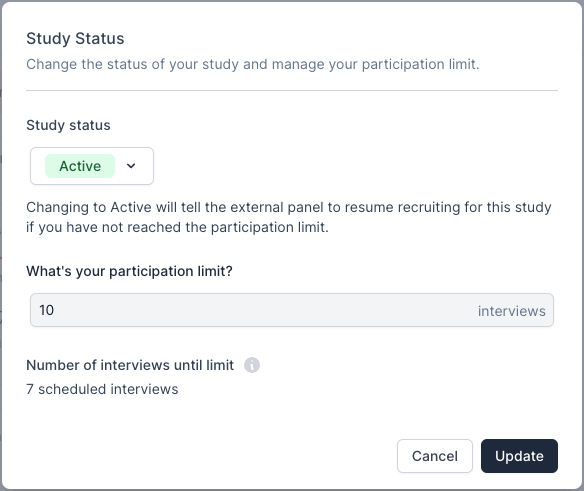
Unpause Study
If you paused your Study to stop recruitment without closing the Study, you can update the Study Status to "Active".
Changing to Active will tell the external panel to resume recruiting for this Study if you have not reached the participation limit.
Select the three dots button ... in the top right corner and select 'Change Status'.
In the popup, select 'Active' from the Study status dropdown.
Select 'Update' to confirm and resume recruiting.
Complete Study
🚨 Permanently stop recruitment and release any unused reserved funds to make them available again by closing your external panel recruitment Study.
Your Study is completed when you have finished all research activity with Participants and reviewed each Participants engagement or submissions to verify, and each one has been marked as completed and sent payment. You may decide that your Study is completed before or after your set participation limit is met.
💡 To finalize your Study, you must Close it by updating the Study Status to Closed.
Update the Study Status to "Closed" after all research is completed. This is not reversible so make sure you really are ready to close the Study.
Changing to “Closed” will tell the external panel to stop recruiting for this Study, and will stop access to the scheduling calendar. Your payment will be finalized when you close this Study, and payments will be charged for any remaining Participants with completed interviews that were not yet paid.
Closing an external panel recruitment Study before the participant limit is met will release the remaining unused reserved budget funds for the # of participants not not met.
From the Study, select the three dots ... button in the top right corner.
Select 'Change Status'.
In the popup, select "Closed" from the Study status dropdown:
Carefully review the confirmation message before selecting 'Update'. This action cannot be undone.
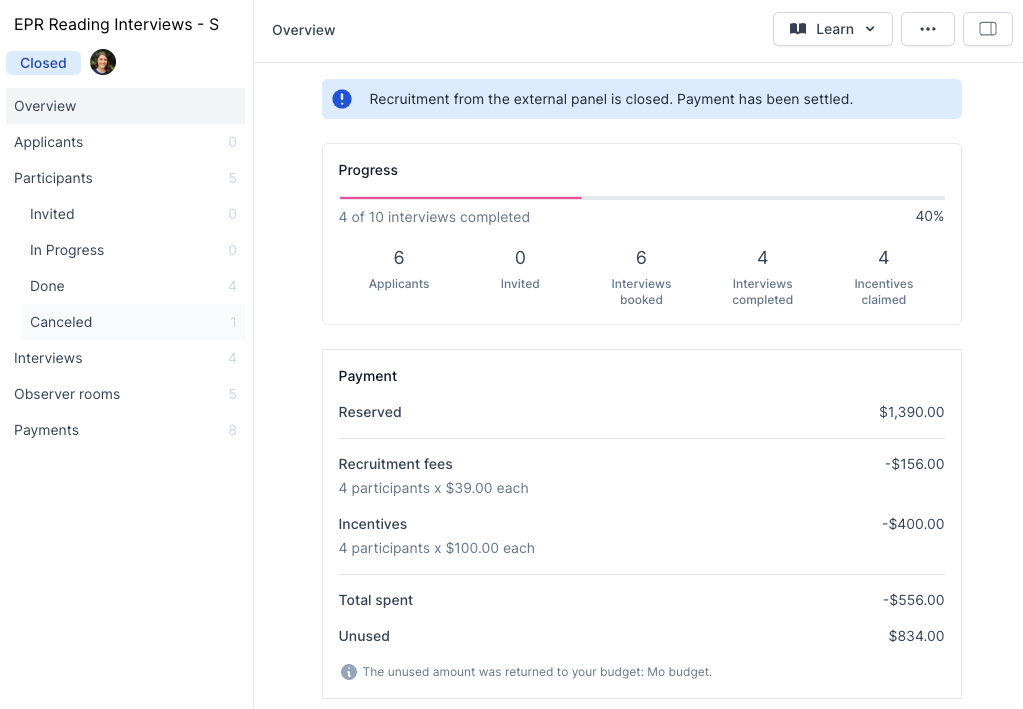
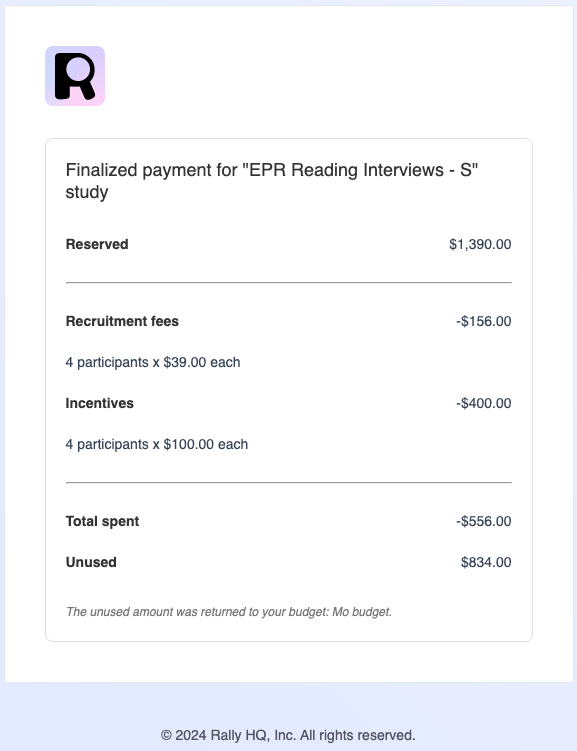
Once you close your Study, Rally will update your Study Overview with the final billing details. A final billing details receipt will also be emailed to the user who closed the Study. The following details will be included in your Study Overview and email receipt:
Reserved (total reserved when recruitment started)
Recruitment Fees - total deducted from budget
# participants x $ recruitment fee for each
Incentives - total deducted from budget
# participants x $ incentive amount for each
Total Spent (total final costs deducted from budget)
Unused (the unused reserved amount returned to your budget)
Budget associated
Finalized Payment Receipt Email
If you need an additional copy of this receipt, please contact Rally.
Finalized Payment in Study Overview of Closed Study