Create a Form
Last updated: August 19, 2026
Forms are used to grow your participant database and group participants for research:
When you create a new form, a list will be created for it within the associated Population.
Participants that sign up using your form will be added to the Population you select when creating the form, and will receive the welcome email.
Forms with Manual Approval disabled automatically add all new signups to the population and send the welcome email without review.
Forms with Manual Approval enabled require review for all new signups before they're added to the population and receive the welcome email.
Before creating a form, decide which Population to add new sign-ups to, or create a new one for a special use case, such as a beta program for testing new features.
Creating forms requires the "Create and modify signup forms" permission. This includes the Rally default roles Admin, Ops Manager, or Researcher.
Creating a form
From the navigation sidebar, select Forms.
Select + New Form.
Enter a Name.
Optional: change the Language to translate non-customizable elements.
Select a Team that will have access to the form.
Select a Population that team has access to, where new participant sign-ups will be added to.
Select Create to open and configure.
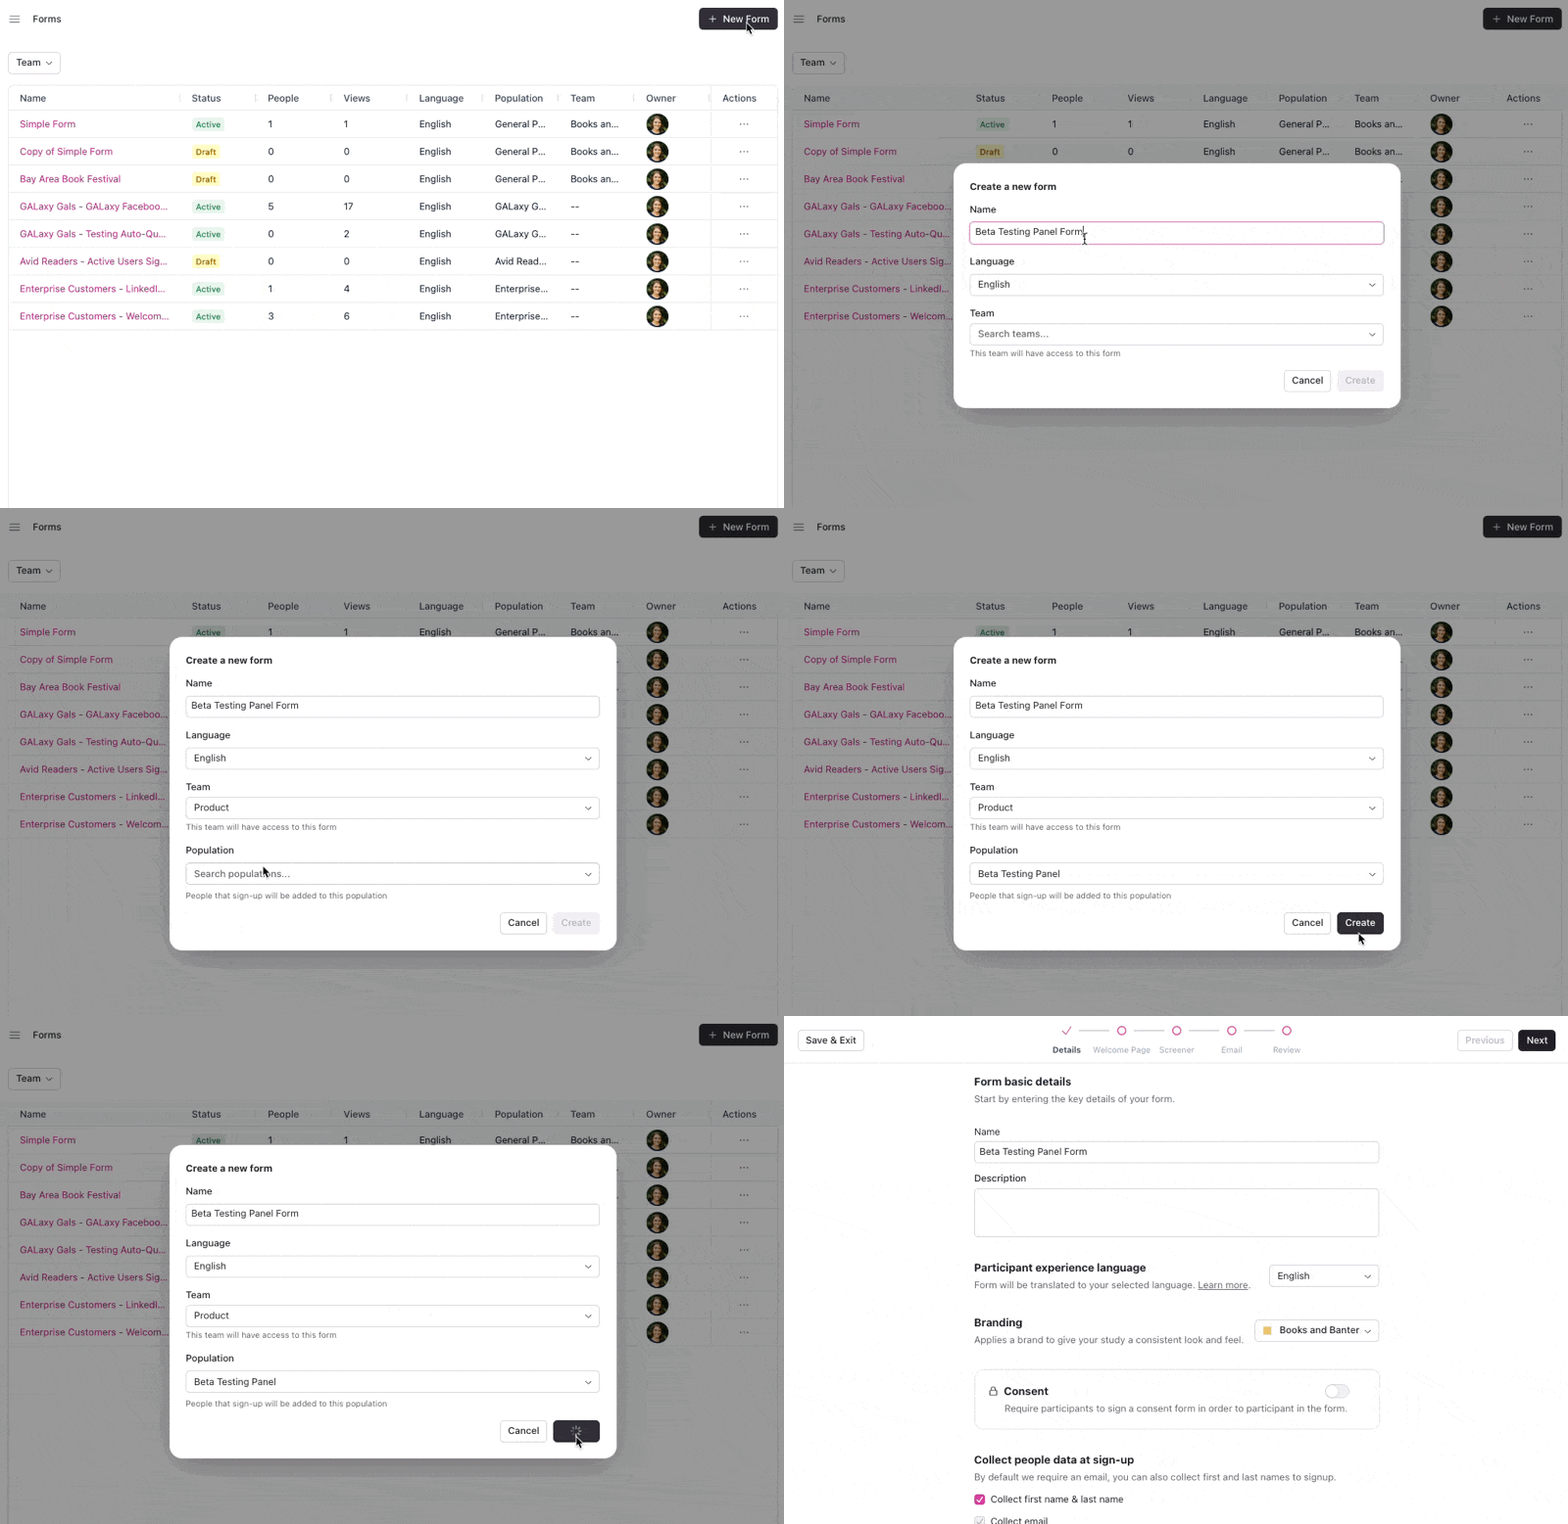
Forms consist of 5 easy steps: Details, Welcome Page, Screener, Email, and Review.
Details
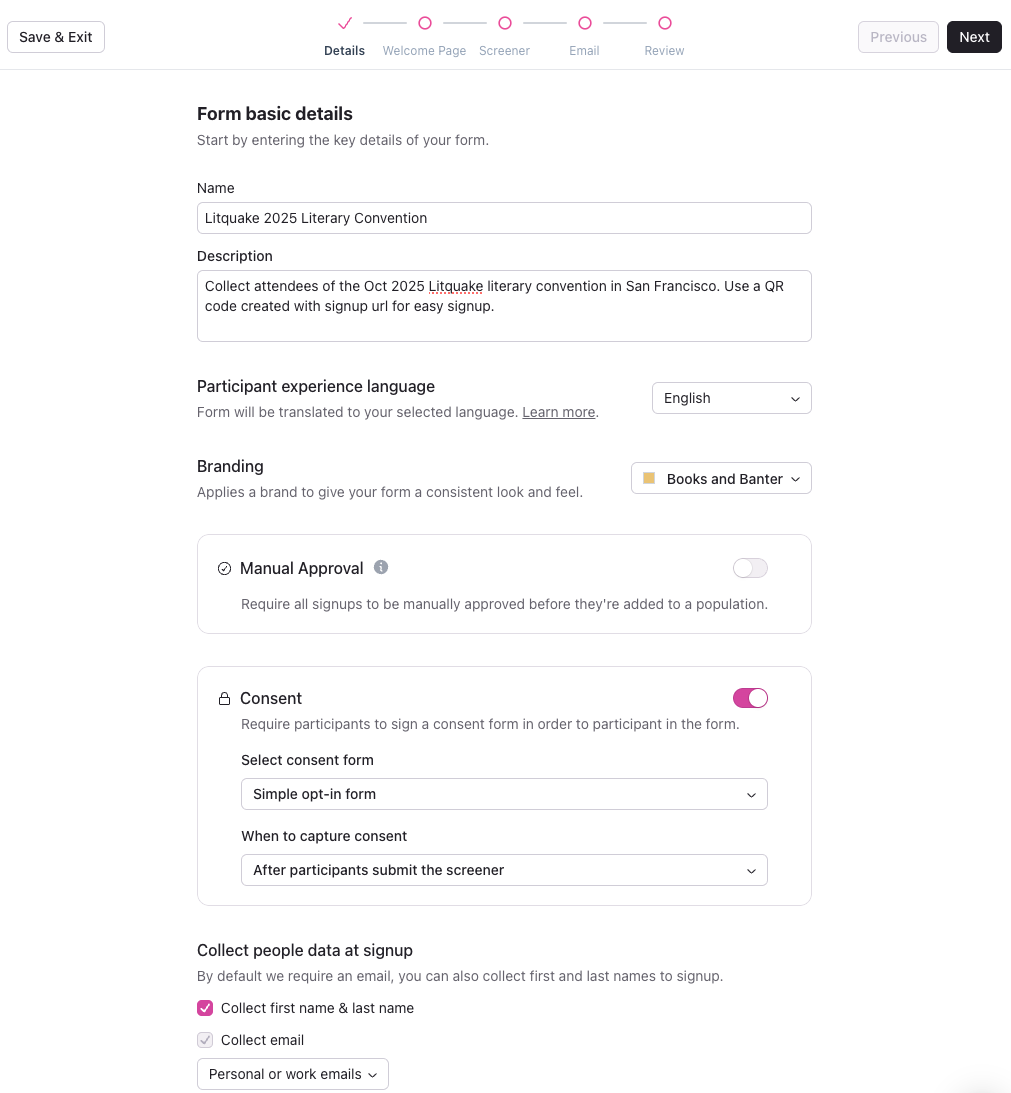
Edit the Name.
Enter a Description to provide internal context how it should be used.
Select the Language.
Webpages, buttons, and some automated emails will be translated into your selected language, but custom text elements must be translated by your team.
Elements to manually translate during setup include the welcome page, consent form, screener questions and responses, and welcome email.
Select Branding for a consistent look and feel.
To hide branding, select None.
Manual Approval lets you review all new signups to approve or reject them before they're added to the associated population and receive the welcome email. Leave it disabled to have new signups added and welcomed automatically, with no review needed.
When enabled, all new form signups must be reviewed and manually approved before they're added to a population, giving you extra control to ensure only quality participants are added. Rejected signups stay in your database; you can review them anytime in the "Rejected" table but aren't added to the population. If you later reject a signup you'd already approved, you'll need to manually remove them from the population; Rally doesn't do this automatically.
When disabled, all new form signups are automatically added to the associated population and receive the welcome email without your review.
Once your form is published and becomes active, the Manual Approval setting is locked and it cannot be turned on or off later. Duplicate the form if you need the opposite setting.
Optionally, enable Consent to require participants to sign a consent form.
Select which Consent Form to use.
Create, view or edit your workspace's Consent Forms in Templates.
Decide when to capture consent:
After participants submit the screener, or
Before participants start the screener
Capturing consent after the screener tends to increase overall signup rates, but it also means some signups may come in without a consent submission attached.
Collect people data at sign-up:
Collect first name & last name: Optional but recommended; enabled by default and requires a person to enter their first name & last name to sign-up.
Collect Email: Email is required by default to sign-up. Decide whether to allow:
Personal or work emails (default)
Work emails only
Select Next to continue.
Welcome page
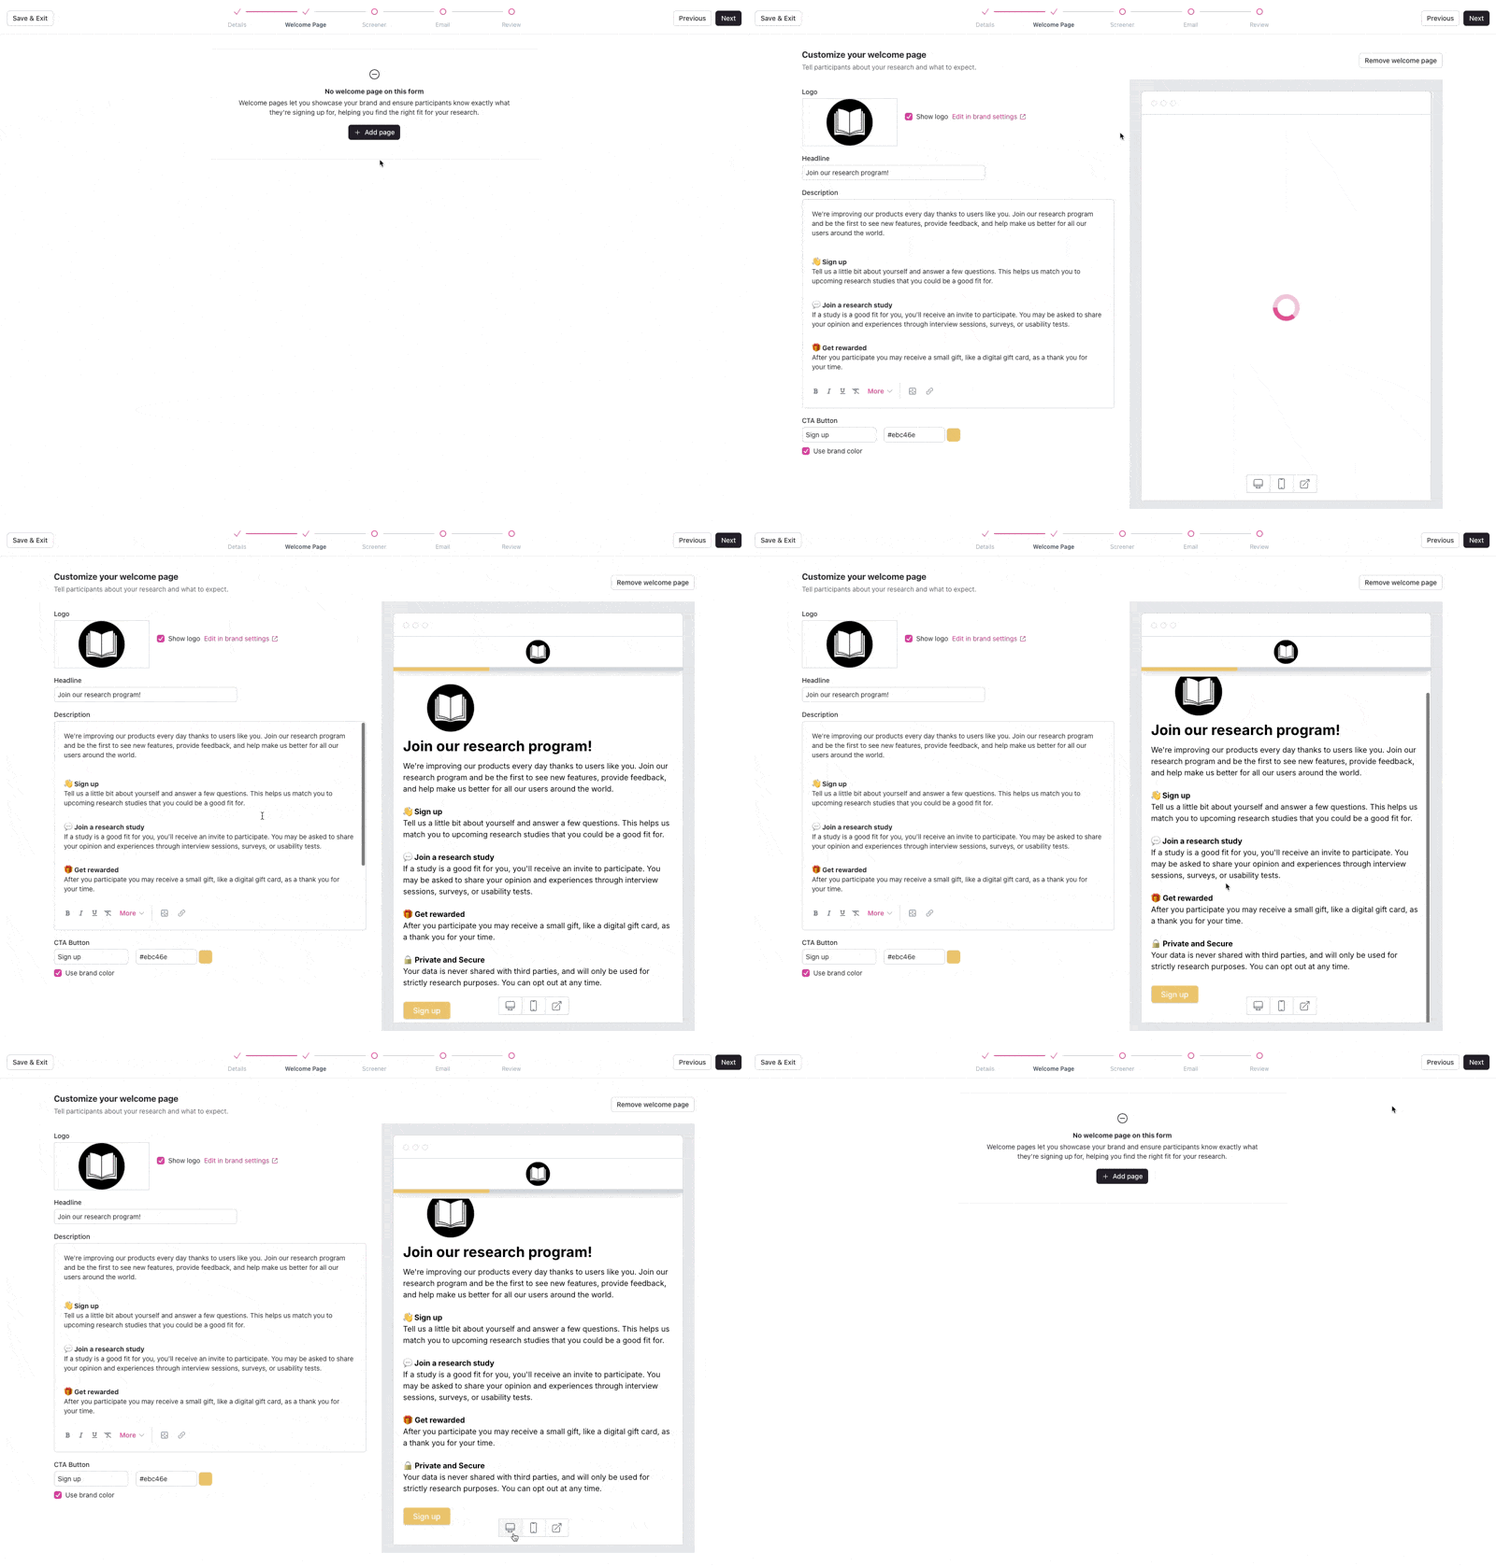
Welcome pages let you showcase your brand and ensure participants know exactly what they're signing up for, helping you find the right fit for your research. Welcome pages are optional, and can be added or removed by editing a form.
Select + Add page to add and edit a welcome page (optional).
Logo: Include your Brand logo, or optionally remove it.
Headline: Enter a short, inviting headline, like "Join our Beta Testing Panel! 🚀."
Description: Enter a description for the body of the welcome page to introduce people you recruit to your program, such as an external description of the people this panel is intended for, the type of research you plan to conduct, and the benefits of joining.
At the bottom of the text box, use the customization toolbar to edit your font style and formatting, add a photo, or add links as a link or customizable button.
CTA Button: Edit the text and color of the signup button at the bottom. This defaults to Use brand color and can be changed.
Preview the welcome page on the right as you edit. Use the icons at the bottom of the preview to compare desktop, mobile, and webpage views.
Select Next to continue.
Screener
Screening helps ensure that the people who take part in your research are the right fit. Shorter screeners may result in higher response rates; consider your specific use case.
Select + Add a screener to begin (screeners are optional).
Select which screening tool to use:
Rally's native screener tool is recommended to seamlessly map properties.
Or, select your Qualtrics integration to use an existing Qualtrics survey.
Select + Add question to open the menu, then choose Create new question or Add from question templates.
Create new question: See how to create a new question for complete steps. We strongly recommend using property mapping to associate question responses with specific properties to enrich person profiles continuously — Rally can also auto-suggest a matching property for each question. See Create a screener for details. Any question's three dots (...) menu (top right corner of the question) lets you save it as a new question template for future use, or remove it from the screener entirely via Remove from screener.
Add from question templates: Save time with premade question templates. Set these up in advance to use consistent, approved questions, and optionally set up property mapping ahead of time. Select the template(s) you'd like to add, then select Add # questions below. Select an added question template to open and edit as needed.
Screener endings: Edit the message shown to participants who complete the screener. Rally prefills standard messaging, but encourages you to edit this as needed to better reflect your company voice.
Scroll up to Preview the participant screener experience.
Select Next to continue.
Customize the welcome email that is automatically sent to participants after they sign up and submit your form.
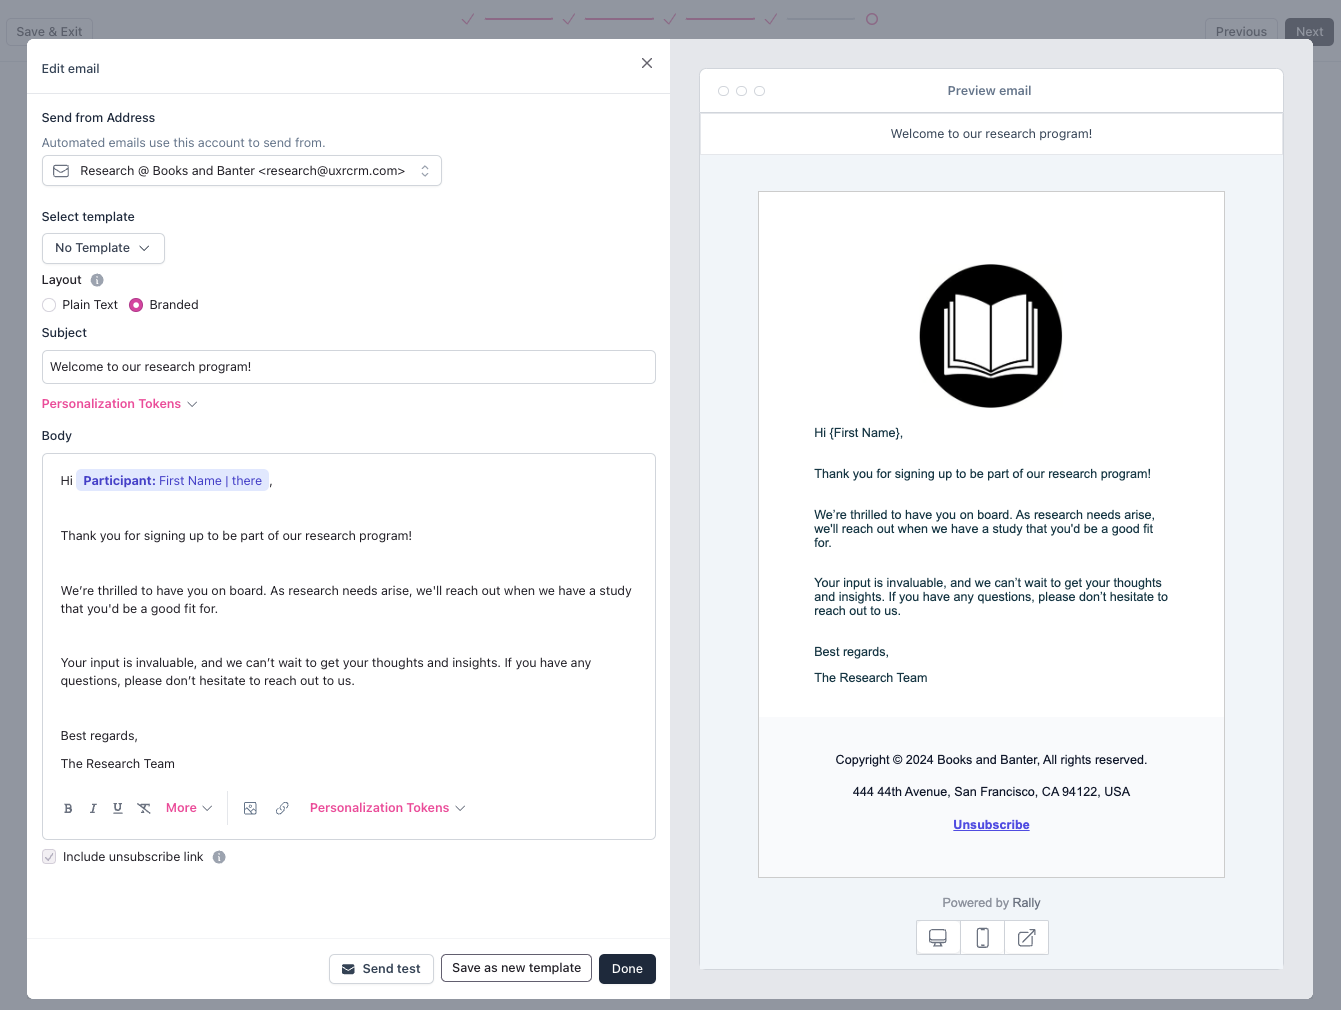
Select the pencil icon to edit the Welcome Email.
Send from Address: Select the email address to send from.
Email Template: Edit the prefilled message, or select from an email template.
Email Layout: Select Plain Text or Branded.
Use a branded layout for more professional outreach, and plain-text for a more personal approach.
Subject: Enter the subject line.
Body: Enter the body of the email.
Where relevant, we suggest using Personalization Tokens, such as including the participant's First Name to enhance engagement.
Use the customization options at the bottom to edit your font style and formatting, add a photo, or add links as a link or customizable button.
Include Unsubscribe Link: Enabled by default; required for branded emails. We recommend always keeping this option enabled to allow recipients to unsubscribe and to help you stay compliant with local spam laws and improve deliverability.
Select Send test to send yourself a copy.
Select Save as new template to add to email template for future use.
Preview the email on the right as you edit. Use the icons at the bottom of the preview to compare desktop, mobile, and webpage views.
Select Done.
Select Next to continue.
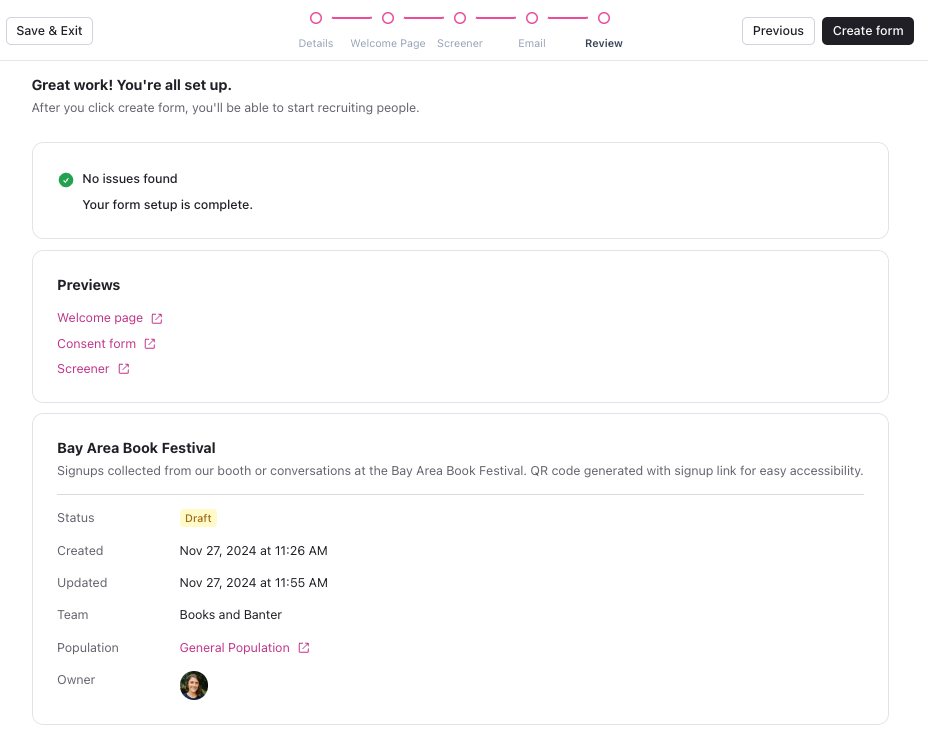
Review
Review key details to ensure everything looks correct.
Check for any issues
Rally will alert you if any issues are found so you can correct them.
Preview key components
Use the Previews links to see how each page will appear to participants, such as the Welcome Page, Consent Form, and Screener. Feel free to submit each one to test, as responses aren't recorded for preview links.
This is a great chance to go back and make any additional edits.
Review settings
Review the internal form name and description, the associated team that will have access, and the associated population new signups will be added to.
Everything looking good? Select Create form! If you still have edits to make, select Save & Exit to keep the form in a draft state instead of publishing it.
After selecting Create form to publish, you'll be able to copy its unique link and invite people to sign up. See Share and manage forms for how.