Managing People in Populations
Last updated: June 25, 2026
Learn how to manage people in populations within Rally, including adding, removing, and moving participants between populations.
You’ll also learn how exclusive populations work and what to expect when making changes that affect where participants belong.
Adding people to a population
Add existing participants from your database into dedicated populations to organize participants and align with your team's recruitment needs and research goals.
People can belong to multiple populations at once, unless they belong to an exclusive population.
Adding people to a population requires the "Add person to population" permission.
Navigate to the Population you want to add people to via the navigation sidebar or directly from the People page
Select Add People in the top right corner and select one of the following options:
Find people in Rally: Add people that already exist in your Rally workspace into the population you're current in. This option will provide the ability to quickly access your panel of people that exist in other populations, lists, and views.
Use filters to refine your search with any custom properties or Rally properties, or use the search box to quickly search by name or email.
Create new person: Add a brand new person record into Rally by manually entering in the person's data. Email, Phone, First or Last Name are required to create a new person.
Import from a CSV: Quickly add many new people and their property data to Rally via CSV import.
Considerations for exclusive populations
Exclusive populations allow you to protect key participants by ensuring they can only belong to a single population and cannot be added to any other populations.
People can only be added to an exclusive population if they are not already part of another population. Additionally, anyone who is already part of an exclusive population cannot be added to other populations.
For people that already belong to one or more populations that you want to add to an exclusive population, you can follow the Move People Between Populations steps below to simultaneously remove them from their existing populations and add them to the exclusive population.
Removing people from a population
Remove people from a specific population they currently belong to. This can be done individually or in bulk.
Removing people from a population requires the "Remove person from population" permission.
Removing participants from a population does not delete them from your workspace. They may still belong to other populations.
Participants that do not belong to any populations will still be in your workspace database where Admins can access them.
Removing people from a population will not impact active studies they are already participating in to avoid unintended impacts or disruption to research.
Navigate to the Population you want to remove people via the navigation sidebar or directly from the People page
Select the participants you want to remove by checking the corresponding checkboxes next to their names.
Use filters to refine your search with any custom properties or Rally properties, or use the search box to quickly search by name or email.
💡Tip: Quickly select multiple consecutive rows simultaneously by making your first selection and then holding the shift key when making your last selection.
Remove people from the population individually or in bulk.
Individually: Hover over a person's name, select the 3 dots (...) and select Remove from population.
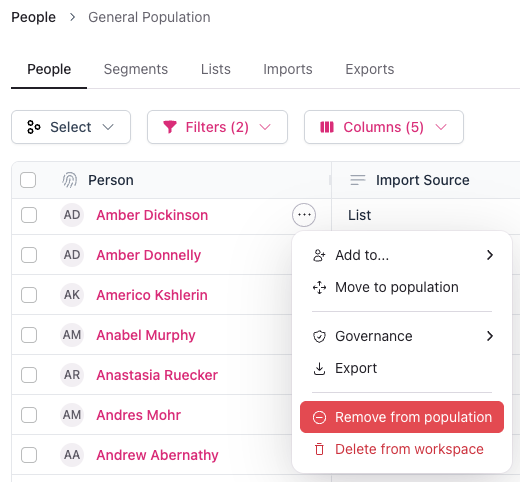
In bulk (one or more people selected): Select the More actions button at the top of the table and choose Remove from population.

Type the number of people to be removed to verify you have the correct number of people selected and avoid any accidental removals.
Select Remove person from population or Remove # people from population again to confirm. They will be removed from the current population.
Move people between populations
Add and move people to a different population while simultaneously removing them from any current populations, including moving people from an exclusive population to a non-exclusive population.
Moving people from one population to another requires both the "Add person to population" and "Remove person from population" permissions.
Navigate to the Population you want to move people via the navigation sidebar or directly from the People page
Select the participants you want to move by checking the corresponding checkboxes next to their names.
Use filters to refine your search with any custom properties or Rally properties, or use the search box to quickly search by name or email.
💡Tip: Quickly select multiple consecutive rows simultaneously by making your first selection and then holding the shift key when making your last selection.
Move people individually or in bulk.
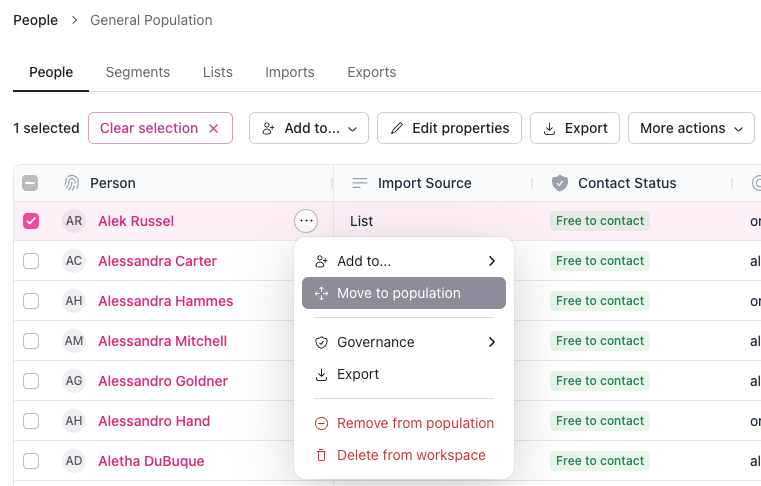
Individually: Hover over a person's name, select the 3 dots (...) and select Move to population.
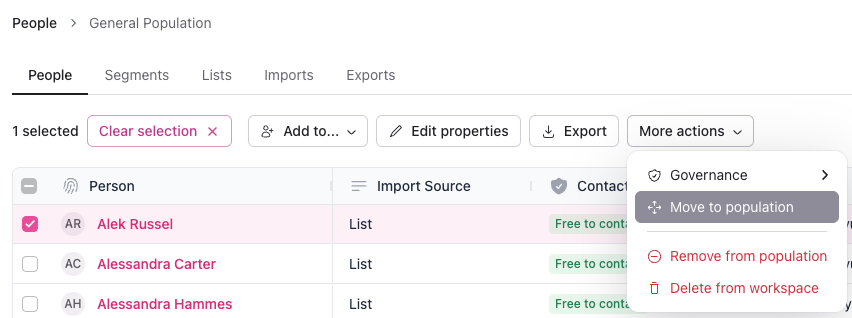
In bulk (one or more people selected): Select the More actions button at the top of the table and choose Move to population.
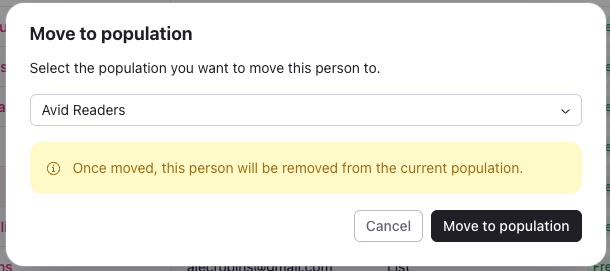
Select a population from the dropdown for them to be moved to and click Move to population again to confirm. Once moved, they will be removed from the current population, and added to the selected one.
Considerations for exclusive populations
Exclusive populations allow you to protect key participants by ensuring they can only belong to a single population and cannot be added to any other populations.
For people that belong to one or more populations, you can use the steps above to move them into an exclusive population while simultaneously removing them from all other populations in the workspace.
Moving people to an exclusive population will remove them from all other populations in this workspace.
When you move people into an exclusive population, Rally displays additional details in the Move to population window to highlight that they will be removed from all other populations.
To help prevent unintended changes, Rally also requires an extra confirmation before the move is finalized.
These additional details and extra confirmations are shown in the screenshot below.

Participant self-unsubscribe from opt-in programs
Participants enrolled in opt-in programs can remove themselves via the public subscription page which is typically linked from research emails.
When a participant opens the page, they'll see a Manage your subscriptions page displaying the email address the changes will apply to, followed by a list of opt-in programs they're currently enrolled in. Participants can select one or more programs and confirm by selecting Select programs to unsubscribe; removed programs disappear from the list immediately.
The page also includes an Opt out from all communications option, which is a separate, broader action that unsubscribes the participant from every program and stops all research emails.
When a participant self-unsubscribes from a program, a Population Unsubscribe event is logged on their activity timeline in Rally, giving your team visibility into when the change occurred.