All CollectionsParticipant ManagementProperties
Filters, Segments, Columns, & Saved Views

Filter, sort, and organize tables, and create custom People segments to invite the right Participants to Studies.

Sophie avatar
Written by Sophie
Updated over a week ago

Properties in Rally allow you to effectively organize and visualize your research Participants, making the research process more efficient. This can be achieved through filtering, segmenting, columns, and saved views.

Filters

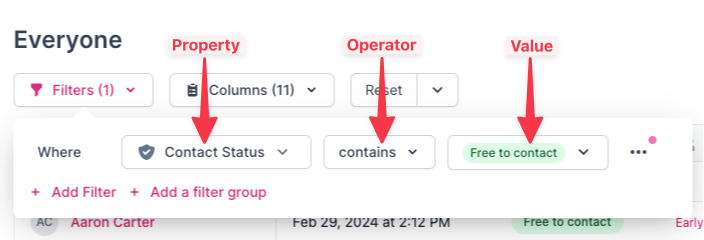
Use filters on Rally tables to narrow down and display specific Participants. This allows you to find the most relevant Participants for your research, or locate Participants in various stages of an ongoing Study. Each filter you configure will consist of a Property + an operator + a value.

Add a Filter

  1. Select the 'Filters' button at the top of a table (such as from People > Everyone, from a Study > Participants, from a Panel > Panelists, from Incentives > Recipients).

  2. Select '+ Add Filter'.

  3. Select the Property: Use the dropdown to select from the available Properties, including Rally's core Out-The-Box Properties and all Custom Properties created in your workspace.

  4. Select the operator: After selecting the Property, you'll be able to select an operator. The options available will depend on the data type of the Property, and automatically updates when you choose a Property to reflect the values that it contains. Some examples of operators you may see depending on the Property:

    • contains

    • does not contain

    • equals

    • does not equal

    • ends with

    • is

    • is not

    • is empty

    • is not empty

    • starts with

    • is after

    • is before

    • is on or after

    • is on or before

    • is within

  5. Select the value: Select which value from the Property is used in this filter. If provided with a text field, enter a value (e.g. Person, First Name, Last Name).

  6. Refine your search by selecting '+ Add Filter' to add another.

  7. Optionally, turn an existing filter into a Filter Group by selecting the three dots ... to the right of a filter and selecting 'Turn into Filter Group'.

  8. Select '+ Add Filter' within the filter group to add additional filters, carefully selecting whether the new filter should begin with AND to require both filters to be met or OR to require either filter to be met for Participants to be included. Learn more about filter groups in the next section.

Each Property in your Rally database can be combined. Rally's filters use boolean operators (AND, OR, NOT, and AND NOT), enabling you to combine Properties using conjunctions.

Add a Filter Group

Using filter groups allows you to apply multiple conditions using AND / OR boolean operators to make each search more precise.

  1. Select the 'Filters' button at the top of a table (such as from People > Everyone, from a Study > Participants, from a Panel > Panelists, from Incentives > Recipients).

  2. Select '+ Add a Filter Group'.

  3. In the filter group, set the Property + operator + value for the first filter.

  4. Add your next filter by selecting '+ Add Filter' within the filter group, or by selecting the three dots ... to the right of your first filter group filter and selecting 'Duplicate'. The duplicate feature is especially useful when adding multiple filters using the same Property.

  5. On the left side of the second filter, select whether the new filter should begin with AND to require both filters to be met or OR to require either filter to be met for Participants to be included.

  6. Optionally, you can select '+ Add Filter' outside the filter group to refine results, as shown below.

Remove a Filter

  1. Select the 'Filters' button to view all currently applied filters.

  2. Select the three dots ... to the right of a filter and select 'Remove'.

Duplicate a Filter

  1. Select the 'Filters' button to view all currently applied filters.

  2. Select the three dots ... to the right of a filter and select 'Duplicate'.

Edit the new duplicated filter as needed. This feature is especially useful when adding multiple filters using the same Property.

Segments

A segment is a saved filter or set of filters, such as custom attributes, survey results, research engagement history, demographic information, and more.

  • Segments can be used to filter and search for Participants within a Study.

  • Saved segments can be shared at the workspace level for team-wide access in "Shared Segments" or kept for personal use in "My Segments".

  • You can find saved segments in the People database in the left sidepanel.

Create New Segment

For each new segment, you can choose to create "Shared Segments", which are available for the entire workspace, or "My Segments", which are available only to the user who created them. Created segments can be updated later to share or unshare with the entire workspace depending on your permissions level.

  1. Navigate to People from the top navigation bar in Rally.

  2. From the left sidepanel, select 'Create New Segment' under the Shared Segments or My Segments section.

  3. Enter a name for the new segment.

  4. Decide whether the new segment will be shared with the entire workspace or only be visible to you by enabling or disabling the 'Share with workspace' checkbox.

  5. Select 'Create Segment' to begin adding filters and adding and arranging columns.

  6. Add filters or filter groups to refine your segment to the specific target group.

  7. Add, rearrange, and resize columns to customize the data shown on the table.

  8. At the top of the table, next to the reset button, select the v down arrow and select 'Save for everyone' to apply your configurations to the segment and update the # [of included Participants] shown next to the segment in the left sidepanel.

๐Ÿ’ก The people included in a segment will update automatically as their Property data is updated through responses to screener or survey questions with Property mapping set up, manually updating Properties for Participants, Salesforce or Snowflake syncs, or uploading a .csv file with people data. Learn more about how to import and update Property data. If a person's Property data changes and they no longer meet the criteria of the filters applied to a segment, they will no longer show in the segment and vice versa.

Edit Segment

Change the name of a segment, change sharing settings to determine whether a segment is shared with the entire workspace or only visible to you, duplicate a segment, or delete a segment. You can also edit the filters and columns applied to a segment any time, making sure to select 'Save for everyone' to apply your configurations.

  1. Navigate to People from the top navigation bar in Rally.

  2. From the left sidepanel, select the name of the relevant segment to open it.

  3. In the top right corner, select the 'Edit Segment' button and select from the options.

Edit Name & Sharing

  1. Within a segment, select 'Edit Segment' in the top right corner.

  2. Select 'Edit Name & Sharing'.

  3. In the popup, edit the name as desired, or enable or disable the 'Share with workspace' checkbox to change who has access to the segment.

  4. Select 'Update Segment' to apply the changes.

Duplicate Segment

  1. Within a segment, select 'Edit Segment' in the top right corner.

  2. Select 'Duplicate Segment'.

  3. In the popup, edit the name as desired. The name will start as the source segment's name + (clone). You may wish to leave the name as-is until you've duplicated the segment and edited the filters as intended. Additionally, enable or disable the 'Share with workspace' checkbox to determine who has access to the duplicated segment.

  4. Select 'Duplicate Segment' to create and begin editing your new segment.

Delete Segment

  1. Within a segment, select 'Edit Segment' in the top right corner.

  2. Select 'Delete Segment'.

  3. In the popup, confirm you're sure you want to delete the segment by selecting 'Delete Segment'. This action cannot be reverted.

Columns

Rally's table layout can be customized by rearranging, resizing, sorting, pinning, and toggling columns on or off. Learn more about table layout and organization. Columns allow you to view the most relevant Participant information based on the selected saved view, segment, panel, or study participants.

Saved Views

  • A saved view determines how information is displayed in your table. For example, if you have applied specific filter(s) and arranged columns within a segment, even if you navigate away from the page, the table will default to your saved view.

  • You can save that view for personal use or save it for the entire workspace, depending on your permissions level.

Did this answer your question?